
Owner's Manual


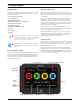

Table Of Contents
- D810 Camera Users Manual
- For Your Safety
- Compatible Lenses
- Approved Memory Cards
- Table of Contents
- Supplied Accessories
- Parts & Controls
- Introduction
- First Steps
- Camera Menus
- Basic Photography and Playback
- Live View Photography
- Movie Live View
- Image Recording Options
- Focus
- Release Mode
- ISO Sensitivity
- Exposure
- White Balance
- Image Enhancement
- Flash Photography
- Other Shooting Options
- More About Playback
- Connections
- Menu Guide
- Defaults
- The Playback Menu: Managing Images
- The Shooting Menu: Shooting Options
- Custom Settings: Fine-Tuning Camera Settings
- Custom Settings
- Custom Settings Bank
- a: Autofocus
- a1: AF-C Priority Selection
- a2: AF-S Priority Selection
- a3: Focus Tracking with Lock-On
- a4: AF Activation
- a5: Focus Point Illumination
- a6: AF Point Illumination
- a7: Focus Point Wrap-Around
- a8: Number of Focus Points
- a9: Store by Orientation
- a10: Built-in AF-assist Illuminator
- a11: Limit AF-Area Mode Selection
- a12: Autofocus Mode Restrictions
- b: Metering/Exposure
- c: Timers/AE Lock
- d: Shooting/Display
- d1: Beep
- d2: CL Mode Shooting Speed
- d3: Max. Continuous Release
- d4: Exposure Delay Mode
- d5: Electronic Front-Curtain Shutter
- d6: File Number Sequence
- d7: Viewfinder Grid Display
- d8: ISO Display and Adjustment
- d9: Screen Tips
- d10: Information Display
- d11: LCD Illumination
- d12: MB-D12 Battery Type
- d13: Battery Order
- e: Bracketing/Flash
- f: Controls
- f1: LCD Illuminator Switch
- f2: Multi Selector Center Button
- f3: Multi Selector
- f4: Assign Fn Button
- f5: Assign Preview Button
- f6: Assign AE-L/AF-L button
- f7: Shutter Spd & Aperture Lock
- f8: Assign BKT Button
- f9: Customize Command Dials
- f10: Release Button to Use Dial
- f11: Slot Empty Release Lock
- f12: Reverse Indicators
- f13: Assign Movie Record Button
- f14: Live View Button Options
- f15: Assign MB-D12 AF-ON
- f16: Assign Remote (WR) Fn Button
- f17: Lens Focus Function Buttons
- g: Movie
- Custom Settings
- The Setup Menu: Camera Setup
- The Retouch Menu: Creating Retouched Copies
- My Menu/Recent Settings
- Technical Notes
- Compatible Lenses
- Optional Flash Units (Speedlights)
- Other Accessories
- Caring for the Camera
- Caring for the Camera and Battery: Cautions
- Exposure Program
- Troubleshooting
- Error Messages
- Specifications
- Approved Memory Cards
- Memory Card Capacity
- Battery Life
- Lenses That May Block the Built-in Flash and AF-Assist Illuminator
- Index
- Troubleshooting
- Error Messages
- Specs
- Index
- AF-S Nikkor 35mm f/1.8G ED Lens Users Manual
- AF-S Nikkor 50mm f/1.8G Lens Users Manual
- AF-S Nikkor 85mm f/1.8G Lens Users Manual
- Atomos Ninja-2 Quick Start Guide
- Atomos Ninja-2 User Manual
- Table of Contents
- Warranty
- Introduction
- Supplied Accessories
- What Else is Needed
- Mounting disks in the Master Caddy
- Connecting the Ninja-2 and powering up
- Ninja-2 connections
- Other physical features
- Using the Ninja-2
- Monitoring and Recording
- Timecode
- Pulldown
- Playback & Playout
- Connecting and Editing
- Using Ninja-2 with external power supplies
- Using Ninja-2 with Atomos Connect Converters
- Software updates
- Specs

Batteries
The Ninja-2 is a battery powered device, and has a special feature to
ensure that you never have to interrupt a recording to change a battery.
We will come to this shortly.
Like all batteries, you will need to take care of them. Make sure that you
don’t short circuit the connections because this can result in very high
currents that can damage the cells and could pose a fire hazard.
Charge new batteries before using them, using the battery charger
supplied.
Batteries do not charge in a linear way. At first they charge very quickly,
and then the rate slows down to a trickle. While charging, one or more
red lights will blink. When 90% charge is reached, all the lights will flash.
It is perfectly OK to use the batteries at this point and we recommend
stopping at this stage for the longest battery life. If you leave the
batteries on charge after all four lights are flashing, the charger goes
into trickle charging mode for the final 10%. Eventually, when trickle
charging is complete, and the batteries are at 100% charge, all the
lights will go out.
Always use battery slot
for the first battery. This is effectively your
primary battery and the Ninja-2 will not start without it.
Battery slot No.2 is the secondary or back-up battery and is not marked.
Once the Ninja-2 has been started from battery slot No. 1, it will operate
on battery slot No. 2 alone. No. 1 is only required for start up.
To attach the battery, gently slide it down into the slot and lock into
position. To remove a battery, push the latch to release it. Each battery
has its own latch, which is located to the right of battery No. 1 and to
the left of battery No. 2 as you look at the back of the Ninja-2. Pull the
latches towards the batteries to release them.
Ninja-2 batteries and modular accessories (Connect Converters, etc)
are held in place very tightly because they are on the outside of the
device and there has to be no possibility whatsoever that they could
work loose, so you will have to be quite firm with the battery latches.
We suggest that you familiarise yourself with the force required to
remove the batteries and accessories so that you can do this quickly in
the field. Make sure that you hold the top and the bottom of the battery
or accessory module when sliding it off to avoid dropping it when it is
released from the main unit.
The Ninja-2 introduces an Atomos technology called Continuous Power
which used battery looping. When power is running low on one battery,
the Ninja-2 will automatically switch to the second battery, you can
remove one of the batteries and replace it with a fully charged one.
Ninja-2 will continue to operate as you do this. You can continue this
process indefinitely.
The Ninja-2 may be powered from NiMH & Li Ion 14.4V battery
systems. Battery adaptor required.
Battery number 1
Gently slide down into
battery slot/s and lock
into position.
Push latch to
release battery
4. Connecting the Ninja-2 and powering up
Atomos Ninja-2 – User Manual Edition 3: May 2013 7