
User Manual


Page | 71
b. Click the NewTek location at left (under the Titles heading) in the
Media Browser.
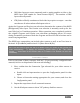
c. In the file pane at right, scroll down to locate a title that does not
cover the entire screen (such as the one shown in Figure 52).
2. In the same manner, add a different second title to the playlist.
3. Right-click the playlist icon for this second title, and select Send to Buffer 1
from the icon menu.
Hint: This introduces the TriCaster’s Buffers, discussed more fully later. For now,
think of them as it will suffice to think of buffers as dedicated ‘instant-recall’
memory slots allocated to hold media for instant display.
We’re ready to configure the DSKs we want to use now.
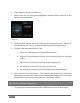
FIGURE 53
The DSK controls are located to the right of the Transition
control group (T-bar) in the central (Switcher) area of the
Live Desktop.
The name tag for the source currently assigned to each
DSK channel is displayed below the DSK’s own label.
4. Click the source labels for DSK 1 and 2, and assign GFX 1 (or simply GFX, if
applicable) and Buffer 1 as their respective sources.
4.7.2 TRANSITIONS
Now we’re ready now to try out the features in the Transition section, just left of the
DSK section in the onscreen Switcher. Let’s begin our exploration of switching with
the BKGD (Background) layer.
1. Select Camera 1 on the Switcher’s Program row.