
MIRA-series-quick-start-guide


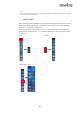
Table Of Contents
- 1 Overview
- 2 Installation Guide
- 2.1 Safety Precautions
- 2.2 Installation Precautions
- 2.3 OPS Computer Installation
- Step 1. (Optional) Unscrew the M3 screws by hand to remove the OPS Computer shielding cover.
- Step 1. (Optional) Unscrew the M3 screws by hand to remove the OPS Computer shielding cover.
- Step 2. Push the OPS Computer horizontally into the interface card slot.
- Step 3. Pass the fixing screws through the upper and lower lugs and tighten them.
- 3 Power ON/OFF
- 4 Operating the Touch Screen
- 5 Add Shortcut
- 6 Quick Setting Menu

24
3 Power ON/OFF
3.1 Power on
Step 1. Use AC power (100V~240V, 50Hz/60Hz) as the product power source. Make sure the
power plug fully inserted and that the ground wire of the outlet is properly connected.
Step 2. Turn on the rocker switch (on the rear side of the screen, next to the power socket) after a
power source has been connected. The power indicator should be red.