
Assembly Manual


HUB Assembly Manual 776-91-02-REV-.docx
THE INFORMATION CONTAINED HEREIN IS PROPRIETARY TO NEW CENTURION SOLUTIONS, INC. AND SHALL NOT BE REPRODUCED OR
DISCLOSED IN WHOLE OR IN PART FOR ANY DESIGN OR MANUFACTURE EXCEPT WHEN SUCH USER POSSESSES DIRECT, WRITTEN
AUTHORIZATION FROM NEW CENTURION SOLUTIONS, INC.
7
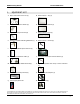
All components should be attached to the board as indicated in the figure below.
Step 6: The last step left to do is assemble the HUB enclosure. First, place the front enclosure into
the space provided as demonstrated in the previous illustration. The front enclosure should fit
right into this space between the two protruding edges. Fold any excessive wires down so that
they will all fit securely when the assemblies are put together. Place the top enclosure over the
front and bottom enclosures so that all edges fit firmly together and are flush. Screw the long
black screws into the openings on the bottom to complete assembling the HUB.
Finally, attach the dipole antenna to the coaxial cable plug by placing the antenna over the plug
and screwing in a clockwise direction. The antenna is sufficiently secured when it is flush with the
HUB enclosure.
Screws
Coax Plug
Step 5
Step 6