
Tus neeg siv phau ntawv


- 104 -
The following steps are for an oscilloscope with dual channel AG. To save the CH1 waveform and store it in
the internal / USB memory:
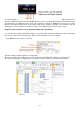
(1) Press the Save button.
(2) Select Type in the lower menu, turn the M knob to select Clone in the left menu.
(3) Select Source in the bottom menu, select Mode as Out1. in the right menu.
(4) Select AG Output Out1 as CH1. in the right menu.
(5) Select Line in the bottom menu. If a or b is selected, turn the M knob to move the cursor. If ab is
selected, turn the M knob to move the cursor pair. If x is selected, the whole screen is automatically
selected.
(6) Select Save in the bottom menu.
● To save the waveform in the internal memory, select Memory in the right menu as Internal. Turn the
M knob to select an object in the left menu and select Save in the right menu.
● To save the waveform to a USB storage device, select Save in the right menu as External. Select
Save in the right-hand menu. An input keyboard for editing the file name is displayed. Turn the M knob
to select the keys and press the knob to enter. Select the button on the keyboard to confirm. The
cloned waveform is saved as an OTA file on the USB storage device.
To output a waveform stored in the internal memory via the generator: (generator model dependent)
(1) Press the Save button.
(2) Select Type in the lower menu, turn the M knob to select Clone in the left menu.
(3) Select Save in the lower menu and select Memory as Internal in the right menu.
(4) Turn the M button to select an object in the left menu.
(5) Select Output in the right-hand menu.
To output a waveform stored on a USB data carrier via the generator:
(1) Press the button to set the output channel of the generator.
(2) Select "Arb" in the bottom menu, select "Others" in the right menu and then "File".
search
(3) Select Storage in the right-hand menu as USB. The unit lists a directory of folders and files on the
USB storage device. Select a folder or file with the M button to scroll up and down the list. To open
the current folder, select Change
in the right-hand menu and then again to return to the parent directory.
(4) Select the desired OTA file and then select Read in the right-hand menu.
To output the waveforms CH1 and CH2 directly through the generator:
(1) Press the Save button.
(2) Select Type in the lower menu and turn the M control to select Clone in the left menu
(3) Select Source in the bottom menu and then Mode as Out1 & Out2 in the right menu.
(4) In the right-hand menu, select AG Output Out1 as CH1; select AG Output Out2 as
CH2.
(5) Select Line in the bottom menu, then the cursor and move it to select the desired waveform.
(6) Now select Clone in the bottom menu. The generator will output the selected waveform between the
cursors.
Data format description of the OTA waveform file
If the source mode is set to Out1 or Out2, the OTA file consists of two parts: the file header and the channel
data. If the source mode is set to Out1 and Out2, the OTA file consists of three parts: File Header, First
Channel Data and Second Channel Data. The file header represents the parameter of the file data expressed
in "parameter name + value". Each parameter name consists of a 4-byte case-sensitive string. The parameter
value is at least 4 bytes.