
Installation Guide


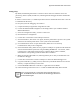


Table Of Contents
- MOSCAD-M Remote Terminal Unit
- CONTENTS
- INTRODUCTION
- INSTALLATION
- THE MOSCAD˚M UNIT
- POWER MANAGEMENT
- ETHERNET INTERFACE OPTION
- APPENDIX A: CABLES AND ADAPTERS
- APPENDIX B: MODELS AND ACCESSORIES
- APPENDIX C: CHANGING THE ANALOG INPUT MEASUREMENT TYPE

Appendix C: Changing the Analog Input Measurement Type
50
Install Main Board
Hold the Main board with the push-button facing down and the 10-pin connectors on the right.
Lower the board, aligning the two small gray round pegs (A) (see Figure 29) on the bottom of
board and the small oblong peg on the upper left-hand side of the board with the matching
grooves. Using both thumbs, press the bottom of the Main board under the two bottom snaps
(B). Use both thumbs to press the top of the board under the two top snaps (C).
Figure 29
Installing Main Board
Close Case
Hold the back of the case face down, with the holes for screw mount to your left. Align the
two top snaps with the two grooves on the top of the case back. Press with both thumbs until
you hear it click. Use both thumbs to press the bottom of case back under the snaps until you
hear it click.
Turn the unit right side up.
Reconnect the 10-pin connectors in their original configuration.