
Operating instructions/Installation instructions


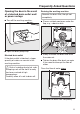


Table Of Contents
- Contents
- IMPORTANT SAFETY INSTRUCTIONS
- Caring for the environment
- Guide to the washer
- Before using for the first time
- Environmentally friendly washing
- 1. Prepare the laundry
- 2. Selecting a program
- 3. Loading the washing machine
- 4. Selecting program settings
- 5. Add detergent
- 6. Starting a program
- 7. Program end
- Spin cycle
- Delay start/SmartStart
- Program guide
- Extra options
- Wash program overview – extra options
- Program sequence
- Changing the program sequence
- Detergent
- Cleaning and care
- Frequently Asked Questions
- A wash program cannot be started
- The program is canceled and a fault indicator light lights up on the control field
- During the program sequence, a symbol appears on the time display
- At the end of the program, an indicator light lights up on the control field
- General problems with the washer
- General problems with the washing machine
- Poor wash results
- The drum door cannot be opened
- Opening the door in the event of a blocked drain outlet and/or power outage
- Customer Service
- Installation
- Front view
- Rear view
- Installation surface
- Transporting the washing machine to its installation site
- Removing the shipping struts
- Installing the shipping struts
- Leveling the machine
- Additional installation requirements
- Product Dimensions
- The water protection system
- Water intake
- Water drainage
- Electrical connection
- Technical data
- Programmable functions
- Choosing and selecting programmable functions
- Editing and saving the programmable function
- Exiting the programming level
- Buzzer
- Keypad tone
- PIN code
- switch-off status
- Memory
- Water intake
- Gentle action
- Reducing the temperature
- Maximum rinse level
- Suds cooling
- Anti-crease
- Low water pressure
- Chlorine bleach
- Display brightness dimmed
- Welcome tone
- Networking
- Remote control
- SmartGrid
- RemoteUpdate
- Switching off WiFi
- Detergents and care products

Installation
*INSTALLATION*
60
Installation surface
A concrete floor is the most suitable
installation surface for this machine. It is
far less prone to vibration during the
spin cycle than wooden floorboards or
a carpeted surface.
Please note:
The machine must be level and
securely positioned.
To avoid vibrations during spinning,
the machine should not be installed
on soft floor coverings.
If installing on a wooden joist floor:
Install the unit on a 2 ft. x 2 ft. x
1
3
/
16
“ (61 x 61 x 3 cm) plywood base.
Ideally the base should be large
enough to span several joists and
should be anchored to the joists and
not just the floor boards.
Tip: If possible, install the machine in a
corner. This is usually the most stable
part of the floor.
Injury can occur if the washing
machine has not been adequately
secured.
During installation, the washing
machine must be secured on a
raised plinth to be made available on
site (concrete or brick), in order to
ensure it cannot fall or slip.
Secure the washing machine using a
clamp/fastening bracket (MTS floor
mounting kit – available from your
Miele dealer or Miele Service).
Transporting the washing
machine to its installation site
Danger of injury due to unsecure
lid.
The fixings at the back of the lid may
become brittle due to external
circumstances. There is a danger of
the lid being pulled off when carrying
the appliance.
Before carrying the appliance, check
that the lid is secure where it
protrudes at the back of the
appliance.
Carry the washing machine by the
front feet and by the lid where it
protrudes at the back of the
appliance.