
Operating and Installation instructions


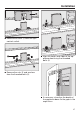


Table Of Contents
- Contents
- IMPORTANT SAFETY INSTRUCTIONS
- Caring for the environment
- Installation
- Installation location
- Installation notes
- Installation dimensions
- Installing the wine conditioning unit
- Before starting...
- Tools required
- Aligning the installation niche
- Checking the installation niche
- Before installation
- Preparing the installation niche
- Pushing the wine conditioning unit into the niche
- Aligning the wine storage unit
- Securing the wine conditioning unit in the niche
- Securing the toe-kick board and cover
- Aligning the appliance door
- Limiting the opening angle of the appliance door
- Electrical connection
- Saving energy
- Guide to the appliance
- Accessories
- Before first use
- Switching the wine conditioning unit on and off
- Selecting additional settings
- The ideal temperature and humidity
- Door alarm
- Storing wine bottles
- Automatic defrosting
- Cleaning and care
- Frequently Asked Questions
- Causes of noises
- Customer Service
- Declaration of conformity
- Copyrights and licenses

Installation
*INSTALLATION*
35
Securing the wine conditioning unit
in the niche
Use the screws supplied to secure
the wine storage unit on both sides.
In a side-by-side combination, only
the external panels of the two appli-
ances can be secured to the cabinet
wall.
Securing the toe-kick board and
cover
Remove the film from the adhesive
strips on the toe-kick cover provided
.
Secure the toe-kick cover to the
toe-kick board .
Click the toe-kick board onto the
bottom of the appliance toe-kick.