Operating and Installation Instructions Gas Cooktop To prevent accidents and machine damage, read the Operating Manual before installation or use. en - US, CA M.-Nr.
WARNING: If the information in this manual is not followed exactly, a fire or explosion may result causing property damage, personal injury or death. – Do not store or use gasoline or other flammable vapors and liquids in the vicinity of this or any other appliance. – WHAT TO DO IF YOU SMELL GAS ß Do not try to light any appliance. ß Do not touch any electrical switch. ß Do not use any phone in your building. ß Immediately call your gas supplier from a neighbor’s phone.
Contents IMPORTANT SAFETY INSTRUCTIONS. . . . . . . . . . . . . . . . . . . . . . . . . . . . . . . . . 4 Guide to the appliance . . . . . . . . . . . . . . . . . . . . . . . . . . . . . . . . . . . . . . . . . . . . . 9 Before the first use . . . . . . . . . . . . . . . . . . . . . . . . . . . . . . . . . . . . . . . . . . . . . . . 11 Operation . . . . . . . . . . . . . . . . . . . . . . . . . . . . . . . . . . . . . . . . . . . . . . . . . . . . . . . 12 Control knobs. . . . . . . . . . . . . . . . . . .
IMPORTANT SAFETY INSTRUCTIONS Correct usage WARNING - When using your gas appliance follow basic precautions, including the following: ~ This appliance is intended for use in This gas cooktop conforms to all uniform safety codes and regulations. residential purposes such as cooking and keeping food warm. Other uses are not permitted and can be dangerous. ~ Only use this gas cooktop for Read all instructions before installation or use to prevent injury and appliance damage.
IMPORTANT SAFETY INSTRUCTIONS Children Technical safety ~ Children should not be left unattended in an area where the appliance is in use. Never allow children to sit or stand on any part of the appliance. Caution: Do not store items of interest to children in cabinets above the appliance. Children climbing on the appliance to reach these items could be injured.
IMPORTANT SAFETY INSTRUCTIONS ~ Before servicing, turn off the gas valve and disconnect the power supply by either removing the fuse, unplugging the unit or manually "tripping" the circuit breaker. ~ While the appliance is under warranty repairs should only be performed by a Miele authorized service technician. Otherwise the warranty is void. ~ Defective components should be replaced by Miele original spare parts only. Only with these parts can the manufacturer guarantee the safety of the appliance.
IMPORTANT SAFETY INSTRUCTIONS ~ Do not flambé under an exhaust hood. Flames could be drawn up into the hood by the suction or the grease filters may ignite. ~ Make sure all components of the ~ Take care that drafts do not blow the burner grate. Using larger pans may cause the flames to spread out and damage the surrounding countertop or other countertop appliances. flammable material toward the flames or push the flames so that they extend beyond the edges of the pan.
IMPORTANT SAFETY INSTRUCTIONS ~ When using a portable appliance near the cooktop, make sure that its power cord does not come in contact with the cooktop. ~ If there is a drawer directly underneath the appliance without a wooden base in between, ensure that no aerosols, combustible liquids or other easily flammable materials are kept in it. If cutlery inserts are to be placed in the drawer, they must be made of a heat-resistant material.
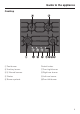
Guide to the appliance Cooktop a Fast burner Control knobs: b Auxiliary burner g Front right burner cd Normal burners h Right rear burner e Grates i Left rear burner f Burner symbols j Front left burner 9
Guide to the appliance Burners Fast, Auxiliary and Normal burners a Burner cap b Burner head c Burner base d Ignition safety control (Thermocouple) e Ignitor 10
Before the first use Adhere the data plate sticker, which is included with the appliance documents, on the appropriate place marked in "Technical Service". Cleaning the cooktop ^ Remove any protective films. ^ Wash the removable parts of the gas burner in a mild solution of warm water and liquid dish soap. ^ Dry and reassemble the parts in the correct order (see "Cleaning and care"). ^ Wipe the cooktop with a damp cloth and dry thoroughly.
Operation Control knobs The control knob is used to turn on the burner and to regulate the strength of the flame. Fast, Auxiliary and Normal burners ß The gas supply is turned off & Highest flame / Lowest flame Turning on ^ To light the burner, press the corresponding burner control knob and turn it counterclockwise to the largest flame symbol. Pressing a burner control knob automatically generates a spark at all burners on the cooktop. This is normal and does not indicate a faulty appliance.
Operation Turning on in the event of a power failure If there is a power loss, you can ignite the flame manually, e.g. with a match. ^ Press the burner control knob and turn it counterclockwise to the largest flame symbol. ^ Keep the knob pressed and ignite the escaping gas-air mixture with a match. ^ Keep the knob pressed for a further approx. 5 - 10 seconds and then release it. Regulating The flame should be regulated so that it never protrudes beyond the pot.
Cookware – Select the cookware to match the burner: large diameter = large burner small diameter = small burner. – Using oversized pans may cause the flames to spread out and damage the surrounding countertop or other countertop appliances. The proper pan size will also improve efficiency. – Pots with a smaller diameter than the pan support and pots that do not sit securely (without wobbling) are hazardous and should not be used.
Energy saving tips – If possible, cook in covered pots or pans. This prevents unnecessary heat loss. – Cook with less water. – The cooking time can be significantly reduced by using a pressure cooker. – After cooking or frying, promptly set to a lower flame. – Generally, wide / shallow pans will heat quicker and cook more evenly than narrow / tall ones.
Safety feature Ignition safety control The appliance is equipped with an Ignition safety control. This control cuts the gas supply if the flame goes out and reignition is unsuccessful, e.g. from a boilover or a draft. Any further escape of gas is prevented. ^ To reignite the burner knob clockwise to "ß" and then turn it on as usual. The Ignition safety control works independently of the power supply. It is active if the appliance is in use during a power failure.
Cleaning and care ,Never use a steam cleaner to clean this cooktop. Pressurized steam could cause permanent damage to the surface and to components. Do not use any sharp or pointed objects which could damage the seal between the frame and the countertop. Keep the ignitor in the burner dry. If it gets wet it will not spark. Dry your cooktop thoroughly after cleaning it to prevent lime deposits. Spills containing salt or sugar should be cleaned immediately.
Cleaning and care Cleaning Ceramic surfaces Instructions Remove heavy dirt with a damp cloth and stubborn Do not use liquid dish soap as not all soiling and dirt with a glass scraper. residue will be removed. Clean with the Miele ceramic surface and stainless This results in an invisible film which causes steel cleaner (see the Miele online store) and with discoloration of the glass kitchen paper or a clean cloth. ceramic. This discoloration Do not apply cleaner to a hot cooktop as this can is permanent.
Cleaning and care Assembling the burners Auxiliary, normal and fast burners ^ Place the burner head b on the burner base c so that the thermocouple d and the ignitor e feed through the holes of the burner head. The burner head must engage properly. ^ Lay the burner cap a flat on the burner ring b. The burner cap cannot shift if positioned correctly. Make sure the burner parts are assembled in the right order.
Frequently asked questions ,Repairs should only be carried out by an authorized technician in accordance with local and national safety regulations. Unauthorized repairs could cause injury or appliance damage. Problem Cause The burner does not The burner is not assembled correctly. ignite after several attempts The gas valve is closed. The burners are wet and soiled and/or the flame holes in the burners are soiled and clogged. The igniters are wet.
Technical Service In the event of a fault which you cannot easily fix yourself, please contact the Miele Technical Service Department at the address on the back of this booklet. When contacting Technical Service please quote the serial number and model of the cooktop. This information is visible on the silver data plate supplied with the cooktop.
Installation Instructions IMPORTANT: SAVE FOR THE LOCAL ELECTRICAL INSPECTOR'S USE Information is subject to change. Please refer to our website to obtain the most current product specification, technical & warranty information. To prevent accidents and appliance damage read these instructions before installation or use.
IMPORTANT INSTALLATION SAFETY INSTRUCTIONS Installation The minimum distances given in these Installation instructions are to combustible surfaces, and must be observed to ensure safe operation. Failure to do so increases the risk of fire. The cabinetry and venting hood should be installed first to prevent damage to the combiset. ~ Gas appliances should only be installed in a well ventilated area.
IMPORTANT INSTALLATION SAFETY INSTRUCTIONS Safety distances above the appliance The minimum safety distance given by the hood manufacturer must be maintained between the combiset and the hood above it. See the installation instructions of the hood for these safety measurements. If the hood manufacturers instructions are not available or if flammable objects are installed over the combiset (e.g. cabinets, utensil rail, etc.), a minimum safety distance of 30" (760 mm) must be maintained.
IMPORTANT INSTALLATION SAFETY INSTRUCTIONS Safety distances When installing a gas cooktop, there may be cupboard or room walls of any size on the rear side and on one side (right or left) (see illustrations). The following minimum safety distances must be maintained: Not allowed a 2" (50 mm) minimum distance at the rear of the countertop cutout to the rear edge of the countertop. b 5 7/8" (150 mm) minimum distance to the right of the countertop cutout to an adjacent piece of furniture (e. g.
Installation dimensions a Appliance front b Installation height c Power supply box with connection cable L = 4 ft ( 1.
Installation ^ Create the countertop cutout as per the dimension drawing. Remember to maintain a minimum safety distance from the back wall, as well as from any tall unit or side wall to the right or left of the cooktop (see "IMPORTANT INSTALLATION SAFETY INSTRUCTIONS"). ^ Seal the cut surfaces with a suitable heat-resistant sealant to avoid swelling caused by moisture. The materials used must be heat-resistant. Make sure that these materials do not touch the surface of the countertop.
Installation Sealing The sealing strip under the edge of the top part of the cooktop provides a sufficient seal for the countertop. Do not let sealant get in between the cooktop frame and the countertop. This could cause difficulties if the cooktop ever needs to be taken out for servicing and possibly result in damage to the cooktop frame or the countertop.
Electrical connection This appliance must be grounded according to local or national codes. All electrical work should be performed by a qualified electrician in accordance with local codes and with the: - National Electrical Code ANSI / NFPA No. 70 for the USA or - Canadian Electrical Code Part I for Canada (CSA Standard C 22.1). ,WARNING Disconnect the appliance from the main power supply before installation or service.
Electrical connection Wiring diagram ,Caution: Label all wires prior to disconnection when servicing controls. Wiring errors can cause improper and dangerous operation. Verify proper operation after servicing.
Gas connection Installation and service must be performed by a qualified installer, service agency or gas supplier. The gas connection must be made in accordance with local codes or, in the absence of local codes, with In Massachusetts installation must be performed by a licensed plumber/gas fitter. - This appliance must be installed with its own shut off valve and the included gas pressure regulator.
Gas connection Gas pressure regulator A pressure regulator that is convertible from natural to LP gas (Propane) or vice versa is included with the appliance. The included regulator corresponds with the gas type of the appliance. Verify before installing. The adjusted pressure is: natural gas - 4" w.c. LP gas - 10" w.c. For convenience, an AGA or CGA approved flexible stainless steel gas hose (accordion type) may be used between the gas connection and the regulator.
Conversion to another type of gas The applinace should have been ordered for connection to either natural gas or LP gas (propane). If the appliance is not configured for the proper type of gas connection please contact your Miele Dealer. If the appliance is to be connected to a type of gas other than it was originally configured for, both the regulator and burners must be converted. A conversion kit is available as an optional accessory from the Miele Technical Service Department.
Burner capacity Nominal ratings Maximum output Gas type BTU/hr kW Auxiliary burner Natural Gas (NG) Propane (LP) 3,750 3,300 1.10 0.97 Normal burner Natural Gas (NG) Propane (LP) 5,800 6,400 1.70 1.88 Fast burner Natural Gas (NG) Propane (LP) 9,300 9,800 2.73 2.87 Total output Natural Gas (NG) Propane (LP) 24,650 25,900 7.20 7.60 Gas type BTU/hr kW Minimum output Auxiliary burner Natural Gas (NG) Propane (LP) 1,000 1,700 0.29 0.
Help protect our environment Disposal of packing materials Disposal of an old appliance The cardboard box and packing materials are biodegradable and recyclable. Please recycle. Old appliances contain materials that can be recycled. Please contact your local recycling authority about the possibility of recycling these materials. Ensure that any plastic wrappings, bags, etc. are disposed of safely and kept out of the reach of children.
Please have the model and serial number of your appliance available before contacting Technical Service. U.S.A. Canada Miele, Inc. Importer Miele Limited National Headquarters 9 Independence Way Princeton, NJ 08540 Phone: 800-843-7231 609-419-9898 609-419-4298 Fax: www.mieleusa.com Technical Service & Support Nationwide Phone: 800-999-1360 888-586-8056 Fax: TechnicalService@mieleusa.com Headquarters and Miele Centre 161 Four Valley Drive Vaughan, ON L4K 4V8 www.miele.
KM 3010 en - US, CA M.-Nr.