
Technical data


Adding an ESS with the CLI
© 2012 Meru Networks, Inc. Configuring an ESS 71
Configure Virtual Cell Overflow with the Web UI
To set up Virtual Cell Overflow from the Web UI, follow these steps:
1. Create a Virtual Cell ESS by following the directions Add an ESS with the Web UI.
Be sure that the setting for Virtual Cell is set to On.
2. Create a non-Virtual Cell ESS by following the directions Add an ESS with the Web
UI. Be sure that the setting for Virtual Cell is set to Off. Make this an Overflow
ESS with the setting Overflow for; select the ESS you created in Step 1. This
overflow ESS automatically inherits the remaining parameters of the Virtual Cell
ESS.
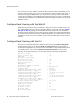
Configure Virtual Cell Overflow with the CLI
In the CLI, a new command, overflowfrom-essprofile, has been added for this
purpose. See the example below.
default(0)# show essid
ESS Profile Name SSID Security Profile
Broadcast Tunnel Interface Type
vcelloverflow vcelloverflow default
on none
ESS Profile(1 entry)
default(0)# configure terminal
default(0)(config)# essid vcelloverflowoss
default(0)(config-essid)# overflowfrom-essprofile vcelloverflow
default(0)(config-essid)# end
default(0)# show essid
ESS Profile Name SSID Security Profile
Broadcast Tunnel Interface Type
vcelloverflow vcelloverflow default
on none
vcelloverflowoss vcelloverflow default
on none
ESS Profile(2)
default(0)# show essid vcelloverflowoss
ESS Profile
ESS Profile Name : vcelloverflowoss
SSID : vcelloverflow
Security Profile Name : default
Primary RADIUS Accounting Server :
Secondary RADIUS Accounting Server :
Accounting Interim Interval (seconds) : 3600
Beacon Interval (msec) : 100
SSID Broadcast : on
Bridging : none
New AP's Join ESS : on
Tunnel Interface Type : none
VLAN Name :
GRE Tunnel Profile Name :
Allow Multicast Flag : off
Silent Client Polling : off
Virtual Cell : off (because this is the overflow ESS)