
User Manual


7 ENGLISH
ASSEMBLY
CAUTION: Always make sure that the battery
cartridge is removed before carrying out any work
on the stapler.
Staples
CAUTION: Do not use staples other than
designated in this manual or staples that appear
to be damaged, bent, rusty or corroded.
CAUTION: Load the same type, size and
uniform length of staples when loading multiple
strips of staples in the magazine.
NOTICE:
Handle the staples and their box carefully.
If the staples have been handled roughly, they may be
bent out of shape, causing poor staple feed or jamming.
NOTICE:
Avoid storing the staples in a very humid
or hot place or place exposed to direct sunlight.
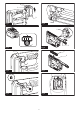
Loading staples
WARNING: When loading staples, always
make sure that the battery cartridge is removed
from the stapler.Unintentionalringmaycause
personalinjuriesandpropertydamage.
CAUTION: After loading staples, make sure
that the sub magazine is surely closed. Falling
staplesoutofthemagazinemaycauseaninjuryto
the operator or bystander, especially when working in
high locations.
1. Remove the battery cartridge.
2. Pressthelockingleverandslidethesubmaga-
zine backward.
►Fig.6: 1. Locking lever 2. Sub magazine
3. Load staples into the main magazine with their
feetfacingup.
►Fig.7: 1. Staples 2.Mainmagazine
4. Afterloadingstaples,pushbackthesub-maga-
zine in place until it clicks.
Toremovestaples,followtheinstallationproceduresin
reverse.
Hook
CAUTION: Do not hang the hook from the
waist belt. Dropping the stapler, which is caused by
thehookaccidentallycomingoutofplace,maycause
unintentionalringandresultinpersonalinjuries.
►Fig.8
Thehookisconvenientfortemporarilyhangingthetool.
Thiscanbeinstalledoneithersideofthetool.
Toinstallthehook,insertitintoagrooveinthetool
housing on either side and then secure it with a screw.
Toremove,loosenthescrewandthentakeitout.
►Fig.9: 1. Groove 2. Hook 3. Screw
OPERATION
Testing the safety system
WARNING: Make sure all safety systems are
in working order before operation. Failure to do
so may cause personal injuries.
►Fig.10: 1.Trigger-lockbutton2. Switch trigger
3. Contact element 4. Sub magazine
Testsafetysystemsforpossiblefaultbeforeoperation
asfollows.
1. Unloadstaplesfromthetoolandkeepthesub
magazine opened.
2. Install the battery cartridge.
3. Only pull the switch trigger without touching the
contact element against the material.
4. Only touch the contact element against the mate-
rial without pulling the switch trigger.
Ifthetooloperatesinthecaseof3and4above,the
safetysystemsarefaulty.Stopusingthetoolimmedi-
ately and ask your local service center.
Driving staples
WARNING: Continue to place the contact
element rmly on the material until the staple is
driven completely.Unintentionalringmaycause
personalinjuries.
►Fig.11: 1. Switch trigger 2. Contact element 3. Front
part 4. Rear part
Youcanoperatethetoolineitherwayof“single
sequentialactuation”or“contactactuation”.
Single sequential actuation:
Inthismode,youcandriveonestaplebyonesequen-
tial operation.
1. Placeatthecontactelementonthematerial.
2. Holdbothofthefrontpartandtherearpartofthe
toolrmlyagainstthematerial.
3. Pulltheswitchtriggerfullytodrivethestaples.
4. Releaseyourngerfromtheswitchtriggerbefore
movethecontactelementfromthematerial.
Contact actuation:
Inthismode,youcandrivestaplessequentially.
1. Pulltheswitchtrigger.
2. Withtheswitchtriggerpulled,placeatthecon-
tact element on the material to drive the staples.
3. Movethetooltothenextareaandplaceatthe
contact element on the material again.
NOTE:Thegrooveindicatesthepointthatstapleis
driven.
►Fig.12: 1. Groove
Iftheheadofthestapleremainsabovetheworkpiece
surface,drivethestaplewhileholdingthestaplerhead
rmlyagainsttheworkpiece.
►Fig.13