IceCube 1394a User Manual 3.5” ATA to Firewire 1394a External Storage Enclosure Table of Contents Chapter 1 Chapter 2 Chapter 3 Chapter 4 Chapter 5 Chapter 6 Chapter 7 Introduction.………………………………………………………………... Package Contents…………………………………………….. …………. Hardware Installation Guide……………………………………………... Installation Procedure…………………………………………………….. Unplug Procedure…………………………………………………………. Partitioning & Formatting..………………………………………………... Technical Information……………………………………………………… 1 P.2 P.3 P.4 P.11 P.13 P.16 P.
Chapter 1 Introduction 1.1 The IceCube 3.5” ATA to Firewire 1394a External Storage Enclosure is clarity, compact, outstanding looking enclosure. Equipped with 2 FireWire ports, this is the perfect solution for additional external storage, data backup, and for transferring data between computers and platforms. 1.2 Available Interfaces a. USB 2.0 b. Firewire 1394a c. Firewire 1394a & USB 2.0 Combo d. Firewire 800 & USB 2.0 Combo 1.3 System Requirement a. Hardware : b. OS requirement : 1.
Chapter 2 Package Contents 1. IceCube (ATA to 1394a External Storage Enclosure) 2. Power Adapter 3. Power Cord 4.
Chapter 3 Hardware Installation Guide 3.
Figure B Figure C 5
Figure D Figure E 6
3.
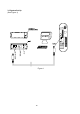
2510 2510 RED BLACK BLACK BLUE RED (+) BLACK (-) Figure G Figure H 8
Figure I 9
3.
Chapter 4 Installation Procedure 4.1.
4.2 MAC OS • • • • Turn on your Computer Connect the power and turn it on Connect the IceCube to your computer’s 1394a port For Mac OS 9.1 or later no driver is required. Your IceCube will show up on your desktop or you will be prompted to initialize the HDD first, if that is a factory new drive or the format is not recognized. (See Figure 2) IceCube Figure 2 Note: If you are using OS 8.6 or 9.04, your Firewire support has to be at least v2.6.
Chapter 5 Unplug Procedure 5.1 Windows 98/SE a. Single click (right mouse button) on the taskbar icon (See Figure 3) b. Click on popup message (See Figure 4) Figure 3 External Hardware Icon Figure 4 c. Click “OK” and remove the device (See Figure 5) Figure 5 5.2 Windows ME / 2000 / XP a. Single click (right mouse button) on the taskbar icon (See Figure 6) b. Click on popup message (See Figure 7) Figure 6 External Hardware Icon Figure 7 c.
5.
Attention!! To assure no data will be lost, always follow the “unplug procedure”.
Chapter 6 Partitioning & Formatting Please be aware that this will destroy all your existing data on the drive, so make sure you have a backup! This step is usually only required the first time you install the HDD or if you have a factory new HDD.
Windows 2000, Windows XP Disk Management Program: Select “Disk Management” Select “My Computer”, then right click Æ “Manage” Choose the drive you want to format and right click on it for further commands Follow the Partition Wizard If you want to use it on many different OS including Mac, we recommend FAT32 17
Mac OS Mac OS9.2 and before does not support creating partitions on an external drive. To do that you would need to purchase additional software. Initializing is no problem on all OS. For OSX please use the Disk Utility to format and create partitions on your external disk.
Chapter 7 Technical Information 7.1 Features and Advantage of the IceCube 1394a 9 Over Voltage Protection (OVP) with a limit of 10% before shut down (max 30V). Protection for device or Hard Drive damage, caused by sudden voltage spikes in the power supply and wrong or faulty power adapter. Indication: Blue LED off, Red LED on 9 Low Voltage Detection (LD) indicating insufficient power supply. Possible case, low bus power, sudden voltage slump in the power supply or faulty power adapter.
7.2 Performance Test Test Computer Motherboard MSI 845PE CPU Processor Intel Pentium 4 CPU Speed 2.4 GHz System RAM (MB) 512 MB 1394 Host Controller VIA VT6306L Operating System Microsoft Windows 2000 Hard Drive Model RPM Capacity Maxtor DiamondMax Plus9 7200 200GB Remark Test Data Model Read Write Unit Interface Oxford 911 39.49 27.11 Mbytes 1394a © Copyright 2002 Macpower Peripherals Ltd.