
Owner's Manual


POD Farm 2 Advanced User Guide – Using Your Line 6 Hardware
2•20
applying two Tones on your Input 1 - just dial up one of the tone presets in the “Blends” folder of POD
X3 and you’ll have two complete Tones applied to your channel strip 1 input signal! Or, go to the POD
X3 Inputs screen to choose exactly what you want Tone 1 and Tone 2 applied to.
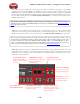
Guitar Input Pad Switch – This little button can be engaged to tame hotter signals at the Guitar In
jack, such as if your guitar or bass has high output active pickups or an on-board preamp.
Input Signal Present and Clip Indicator Lights – The green “Signal Present” indicator lights when
either a guitar or mic input signal is detected. The red “Clip” indicator lights up if input clipping is
detected at the Channel Strip Mic or Guitar Inputs. To avoid clipping (and you really should always
avoid clipping), engage the Mic Pad or Guitar Pad switch or turn down the Mic Trim knob. You might
also try adjusting the output level of the device that feeds these inputs.
Microphone Input – Connect up to two microphones into the channel strip 1 and 2 XLR inputs
using standard XLR mic cables. POD X3 itself applies preamp and effects models to your mic input,
which is then fed out the Analog Left & Right Live Outputs, Direct/Studio XLR Outputs, the AES/
EBU & S/PDIF digital outputs, and out the Record Sends digitally to your computer across the USB
2.0 connection. POD X3 is, of course, also capable of applying a Dual Tone, such as independently
applying different set of guitar amps, bass amps, mic preamps and effects to whatever you are inputting
into channel strips 1 & 2! Just go to the POD X3 Inputs screen to choose what you want Tone 1 and
Tone 2 applied to.
Mic Input Trim knob – You can use the little “Trim” knob at the top of the channel strip to adjust the
respective mic input signal level, just like you would on a traditional mixing console’s channel strip.
Note that you can also engage the Mic In Pad switch if the input is too high. The Signal Present and
Clip lights will help with setting your input level.
Mic Input Low Cut Filter and Pad Switches – Engage the Low Cut Filter for the Mic Input to cut off
all frequencies 75Hz and below - useful for eliminating rumble from mic sources. If you are plugging
in a Mic with a hot signal level, engage this pad to attenuate the channel strip’s Mic Input by -20dB.
Phantom Power Switch – Pushing in this button activates 48V Phantom Power for both Channel
Strip Mic Inputs. The LED will light when Phantom Power is activated.
Phones Output
Phones Output - If you want to listen to the audio using stereo headphones, then plug them into this
1/4 inch stereo jack. This Phones jack outputs the same signal fed to the Analog Line Outs; the audio
from your DAW, as well as anything plugged into the Guitar, Mic, Aux, Variax, digital or Line inputs.
The volume is set by the Master Volume knob. Any time you use headphones, it important to be sure
the Master Volume knob is not set at a ridiculous level rst!