
Installation Guide


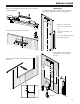


Slide the appliance into the
recess. Move the power
cord and appliance at the
same time to avoid dam-
age.
Recess
top view
Inset 7/8" (22 mm) panel
X = 2
5
/
8
" (66 mm)
Inset 3/4" (19 mm) panel
X = 2
1
/
2
" (63 mm)
Inset 5/8" (16 mm) panel
X = 2
3
/
8
" (60 mm)
Frameless
X = 1
3
/
4
" (44 mm)
Align the appliance in
depth.
X = Recess front to
appliance housing front
(not cover strip)
or
with the depth adjustment
aid:
The surface of the depth
adjustment aid must be
flush with the surface of
the recess. (Example
shows 3/4" (19 mm))
IMPORTANT
The depth of the door cannot be adjusted later!
Remove the transit supports
using the Torx 25 key.
Raise the appliance evenly by turning the screws suc-
cessively until the appliance back touches the anti-
tipping bracket (lift approx. 1/4" / 6.5 mm).
Maximum height adjustment of the appliance = 3/4"(19mm)
IMPORTANT
When turning the screws with a power driver please
consider absolutely.
Maximum rotation speed = 400 rpm
Maximum torque = 8.8 lbs/in (1 Nm)
Failure to follow this instruction will result in
damage to the height adjustment unit.
DANGER!
Risk of death or serious injury due to
appliance tipping.
Do not open the appliance door before the
height adjustment is finished and the anti-
tipping bracket supports the appliance.
Turn clockwise to raise the appliance.
15
I
nStallatIon