
Manual


Installation
6
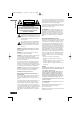
Connections with TV and
over-the-air antenna
1. Connect the antenna to the “From
Antenna” jack on this unit using a
coaxial RF cable (N).
2.
Connect the “To TV (RF)” jack on this
unit to the “Antenna In” jack on your
TV using a coaxial RF cable (R).
Your TV must be tuned to the selected
RF Output Channel (Refer to page 8)
channel (3 or 4) to display the picture.
(default: channel 3).
OR
Connect the VIDEO and AUDIO (L/R)
jacks on this unit to the video and
audio input jacks on the TV using the
video (V) and audio (A) cable.
3. Plug the power cord into a power
strip/surge protector or a wall outlet.
Install Guide
The Install Guide is a convenient way for
you to customize the settings of this unit.
When the unit is turned on for the first
time after connecting the power supply,
Install Guide is displayed on the screen
automatically.
Step 1 (Welcome Message)
Press i to move to the
next step.
Step 2 (Menu Language)
Use U / u to select a lan-
guage (English, Spanish,
French) then press i to
move to the next step.
Step 3 (TV Aspect Ratio)
Use U / u to select your
TV type then press i to
move to the next step.
Step 4 (Searching for
Channels...)
Press (Select) to start
auto tuning.
After auto tuning is
complete, press i to
move to the next step.
Step 5 (Time Zone)
Use U / u to select a time
zone then press i to
move to the next step.
Step 6 (Thank You
Message)
Press (Select) to
finish install guide.
Rear of this unit
TV
V
ARN
ANTENNA
INPUT
Antenna
Set “Audio Output” option to “Mono” if the unit
is connected to TV with RF cable (See page 9).
Note
LSX300-4DM_ENG 1/24/08 8:56 AM Page 6