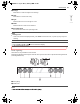
22 OPERATION OPERATION Control Panel Control Panel Features Model: LSGL6337* Model: LSGL6335* a Smart DiagnosisTM Use during the Smart Diagnosis feature. b Control Lock Press and hold the button for 3 seconds to lock the control panel. c Cook Time Press the button to set the desired amount of time for food to cook. The oven shuts off when the set cooking time runs out. d Start Time Press the button to set the delayed timed cook. The oven starts at the set time. e Temp.
OPERATION 23 h Settings Press button to select and adjust oven settings. Press button to set the time of day. j Light Press the button to turn oven light on or off. k START Press the button to start all oven features. l Oven Mode Knob Turn the knob to select oven operating mode. NOTE Flashing Clock - If the colon in the clock display flashes, press Clock and reset the time, or press any key to stop the flashing. NOTE panel to activate the display.
24 OPERATION NOTE problem with the product. atch the actual operation of the heating elements, it may indicate a Changing Oven Settings Clock The clock must be set to the correct time of day in order for the automatic oven timing functions to work properly. 1 Press Clock 2 Press the numbers to enter the time. For example, to set the clock for 10:30, press the numbers: 1, 0, 3 and 0. 3 Press START. NOTE The Timer On/Off feature can be used during any of the other oven control functions.
OPERATION 25 The power on chime sounds, SEt appears in the display, and the Wi-Fi icon (f) blinks. 4 Connect the appliance to the Wi-Fi network using the smartphone app. 5 To disconnect the appliance from the network, delete it from the connected appliances in the app. NOTE Convection Auto Conversion is enabled by default. To change the setting, follow these instructions. 1 Press Settings repeatedly until Auto appears in the display. 2 Press 1 to disable or enable auto conversion.
26 OPERATION Turning the Preheat Alarm Light On/Off When the oven reaches its set-temperature, the preheating alarm light flashes 5 times or until the oven door is opened. You can activate or deactivate the preheating alarm light. 1 Press Settings repeatedly until PrE appears in the display. 2 Press 1 to turn the light on/off. 3 Press START to accept the change. unlock melody sounds and the controls unlock.
OPERATION 27 1 Press Cook Time. 2 Change the baking time: press 1, 3, 0. The oven will continue to cook for the set amount of time and then turn off automatically. When the cooking time has elapsed: 3 Press START to accept the change. End and the time of day show in the display. seconds until the oven mode knob is turned to the OFF position. Cook Time (Timed Cook) Set the oven to cook for a specific length of time using the Timed Cook feature. This feature can only be used with the Bake, Conv.
28 OPERATION Min. Max. WARNING Temp. / Temp. / Default Broil Lo 400 °F Hi 500 °F Hi / 3 Hr. Bake 170 °F / 80 °C 550 °F / 285 °C 350 °F / 12 Hr. Proof 0:01 Hr. / min. 11:59 Hr. / min. 12 Hr. Feature Time Time Warm 3 Hr. Probe 80 °F / 27 °C 210 °F / 100 °C 150 °F / 65 °C Self Clean 3 Hr. 5 Hr. 4 Hr. EasyClean 10 min. Frozen Meal 300 / 150 0:01 Hr. / min. 550 / 285 11:59 Hr. / min. 400 °F / 205 Air Fry 300 / 150 0:01 Hr. / min. 550 / 285 11:59 Hr. / min.
OPERATION 29 flames when lifting cookware. Do not use towels or other bulky cloth items. Use a pot holder. ignition of flammable materials and spillage, turn cookware handles toward the side or back of the range without extending them over adjacent burners. air from the vent may ignite flammable items and will increase pressure in closed containers, which may cause them to burst. setting. meter if possible to prevent overheating fat from heating beyond the smoking point.
30 OPERATION a Medium and large burners The medium and large burners are the primary burners for most cooking. These general purpose burners can be turned down from Hi to Lo to suit a wide range of cooking needs. b Small burner The smallest burner is used for delicate foods such as sauces or foods that require low heat for a long cooking time. 4 Turn the control knob to control the flame size. CAUTION any burner while another burner is on. All the burners spark when any burner is turned to LITE.
OPERATION 31 monoxide levels above allowable standards. This can be hazardous to your health. - If heated slowly, most skillets will give satisfactory results. ENGLISH - This metal alone has poor heating properties and is usually combined with copper, aluminum or other metals for improved heat distribution. Combination metal skillets work satisfactorily if they are used with medium heat as the manufacturer recommends. - Under some conditions, the enamel of this cookware may melt. Follow cookware methods.
32 OPERATION a Front NOTE rests firmly on the wok grate. the wrong size to fit securely in the wok grate. same time. e cannot be used at the the extra large, right front burner. than a wok. with cookware other hot, soapy water. Do not use oven cleaners, steel wool, or abrasive cleansers. Do not clean with the self-clean mode. Using Stove-Top Grills Do not place stove-top grills on the burner. CAUTION ills on the surface burners.
OPERATION 33 - Cook Setting: HI - Preheat Conditions: HI 5 min. - Preheat Conditions: HI 5 min. - Cook Setting: HI - Preheat Conditions: HI 5 min. - Cook Setting: HI NOTE period, adjust the griddle temperature settings as the griddle retains heat. In Case of Power Failure In case of a power failure, you can light the gas surface burners on your range with a match. Surface burners in use when an electrical power failure occurs will continue to operate normally. CAUTION a match.
34 OPERATION proper air flow. Do not touch vent openings or nearby surfaces during any cooking operation. Using Oven Racks The racks have a turned-up back edge that prevents them from being pulled out of the oven cavity. CAUTION to prevent burns. re turning the oven on any other material, or place anything on the bottom of the oven. Doing so will result in poor baking and may damage the oven bottom. aluminum foil. Removing Racks glass.
OPERATION 35 NOTE NOTE seconds. tomatically after 90 is disabled when the oven door is opened and for one second after closing the door. Baking Tips rature will vary depending on the characteristics, size, and shape of the baking pan used. Clean, Control Lock, and initial power input (on some models only). time. h or without a nonstick finish), heatproof glass-ceramic, ceramic or other bakeware recommended for oven use. activate the InstaView function. enough to be audible.
36 OPERATION display shows the auto converted oven temperature, 350 °F and the fan icon. 4 When cooking has finished or to cancel, turn the oven mode knob to the OFF position. NOTE Grid (sold separately) Broiler pan (sold separately) CAUTION fan stops when the door is open. In some cases, the fan may shut off during a convection bake cycle. Tips for Convection Baking multiple-rack cooking of pastries, cookies, muffins, biscuits, and breads of all kinds.
OPERATION 37 Broil Baking Rack Guide Cakes Layer cakes Bundt cakes Angel food cake 4 3 3 Cookies Sugar cookies Chocolate chips Brownies 3 3 3 Pizza Fresh Frozen 4 4 Pastry Crust From scratch Refrigerated 4 4 Breads Biscuit, canned Biscuit, from scratch Muffins 5 5 5 Desserts Fruit crisps and cobblers, from scratch Pies, from scratch, 2crust fruit 3 3 Custards Cheesecake, crème brulée 2 Soufflés Sweet or savory 2 Casserole Frozen lasagna 5 Poultry CAUTION cause a grease fire.
38 OPERATION 4 Turn the oven mode knob to the OFF position to cancel at any time or when cooking is complete. Tips for Reducing Smoke Due to the intense heat associated with broiling, it is normal to experience smoke during the cooking process. This smoke is a natural byproduct of searing and should not cause you to worry. If you are experiencing more smoke than you are comfortable with, use the following tips to reduce the amount of smoke in your oven. or regular baking sheets for safety reasons.
OPERATION 39 Recommended Broiling Guide The size, weight, thickness, starting temperature, and your preference of doneness will affect broiling times. a Grid (sold separately) b Broiler pan (sold separately) * : This feature is for the offset rack use. Hamburgers Rack Position First Side (min.) Second Side (min.) Comments 7* 6-7 4-5 Space evenly. Up to 9 patties may be broiled at once.
40 OPERATION Quantity and/or Thickness Food Lamb Chops Bacon Rack Position First Side (min.) Second Side (min.) 2 (1" thick) about 10 to 12 oz. Medium 5 (6*) 6 4-7 Well Done 5 (6*) 10 10 2 (1 1/2" thick) about 1lb. Medium 5 (6*) 10 4-6 Well done 5 (6*) 17 12-14 4 (5*) 8 3 1/2 lb. (about 8 thin slices) Comments cook time according to your preference. NOTE food-borne illness.
OPERATION 41 Proof Setting the Proof Function 1 Use rack position 2 or 3 for proofing. 1 Turn the oven mode knob to select Proof/ Warm until Proof appears in the display. 2 Press 2 to set Warm. 3 Press START. 4 To cancel the Warm function, turn the oven mode knob to the OFF position. NOTE warm. Do not use it to cool food down. 2 Turn the oven mode knob to select Proof/ Warm until Proof appears in the display. 3 Press START.
42 OPERATION NOTE while operating some cook modes. b Heavy Duty Rack fry tray, place food on a wire rack inside a foil-lined cookie pan. to 3 hours unless you turn the oven mode knob to the OFF position. Air Fry This feature automatically increases the entered temperature by 50°F for optimal performance when using Air Fry. The function is specially designed for oilfree frying. Setting the Air Fry Function 1 Turn the oven mode knob to select Air Fry. 400°F appears in the display.
OPERATION 43 through the oven and can result in carbon monoxide poisoning. Aluminum foil can also trap heat, causing a fire hazard or poor oven performance. down the interior of the oven before and after air frying (once the oven has cooled). before you start Air Fry and leave it on for 15 minutes after you're done. necessary to help maintain the oven temperature, prevent heat loss, and save energy. to make sure the kitchen is well-ventilated. regularly.
44 OPERATION Quantity (oz) Temp. (°F) Rack Position Time 50 425 5 25-35 Fresh Chicken Wings 40 450 5 30-35 Fresh Chicken 40 450 5 30-40 Thighs 40 450 5 30-35 Breasts 40 450 5 30-35 Frozen Onion Rings, Breaded 20 400 5 15-25 Frozen Spring Rolls (0.7 oz each) 45 425 5 18-28 Thin Sausage (2.5 oz each, diameter 0.8") 90 425 5 20-30 Frozen Coconut Shrimp 25 425 5 20-30 Brush or lightly spray the surface of food with oil. Fresh Scallops on the half shell (35.
OPERATION 45 Setting Air Sous-Vide Mode 1 Place the heavy duty rack in position 3 and place the sealed food bag on it. Recommended Food Beef steak Chicken breast Turn the oven mode knob to select Air SousVide mode. 3 Set the desired oven temperature. (Range: 100 °F ~ 205 °F) 4 Press START. 5 Once cooking is finished, allow the oven to cool completely. Guide Quantity (oz) 14.1-17.6 oz 4.2-5.3 oz 7 oz Asparagus 2 2.8 oz / 6 ea 5.
46 OPERATION 2 Select the desired option by pressing either 1 or 2. situations: 1: Hi (275 °F) - Remote Start is never set up in the smartphone app. 2: Lo (220 °F) 3 - The Remote Start status is OFF or door. - Remote Start experiences a problem during operation. Press START. 4 - The Remote Start function cannot be started when the oven door is open. A beep alerts you to shut the door. When cooking is complete, turn the oven mode knob to the OFF position.
OPERATION 47 Set the oven temperature: touch 3, 7 and 5 until 375 °F appears in the display. 3 Press Start. 4 Set the probe temperature: touch 1, 6 and 0 until 160 °F appears in the display. 5 Press Start. NOTE but can be changed to any temperature between 80 °F (27 °C) and 210 °F (100 °C). The display shows the changing probe temperature. When the set probe temperature is reached, the oven shuts off automatically. Changing the Probe Temperature 1 Press Temp. 2 Set the oven temperature.
48 OPERATION NOTE t, the oven turns off automatically at the end of the cook time, without chiming. The oven remains in Sabbath mode, but is turned off. automatically turn off. on in Sabbath mode, but the oven will be off. oven door first before engaging Sabbath Mode.
SMART FUNCTIONS 49 SMART FUNCTIONS This feature is only available on models with Wi-Fi. NOTE running. Cancel the timer operation to use Scan to Cook. The LG ThinQ application allows you to communicate with the appliance using a smartphone. LG ThinQ Application Features Smart Diagnosis - This function provides useful information for diagnosing and solving issues with the appliance based on the pattern of use.
50 SMART FUNCTIONS NOTE depending on the Internet service provider. may be interrupted because of the home network environment. Wireless LAN Module Specifications Frequency Range 2412 - 2462 MHz Output Power (Max) < 30 dBm problems with the wireless signal transmission, unplug the appliance and wait about a minute before trying again. FCC Notice disable the firewall or add an exception to it.
SMART FUNCTIONS 51 troubleshooting data to a smartphone using the LG ThinQ application. This equipment should be installed and operated with a minimum distance of 20 cm (7.8 inches) between the antenna and your body. Users must follow the specific operating instructions for satisfying RF exposure compliance. Using Audible Diagnosis to Diagnose Issues LG ThinQ application and select the Smart Diagnosis feature in the menu. Follow the instructions provided in the LG ThinQ application.
52 MAINTENANCE MAINTENANCE Cleaning the OFF position and pull them straight off the stems. CAUTION the OFF position centered at the top, and slide the knob directly onto the stem. cooled down before touching any of its parts. cleaning the cooktop. NOTE General Cleaning Tips scrape off any chunks or debris before and during oven cleaning. pad may help to take off burnt-on stains better than a soft sponge or towel.
MAINTENANCE 53 Oven Door with a commercial oven cleaner or in the dishwasher. CAUTION oughly clean the oven door. Rinse well. Do not immerse the door in water. ner on the outside glass of the oven door. Do not spray water or glass cleaner on the door vents. harsh abrasive cleaning materials on the outside of the oven door. door gasket is made of a woven material that is essential for a good seal. Care should be taken not to rub, damage, or remove this gasket.
54 MAINTENANCE Grates and burner heads/caps can be removed for care and cleaning. cause injury. Hitting an electrode with a hard object may damage it. in a solution of mild liquid detergent and hot use a toothbrush or wire brush. burner ports or electrodes are clogged or dirty. routinely, especially after excessive spillover. CAUTION properly. They will be stable and rest flat when correctly installed. After Cleaning the Burner Heads/Caps Shake out any excess water and then let them dry thoroughly.
MAINTENANCE 55 Cleaning the Burner Grates NOTE CAUTION with clean water. ed regularly and after - Rub in the direction of the grain to avoid damaging the surface. soapy water and rinse completely and securely position them over the burners. Cleaning the Cooktop Surface The EasyClean coating makes cleaning the cooktop easier. Even heavy grease stains can be removed using only warm water. CAUTION allow the cooktop to cool. until it has cooled.
56 MAINTENANCE cavity is above 150 °F (65 °C), Hot will appear in the display, and the EasyClean cycle will not be activated until the oven cavity cools down. of the oven, it is better to use the Self Clean cycle. vel to ensure that the bottom surface of the oven cavity is entirely covered by water at the beginning of the EasyClean cycle. Benefits of EasyClean r; no chemical cleaners some models) Tap water may leave mineral deposits on the oven bottom.
MAINTENANCE 57 5 NOTE water to clean each oven. Do not spray water directly on the door. Doing so will result in water dripping to the floor. 6 Close the oven door. Turn the oven mode knob to select EasyClean. Press START. NOTE pads or cleaners as these materials can permanently damage the oven surface. 10 Once the oven cavity is cleaned, wipe any excess water with a clean dry towel. Replace racks and any other accessories.
58 MAINTENANCE the oven is heavily soiled. During Self Clean, the kitchen should be well ventilated to minimize the odors from cleaning. Before Starting Self Clean oven racks, broiler pan, broiler grid, all cookware, aluminum foil or any other material from the oven. - If oven racks are left in the oven cavity during the Self Clean cycle, they will discolor and become difficult to slide in and out. minimize the odors from cleaning. Open a window or turn on a ventilation fan or hood before self-cleaning.
MAINTENANCE 59 and cooling. This is normal and will not affect performance. locks automatically. You will not be able to open the oven door until the oven is cooled. The lock releases automatically. k indicator light stops flashing and remains on. Allow about 15 seconds for the oven door lock to activate. the Delayed Self Clean can never be set to start more than 12 hours in advance.
60 MAINTENANCE 2 Turn the oven mode knob to select Self Clean. The oven defaults to the recommended fourhour self clean for a moderately soiled oven. Press buttons as below to select a self clean time from 3 to 5 hours. 1 : 3 hours 2 : 4 hours 3 : 5 hours a Slot 3 Press Start Time. 4 Set the time of day you would like the Self Clean to start by pressing numbers. 5 Press START. b Hinge Lock NOTE c Lock d Unlock 3 Firmly grasp both sides of the door at the top.
MAINTENANCE 61 further cleaning is needed. Use warm water to thoroughly clean. Fully open the drawer. 2 Locate the glide lever on each side of the drawer. Push down on the left glide lever and pull up on the right glide lever. a Hinge arm b Bottom edge of slot c Indentation 3 Open the door fully. If the door will not open fully, the indentation is not seated correctly in the bottom edge of the slots. 4 Lock the hinge locks, rotating them back toward the slots in the oven frame until they lock.
62 MAINTENANCE WARNING the main fuse or circuit breaker panel. Failure to do so can result in severe personal injury, death, or electrical shock. 2 3 Move the vent trim in the indicated direction approximately 1/4". Lift the vent trim. Assembling the Vent Trim Assemble the vent trim in the reverse sequence of its removal. Replacing Changing the Oven Light The oven light is a standard 40-watt appliance halogen. It turns on when the oven door is open.