OWNER’S MANUAL Network 3D Blu-ray Disc™ / DVD Player Please read this manual carefully before operating your set and retain it for future reference.
Getting Started Safety Information 1 CAUTION Getting Started RISK OF ELECTRIC SHOCK DO NOT OPEN CAUTION: TO REDUCE THE RISK OF ELECTRIC SHOCK DO NOT REMOVE COVER (OR BACK) NO USER-SERVICEABLE PARTS INSIDE REFER SERVICING TO QUALIFIED SERVICE PERSONNEL.
Getting Started This device is equipped with a portable battery or accumulator. CAUTION: The apparatus shall not be exposed to water (dripping or splashing) and no objects filled with liquids, such as vases, shall be placed on the apparatus. Disposal of your old appliance 1. When this crossed-out wheeled bin symbol is attached to a product it means the product is covered by the European Directive 2002/96/EC. 2.
1 Getting Started Getting Started For Wireless product European Union Notice Notes on Copyrights LG Electronics hereby declares that this/ these product(s) is/ are in compliance with the essential requirements and other relevant provisions of Directive 1999/5/ EC, 2004/108/EC, 2006/95/EC, 2009/125/EC and 2011/65/EU.
Getting Started Important Notice for TV colour system The colour system of this player differs according to currently playing discs. Only the multi system colour TV can receive all signals output from the player. yy If you have a PAL colour system TV, you will see just distorted images when using discs or video contents recorded in NTSC. yy The multi system colour TV changes the colour system automatically according to input signals.
Table of Contents Table of Contents 1 Getting Started 2 8 8 9 9 9 10 11 12 12 Safety Information Introduction – Playable Discs and symbols used in this manual – About the “7” Symbol Display – Regional Code – System Select Remote Control – Magic remote control functions Front Panel Rear Panel 2 Connecting 13 14 14 15 16 17 17 17 19 19 Connecting to Your TV – What is SIMPLINK? – Resolution Setting Connecting to an Amplifier – Connecting to an Amplifier via HDMI Output – Connecting to an Amplifier
Table of Contents 50 51 51 52 52 53 – Viewing information from Gracenote Media Database Using the Premium Using the LG Smart World – Signing in – Searching online content Using the My Apps Menu 5 Troubleshooting 54 54 55 56 56 56 Troubleshooting – General – Network – Picture – Customer support – Open source software notice 6 Appendix 57 58 58 58 60 60 61 About Magic Remote Control Network Software Update – Network update notification – Software update Additional Information – File requirement – AVC
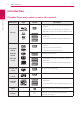
Getting Started Introduction 1 Playable Discs and symbols used in this manual Getting Started Media/Term Logo Symbol e Description yy Discs such as movies that can be purchased or rented. yy “Blu-ray 3D” discs and “Blu-ray 3D ONLY” discs. yy BD-R/RE discs that are recorded in BDAV format. Blu-ray y u i r DVD-ROM yy BD-R/RE discs that contain Movie, Music or Photo files. yy ISO 9660+JOLIET, UDF and UDF Bridge format yy Discs such as movies that can be purchased or rented.
Getting Started ,,Note yy Depending on the recording software & the finalization, some recorded discs (CD-R/RW, DVD±R/RW, BD-R/RE) may not be playable. yy BD-R/RE, DVD±R/RW and CD-R/RW discs recorded using a personal computer or a DVD or CD Recorder may not play if the disc is damaged or dirty, or if there is dirt or condensation on the player’s lens.
Getting Started Remote Control a Remote Control Indicator: (RF & Bluetooth transmitter) Blinks when operating. 1 Getting Started b 1 (POWER): Switches the unit ON or OFF. c BACK (1): Exits the menu or returns to the previous screen. d HOME ( ): Displays the Home screen. h e Direction buttons: Selects an option in the menu. If you press the navigation button while moving the pointer on the screen, the pointer disappears, and the Magic remote control works as a regular remote control.
Getting Started Magic remote control functions 11 How to use Magic remote control The Magic remote control operates by pairing with your unit. Once you purchased the unit, please register the Magic remote control as follows; 1 Getting Started To register the Magic remote control WHEEL yy Shake the remote control slightly to make the pointer appear on the screen. To use the Magic remote control, register it with your unit first. 1.
Getting Started Front Panel 1 Getting Started a Disc Slot e T (PLAY / PAUSE) b Display Window f I (STOP) c Remote Sensor g 1/! (POWER) d R (OPEN / CLOSE) h USB Port Rear Panel a AC power cord c LAN port b DIGITAL AUDIO OUT (OPTICAL) d HDMI OUT
Connecting Connecting to Your TV If you have a HDMI TV or monitor, you can connect it to this player using a HDMI cable (Type A, High Speed HDMI™ Cable). Connect the HDMI jack on the player to the HDMI jack on a HDMI compatible TV or monitor. 13 Additional Information for HDMI yy When you connect a HDMI or DVI compatible device make sure of the following: -- Try switching off the HDMI/DVI device and this player.
Connecting What is SIMPLINK? Some functions of this unit are controlled by the TV’s remote control when this unit and LG TV’s with SIMPLINK are connected through HDMI connection. 2 Controllable functions by LG TV’s remote control; Play, Pause, Scan, Skip, Stop, Power Off, etc. Connecting Refer to the TV owner’s manual for the details of SIMPLINK function. LG TV’s with SIMPLINK function has the logo as shown above. Resolution Setting The player provides several output resolutions for HDMI OUT jack.
Connecting ,,Note yy If your TV does not accept the resolution you have set on the player, you can set resolution to 576p as follows: 1. Press HOME ( ) to disappear the HOME menu. 2. Press I (STOP) for more than 5 seconds. yy If you select a resolution that your TV does not accept, the warning message will appear. After resolution change, if you cannot see the screen, please wait 20 seconds and the resolution will automatically revert back to the previous resolution.
Connecting Connecting to an Amplifier via HDMI Output Connecting to an Amplifier via Digital Audio Output Connect the player’s HDMI OUT jack to the corresponding in jack on your amplifier using a HDMI cable. Connect the player’s OPTICAL AUDIO OUT jack to the corresponding in jack on your amplifier using an optional digital audio cable.
Connecting Connecting to your Home Network 17 Broadband service This player can be connected to a local area network (LAN) via the LAN port on the rear panel or the internal wireless module. By connecting the unit to a broadband home network, you have access to services such as software updates, BD-Live interactivity and on-line content services.
Connecting 1. Select [Connection Setting] option in the [Settings] menu then press Wheel ( ). 2. Use w/s/a/d to select the IP mode between [Dynamic] and [Static]. Normally, select [Dynamic] to allocate an IP address automatically. 2 Connecting 2. Read the preparations for the network settings and then press Wheel ( ) while [Start] is highlighted.
Connecting Wireless network connection Another connection option is to use an Access Point or a wireless router. The network configuration and connection method may vary depending on the equipment in use and the network environment. 19 Preparation Before setting the wireless network, you need to: -- connect the broadband internet to the wireless home network. -- set the access point or wireless router. -- note the SSID and security code of the network. Wireless Communication DLNA certified servers 2.
Connecting Advanced Setting If you want to set the network settings manually, use w/s to select [Advanced Setting] on the [Network Setting] menu and press Wheel ( ). 1. Use w/s to select [Wireless] and press Wheel ( ). ,,Note 2 Connecting yy WEP security mode generally have 4 keys available on an access point setting. If your access point or wireless router use WEP security, enter the security code of the key “No.1” to connect on your home network.
Connecting Notes on Network Connection yy Many network connection problems during set up can often be fixed by re-setting the router or modem. After connecting the player to the home network, quickly power off and/ or disconnect the power cable of the home network router or cable modem. Then power on and/or connect the power cable again.
System Setting Initial Setup When you turn on the unit for the first time, the initial setup wizard appears on the screen. Set the display language and network settings on the initial setup wizard. If you have security on your access point, you need to input the security code as necessary. 6. Use w/s/a/d to select the IP mode between [Dynamic] and [Static]. Normally, select [Dynamic] to allocate an IP address automatically. 1. Press 1 (POWER). The initial setup wizard appears on the screen. 2.
System Setting 23 Settings Adjust the Setup Settings You can change the settings of the player in the [Settings] menu. 1. Press HOME ( ). [NETWORK] Menu The [NETWORK] settings are needed to use the software update, BD-Live and on-line content services. Connection Setting If your home network environment is ready to connect the player, the player needs to be set the wired or wireless network connection for network communication. (See “Connecting to your Home Network” on page 17.
System Setting Smart Service Setting [Country Setting] Select your area for displaying proper online content service. [Initialize] Depending on the region, [Initialize] function may not be available. Device Name You can make a network name using virtual keyboard. This player will be recognised by the name you are entering on your home network. 3 Wi-Fi Direct System Setting This player is a Wi-Fi Direct™ certified device.
System Setting 25 [DISPLAY] Menu Resolution TV Aspect Ratio Sets the output resolution of the HDMI video signal. Refer to page 14 for details about the resolution setting. Select a TV aspect ratio option according to your TV type. [Auto] Select when a standard 4:3 TV is connected. Displays theatrical images with masking bars above and below the picture. If the HDMI OUT jack is connected to TVs providing display information (EDID), automatically selects the resolution best suited to the connected TV.
System Setting 1080p Display Mode HDMI Color Setting When the resolution is set to 1080p, select [24 Hz] for smooth presentation of film material (1080p/24 Hz) with a HDMI-equipped display compatible with 1080p/24 Hz input. Select the type of output from the HDMI OUT jack. For this setting, please refer to the manuals of your display device. ,,Note yy When you select [24 Hz], you may experience some picture disturbance when the video switches video and film material. In this case, select [50 Hz].
System Setting 27 [LANGUAGE] Menu [AUDIO] Menu Display Menu Each disc has a variety of audio output options. Set the player’s Audio options according to the type of audio system you use. Select a language for the [Settings] menu and onscreen display. Disc Menu/Disc Audio/ Disc Subtitle Select the language you prefer for the audio track (disc audio), subtitles, and the disc menu. [Original] Refers to the original language in which the disc was recorded. Press Wheel ( ) to select another language.
System Setting Sampling Freq. (Digital Audio Output) [48 kHz] Select this if your A/V Receiver or Amplifier is not capable of handling 192 kHz and 96 kHz signal. When this choice is made, this unit automatically converts any 192 kHz and 96 kHz signals to 48 kHz so your system can decode them. [96 kHz] 3 System Setting Select this if your A/V Receiver or Amplifier is not capable of handling 192 kHz signals.
System Setting 29 [LOCK] Menu DVD Rating The [LOCK] settings affect only BD-ROM and DVD playback. Blocks playback of rated DVD based on their content. (Not all discs are rated.) To access the any features in [LOCK] settings, you must enter the 4-digit security code you have created. If you have not entered a password yet, you are prompted to do so. Enter a 4-digit password twice, and press Wheel ( ) to create a new password. Password You can create or change the password.
System Setting [OTHERS] Menu Quick Start Pointer This player can stay in standby mode with low power consumption, so that the player can instantly boot without delay when you turn on this unit. Set this option to [On] for activating [Quick Start] function. Sets the speed and size of the Magic remote control’s magic pointer. [Speed] Sets the moving speed of the magic pointer. [Size] Chooses the size of the magic pointer.
System Setting 31 Initialize [Factory Set] You can reset the player to its original factory settings. [Blu-ray Storage Clear] Initializes the BD-Live contents from the connected USB storage. ,,Note If you reset the player to its original factory settings using [Factory Set] option, you have to set all the activation for the on-line services and network settings again. [Information] Displays the current software version.
Operating Home Menu Display Using [HOME] menu The home menu appears when you press HOME ( ). Use w/s/a/d to select a category and press Wheel ( ). 4 Using the Smart Share You can play video, photo and audio content on the unit by inserting a disc, connecting an USB device or using home network (DLNA). 1. Press HOME ( ) to display the home menu. 2. Select [Smart Share] and press Wheel ( ).
Operating 33 Playing the Linked Devices Playing a Disc erot 1. Insert a disc in the disc slot. For the most Audio CD, BD-ROM and DVD-ROM discs, playback starts automatically. 2. Press HOME ( ) and then select [Smart Share]. Playing Blu-ray 3D disc e This player can play the Blu-ray 3D discs which contains separate views for the left and right eyes. Preparation In order to playback Blu-ray 3D title in stereoscopic 3D mode, you need to: yy Check your TV is 3D capable and has HDMI input(s). 3.
Operating Playing a file on disc/USB device yui Notes on USB device This player can play video, audio and photo files contained in the disc or USB device. 1. Insert a data disc in the disc slot or connect an USB device. yy This player supports USB flash drive/external HDD formatted in FAT32 and NTFS when accessing files (music, photo, movie). However, for BD-Live, use the USB flash drive / external HDD formatted in FAT32. yy This unit can support up to 4 partitions of the USB device.
Operating 35 ,,Note Playing a file on a network server yui yy The file requirements are described on page 60. This player can play video, audio and photo files located in a DLNA server through your home network. 1. Check the network connection and settings (page 17). 2. Press HOME ( ). 3. Select [Smart Share] and press Wheel ( ). yy The thumbnail of the unplayable files can be displayed, but those cannot be played on this player.
Operating Using Home Network Server for PC MAC OS X DLNA stands for Digital Living Network Alliance, which allows users to access video, photo and audio files stored in server and enjoy them on TV via home networking. 2. Browse the CD-ROM drive and open the “MediaHome_4_Essentials_MAC” folder. Before connecting to PC to play a file , Nero MediaHome 4 Essentials program should be installed on your PC. 4.
Operating 37 About Nero MediaHome 4 Essentials Nero MediaHome 4 Essentials is a software for sharing video, audio and photo files stored on your computer to this unit as a DLNA-compatible digital media server.
Operating General Playback Basic operations for photo content Basic operations for video and audio content To play a slide show To stop playback To stop a slide show Press Z (STOP) during playback. To pause playback Press N (Play/Pause) during playback. Press N (Play/Pause) to resume playback. To scan forward or backward Press and hold C or V to play fast forward or fast reverse during playback. 4 You can change the various playback speeds by pressing c or v repeatedly.
Operating 39 Resume playback eroyt u The unit records the point where you pressed the Z (STOP) depending on the disc. If “MZ (Resume Stop)” appears on the screen briefly, press N (Play/Pause) to resume playback (from the scene point). If you press Z (STOP) twice or unload the disc, “Z(Complete Stop)” appears on the screen. The unit will clear the stopped point. ,,Note This unit memorizes the last scene from the last disc that is viewed.
Operating On-Screen Display Displaying content information onscreen You can display and adjust various information and settings about the content. eroy To control video playback eroy 2. Select an [Option] using a/d, and press Wheel ( ). 1. During playback, press INFO/MENU (m). You can control playback and set options while watching videos. During playback, press INFO/MENU (m). 4 a Progress bar - Displays the current position and total playing time.
Operating ,,Note yy If no button is pressed for a few seconds, the on-screen display disappears. yy A title number cannot be selected on some discs. yy Available items may differ depending on discs or titles. 41 Setting the slide show option You can use various options during viewing a photo in full screen. 1. While viewing pictures, press INFO/MENU (m). 2. Select an [Option] using a/d, and press Wheel ( ).
Operating Advanced Playback Repeating a specific portion eroty Repeat playback erotu y This player can repeat a portion you have selected. Blu-ray Disc / DVD / Video files 1. During playback, press INFO/MENU (m). 2. Select an [Repeat] using a/d, and press Wheel ( ) A-B – Selected portion will be repeated continually. Chapter – The current chapter will be played back repeatedly. Title – The current title will be played back repeatedly. 4 All – All the titles or files will be played back repeatedly.
Operating 43 Selecting a subtitle language eroy 1. During playback, press INFO/MENU (m). 2. Select an [Option] using a/d, and press Wheel ( ). Watching from a different angle er 3. Use w/s to select the [Subtitle] option. If the disc contains scenes recorded at different camera angles, you can change to a different camera angle during playback. 4. Press a/d to select desired subtitle language. 1. During playback, press INFO/MENU (m). By pressing Wheel ( subtitle options. ), you can set various 5.
Operating Changing subtitle Code Page y If the subtitle is displayed in broken letter, you can change the subtitle code page to view the subtitle file properly. 1. During playback, press INFO/MENU (m). 2. Select an [Option] using a/d, and press Wheel ( ). Setting the [User setting] option 1. During playback, press INFO/MENU (m). 2. Select an [Option] using a/d, and press Wheel ( ). 3. Use w/s to select the [Picture Mode] option. 4. Use a/d to select the [User setting] option, and press Wheel ( ). 3.
Operating 45 Changing content list view yui Selecting a subtitle file y On the [Smart Share] menu, you can change the content list view. If the subtitle file name is different from the video file name, you need to select the subtitle file on the [Movie] menu before playing the movie. Press red (R) colored button repeatedly. 1. Use w/s/a/d to select the subtitle file you wish to play in the [Movie] menu. 2. Press Wheel ( ). Press Wheel ( ) again to deselect the subtitle file.
Operating Listening to music during slide show i You can display photo files while listening to audio files. 1. While viewing a photo in full screen, press INFO/ MENU (m) to display the option menu. 3. Use w/s to select [Music Select] option, and press Wheel ( ) to display the [Music Select] menu. 4. Use w/s to select a device, and press Wheel ( ). Available device may differ depending on the location of the current photo file.
Operating 47 Advanced Features Wi-Fi Direct™ To select a server from the device list, files or folders must be shared by DLNA server from the connected Wi-Fi Direct™ device. 6. Select [Movie], [Photo] or [Music] using w/s/ a/d, and press Wheel ( ). Connecting to a Wi-Fi Direct™ certified device yui This player can play movie, music and photo files located in a Wi-Fi Direct™ certified device.
Operating Enjoying Miracast™ You can mirror Miracast certified device’s screen and sound onto TV screen through your player wirelessly. On Miracast™ certified device 1. Turn on the Miracast certified device and run its [Miracast] function. On your player 2. Press HOME ( ). 3. Select [Miracast] and press Wheel ( ).
Operating 49 >>Caution Do not extract the connected USB device while content is being downloaded or a Bluray disc is still in the disc slot. Doing so may damage the connected USB device and BDLive features may not operate properly with the damaged USB device anymore. If the connected USB device seems damaged from such an action, you can format the connected USB device from the PC and reuse it with this player.
Operating Viewing information from Gracenote Media Database The player can access the Gracenote Media Database and load the music information so that Track name, Artist Name, Genre and other text information can be displayed on the list. Audio CD When you insert an Audio CD, the player starts playback automatically and loads the music title from the Gracenote Media Database. If there is no music information from the database, music titles will not appear on the screen.
Operating Using the Premium You can use various content services via Internet with the Premium feature. Using the LG Smart World 2. Press HOME ( ). You can use the LG application services on this player via Internet. You can easily find and download various applications from LG Smart World. 3. Select the [Premium] using a/d, and press Wheel ( ). 1. Check the network connection and settings (page 17). 1. Check the network connection and settings (page 17). 51 2. Press HOME ( ). 3.
Operating Signing in Searching online content To use the [LG Smart World] feature, you need to sign in with your account. If you are having difficulties finding specific content from online services, you can use the all-in-one search function by entering keywords in the [ ] menu. 1. On the home menu, select [ Wheel ( ). ] icon and press 2. Fill the [ID] and [Password] field using the virtual keyboard. If you do not have an account, press red (R) colored button to register. 3.
Operating 53 Using the My Apps Menu You can move or delete an installed application in the [My Apps] menu. 1. Press HOME ( ). 2. Select the [My Apps], and press Wheel ( ). 3. On the [My Apps] menu, press red (R) colored button. Move an application 1. Select an application, and press Wheel ( display the options. ) to 4 3. Use w/s/a/d to select a position you want to move to, and press Wheel ( ). Delete an application 1. Select an application, and press Wheel ( display the options. ) to 2.
Troubleshooting Troubleshooting General Symptom Cause & Solution The Power does not turned on. yy Plug the power cord into the wall outlet securely. The unit does not start playback. yy Insert a playable disc. (Check the disc type, colour system, and regional code.) yy Insert the disc with the playback side down. yy Clean the disc. yy Cancel the Rating function or change the rating level. The connected USB storage device is not recognized.
Troubleshooting 55 Network Symptom Cause & Solution BD-Live feature does not work. yy The connected USB storage may not have enough space. Connect the USB storage with at least 1GB free space. yy Ensure that the unit is correctly connected to the local area network and can access the internet (see page 17). yy Your broadband speed may not fast enough to use the BD-Live features. Contact your Internet Service Provider (ISP) and increase the broadband speed is recommended.
Troubleshooting Picture Symptom Cause & Solution There is no picture. yy Select the appropriate video input mode on the TV so the picture from the unit appears on the TV screen. yy Connect the video connection securely. yy Check the [HDMI Color Setting] in the [Settings] menu is set to the appropriate item that conforms to your video connection. yy Your TV may not support the resolution you have set on the player. Change the resolution that your TV accepts.
Appendix 57 About Magic Remote Control To re-register the Magic remote control >>Caution yy Use within an effective distance of 33 ft. (10 meters). Using the Remote Control from greater distances or when obstructions block the sight line may cause malfunctions. yy Electronic devices nearby may cause communication interference. Devices such as microwave oven and wireless LAN use the same frequency range (2.4 GHz) as the Magic remote control, which may interfere with the remote control.
Appendix Network Software Update Network update notification From time to time, performance improvements and/or additional features or services may be made available to units that are connected to a broadband home network. If there is new software available and the unit is connected to a broadband home network, the player will inform you about the update as follows. Option 1: 1. The update menu will appear on the screen when you turn off the player. 2.
Appendix 59 4. If newer version exists, the message “Do you want to download it?” appears. 5. Select [OK] to start update. (Selecting [Cancel] will end the update.) 6. The player starts downloading the newest update from the server. (Downloading will takes several minutes depending on your home network condition) 7. When downloading is completed, the message, “Download is complete. Do you want to update?” appears. 8. Select [OK] to start updating.
Appendix Additional Information File requirement Video files File Location File Extension Disc, USB “.avi”, “.mpg”, “.mpeg”, “.mkv”, “.mp4”, “.asf”, “.wmv”, “.m4v” (DRM free), “.vob”, “.3gp”, “.mov”, “.trp”, “.m2t”, “.mpe”, “.m1v”, “.m2v”, “.wm”, ”.flv”, “.ts”, “.dat” DIVX3.11, DIVX4, DIVX5, DIVX6, (standard playback only) XVID, MPEG1 SS, H.264/ MPEG-4 AVC, MPEG2 PS, MPEG2 TS, VC-1 SM (WMV3) Dolby Digital, DTS, MP3, WMA, AAC, AC3 SubRip (.srt / .txt), SAMI (.smi), SubStation Alpha (.ssa/.
Appendix ,,Note yy The file name is limited to 180 characters. yy Maximum files/Folder: Less than 2000 (total number of files and folders) ,,Note yy A “avi” file which is encoded “WMV 9 codec” is not supported. yy Depending on the size and number of the files, it may take several minutes to read the content on the media. yy This player supports UTF-8 files even it contains Unicode subtitle content. This player can not support the pure Unicode subtitle files.
Appendix About DLNA Compatibility notes This Player is a DLNA Certified digital media player that can display and play video, photo and audio content from your DLNA-compatible digital media server (PC and Consumer Electronics). yy Because BD-ROM is a new format, certain disc, digital connection and other compatibility issues are possible. If you experience compatibility problems, please contact an authorized Customer Service Center.
Appendix 63 Audio Output Specifications OPTICAL (DIGITAL AUDIO OUT) *3 Jack/Setting Source PCM Stereo DTS Re-encode *4 BitStream Dolby Digital PCM 2ch DTS Dolby Digital Dolby Digital Plus PCM 2ch DTS Dolby Digital Dolby TrueHD PCM 2ch DTS 2ch Dolby Digital AAC PCM 2ch DTS AAC DTS PCM 2ch DTS DTS DTS-HD PCM 2ch DTS DTS Linear PCM 2ch PCM 2ch DTS PCM 2ch Linear PCM 5.1ch PCM 2ch DTS PCM 2ch Linear PCM 7.
Appendix yy The audio is outputted as PCM 48 kHz/16 bit for MP3/WMA file and PCM 44.1kHz/16 bit for Audio CD during playback. yy You must select a digital audio output and a maximum sampling frequency that your Amplifier (or AV receiver) accepts using [Digital Output] and [Sampling Freq.] options on the [Settings] menu (page 27). yy With digital audio connection (DIGITAL AUDIO OUT or HDMI OUT), Disc Menu button sounds of BD-ROM may not be heard if the [Digital Output] option is set to [BitStream].
Appendix 65 Area Code List Choose an area code from this list.
Appendix Language Code List Use this list to input your desired language for the following initial settings: [Disc Audio], [Disc Subtitle] and [Disc Menu].
Appendix 67 Trademarks and Licenses Blu-ray Disc™, Blu-ray™, Blu-ray 3D™, BD-Live™, BONUSVIEW™ and the logos are trademarks of the Blu-ray Disc Association. “DVD Logo” is a trademark of DVD Format/Logo Licensing Corporation. Java is a trademark of Oracle and/or its affiliates. “x.v.Colour” is a trademark of Sony Corporation. Manufactured under license from Dolby Laboratories. Dolby and the double-D symbol are trademarks of Dolby Laboratories.
Appendix Gracenote®, Gracenote logo and logotype, and the “Powered by Gracenote” logo are either registered trademarks or trademarks of Gracenote, Inc. in the United States and/or other countries. Music recognition technology and related data are provided by Gracenote®. Portions of the content is copyright © Gracenote or its providers. Gracenote® End User License Agreement This application or device contains software from Gracenote, Inc. of Emeryville, California (“Gracenote”).
Appendix 69 Cinavia Notice This product uses Cinavia technology to limit the use of unauthorized copies of some commerciallyproduced film and videos and their soundtracks. When a prohibited use of an unauthorized copy is detected, a message will be displayed and playback or copying will be interrupted. More information about Cinavia technology is provided at the Cinavia Online Consumer Information Center at http://www.cinavia.com.
Appendix Specifications General Power requirements Refer to main label on the rear panel. Power consumption 16 W Dimensions (W x H x D) Approx. 430 mm x 37.5 mm x 203 mm Net Weight (Approx.) 1.
Appendix Maintenance 71 Notes on discs Handling discs Handling the unit When shipping the unit Please save the original shipping carton and packing materials. If you need to ship the unit, for maximum protection, re-pack the unit as it was originally packed at the factory. Cleaning the unit To clean the player, use a soft, dry cloth. If the surfaces are extremely dirty, use a soft cloth lightly moistened with a mild detergent solution.
Appendix Important Information Relating to Network Services All information, data, documents, communications, downloads, files, text, images, photographs, graphics, videos, webcasts, publications, tools, resources, software, code, programs, applets, widgets, applications, products and other content (“Content”) and all services and offerings (“Services”) provided or made available by or through any third party (each a “Service Provider”) is the sole responsibility of the Service Provider from whom it ori