
Lenovo H520e Hardware Maintenance Manual

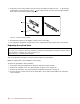


6.Connectoneendofthesignalcabletotherearofthenewopticaldriveandtheotherendtoanavailable
SATAconnectoronthesystemboard.See“Locatingpartsonthesystemboard”onpage67.Then,
locateanavailablefive-wirepowerconnectorandconnectittotherearofthenewopticaldrive.
Figure19.Connectingtheopticaldrive
7.Tocompletetheinstallationorreplacement,goto“Completingthepartsreplacement”onpage90.
Replacingtheheatsinkandfanassembly
Attention:
Donotopenyourcomputerorattemptanyrepairbeforereadingandunderstandingthe“Importantsafetyinformation”
intheUserGuide.ToobtainacopyoftheUserGuide,goto:
http://www.lenovo.com/ThinkCentreUserGuides
Thissectionprovidesinstructionsonhowtoreplacetheheatsinkandfanassembly.
DANGER
Attention/Caution/Dangericon,warningusersandservicersofahotsurfacenearbyTheheatsink
andfanassemblymightbeveryhot.Turnoffthecomputerandwaitthreetofiveminutestoletthe
computercoolbeforeremovingthecomputercover.
Toreplacetheheatsinkandfanassembly,dothefollowing:
1.Turnoffthecomputeranddisconnectallpowercordsfromelectricaloutlets.
2.Removethecomputercover.See“Removingthecomputercover”onpage70.
3.Laythecomputeronitssideforeasieraccesstothesystemboard.
4.Locatetheheatsinkandfanassembly.See“LocatingmajorFRUsandCRUs”onpage66.
5.Disconnecttheheatsinkandfanassemblycablefromthemicroprocessorfanconnectoronthesystem
board.See“Locatingpartsonthesystemboard”onpage67.
80LenovoH520eHardwareMaintenanceManual