User manual
Table Of Contents
- Important safety information
- Service and upgrades
- Static electricity prevention
- Power cords and power adapters
- Extension cords and related devices
- Plugs and outlets
- External devices
- Heat and product ventilation
- Operating environment
- Laser compliance statement
- Power supply statement
- Cleaning and maintenance
- Tip-over hazard prevention notice
- Chapter 1. Product overview
- Chapter 2. Using your computer
- Chapter 3. You and your computer
- Chapter 4. Security
- Chapter 5. Installing or replacing hardware
- Handling static-sensitive devices
- Installing or replacing hardware
- Installing external options
- Installing the monitor stand
- Removing the computer cover
- Removing and reinstalling the frame foot
- Removing and reinstalling the rear I/O assembly
- Installing or replacing a memory module
- Replacing the hard disk drive
- Replacing the optical drive
- Replacing the converter board
- Replacing the heat sink
- Replacing the microprocessor
- Replacing the internal speakers
- Replacing the thermal sensor
- Replacing the integrated camera
- Replacing the Wi-Fi card
- Replacing the ambient light sensor
- Replacing the card reader
- Replacing the ExpressCard
- Replacing the heat sink and fan assembly for GPU
- Replacing the rear PS/2 connectors and serial port assembly
- Replacing the mouse
- Replacing the keyboard
- Completing the parts replacement
- Chapter 6. Recovery information
- Chapter 7. Using the Setup Utility program
- Chapter 8. Updating system programs
- Chapter 9. Preventing problems
- Chapter 10. Troubleshooting and diagnostics
- Chapter 11. Getting information, help, and service
- Appendix A. Notices
- Appendix B. Regulatory information
- Appendix C. WEEE and recycling information
- Appendix D. Restriction of Hazardous Substances Directive (RoHS)
- Appendix E. China Energy Label
- Appendix F. ENERGY STAR model information
- Index

3.Disconnectthepowercords,Input/Outputcables,andanyothercablesthatareconnectedtothe
computer.See“Locatingconnectors,controls,andindicatorsonthefrontofyourcomputer”onpage
10
and“Locatingconnectorsontherearofyourcomputer”onpage13.
4.Removeanylockingdevicethatsecuresthecomputercover,suchasanaKensington-stylecablelock.
See“AttachingaKensington-stylecablelock”onpage36.
5.Placeasoft,cleantowelorclothonthedeskorsurface.Holdthesidesofyourcomputerandgentlylay
itdownsothatthescreenisagainstthesurfaceandthecoverisfacingup.
6.Removetheframestand.See“Installingthemonitorstand”onpage40.
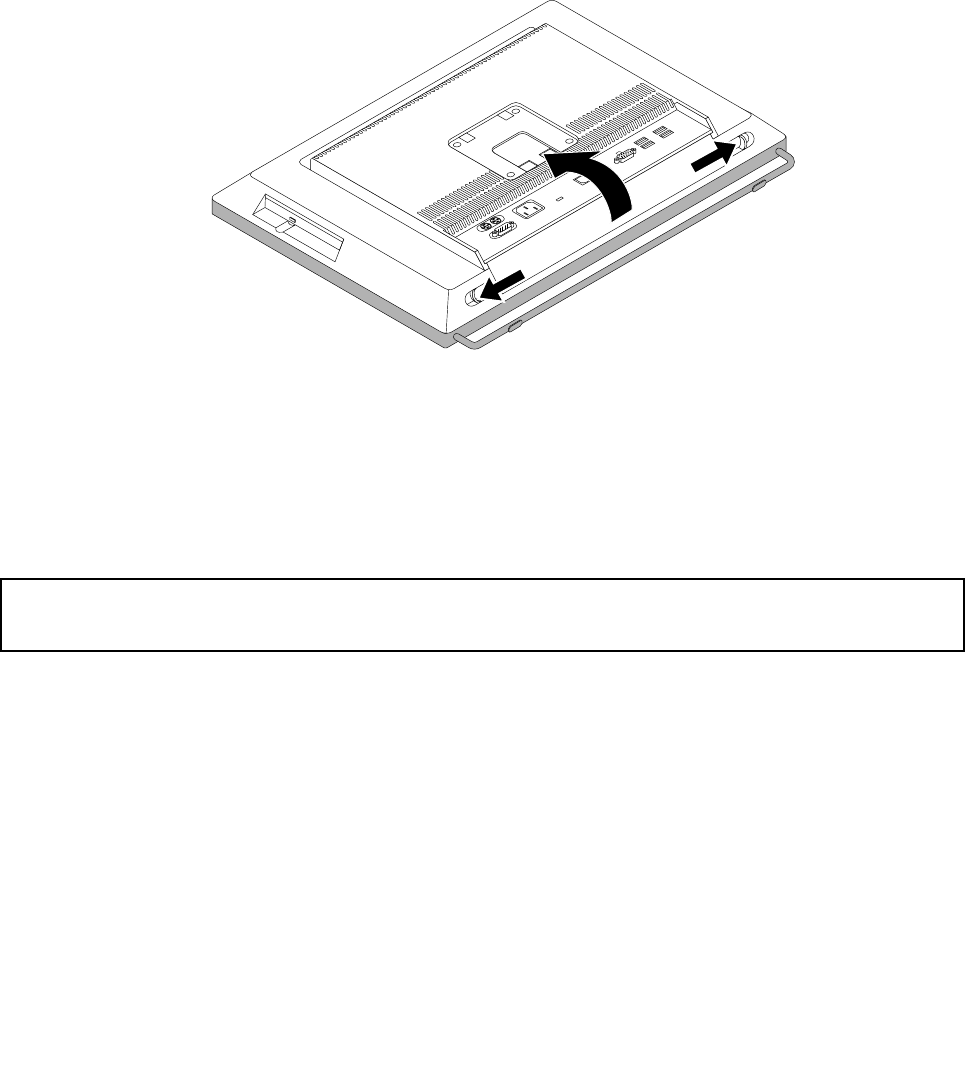
7.Pressthetwocover-releasebuttonsonthecomputercoverasshown,slidethecomputercovertoward
thetopofthecomputer,andthenliftthecomputercoveruptoremoveitfromthechassis.
Figure14.Removingthecomputercover
Whattodonext:
•Toworkwithanotherpieceofhardware,gototheappropriatesection.
•Tocompletetheinstallationorreplacement,goto“Completingthepartsreplacement”onpage71.
Removingandreinstallingtheframefoot
Attention:
Donotopenyourcomputerorattemptanyrepairbeforereadingandunderstanding“Importantsafetyinformation”
onpagev.
Thissectionprovidesinstructionsonhowtoremoveandreinstalltheframefoot.
Note:Theframefootisavailableonlyinsomemodels.
Toremoveandreinstalltheframefoot,dothefollowing:
1.Removeallmediafromthedrivesandturnoffallattacheddevicesandthecomputer.Then,disconnect
allpowercordsfromelectricaloutletsanddisconnectallcablesthatareconnectedtothecomputer.
2.Placeasoft,cleantowelorclothonthedeskorsurface.Holdthesidesofyourcomputerandgentlylay
itdownsothatthescreenisagainstthesurfaceandthecoverisfacingup.
3.Removetheframestand.See“Installingthemonitorstand”onpage40.
4.Removethecomputercover.See“Removingthecomputercover”onpage42.
5.Locatetheframefoot.See“Locatingcomponents”onpage15.
Chapter5.Installingorreplacinghardware43


