
Specifications


4.Pivotthedrivebayassemblyupward.See“Accessingthesystemboardcomponentsanddrives”on
page126.
5.DisconnectthefrontaudioandUSBassemblycablesfromthesystemboard.See“Locatingpartson
thesystemboard”onpage79.
Note:Ensureyounotethelocationsofthecableswhenyoudisconnectthecablesfromthesystem
board.
6.Lowerthedrivebayassembly.See“Accessingthesystemboardcomponentsanddrives”onpage126.
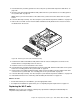
7.RemovethescrewthatsecuresthefrontaudioandUSBassemblybrackettothechassistoremove
thebracketfromthechassis.
Figure108.RemovingthefrontaudioandUSBassembly
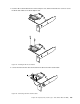
8.InstallthefrontaudioandUSBassemblybracketintothechassisandalignthescrewholeinthe
bracketwiththecorrespondingholeinthechassis.
9.Installthescrewtosecurethebrackettothechassis.
10.PivotthedrivebayassemblyupwardandreconnectthefrontUSBandfrontaudiocablestothesystem
board.See“Locatingpartsonthesystemboard”onpage79.
11.ReconnectthefrontaudioandUSBassemblycablestothefrontaudioconnectorandthefrontUSB
connectoronthesystemboard.See“Locatingpartsonthesystemboard”onpage79.
12.Lowerthedrivebayassembly.See“Accessingthesystemboardcomponentsanddrives”onpage126.
13.Reinstallthefrontbezel.See“Removingandreinstallingthefrontbezel”onpage124.
Whattodonext:
•Toworkwithanotherpieceofhardware,gototheappropriatesection.
•Tocompletetheinstallationorreplacement,goto“Completingthepartsreplacement”onpage171.
ReplacingtheWi-Fiunits
Attention:Donotopenyourcomputerorattemptanyrepairbeforereadingandunderstandingthe
“Importantsafetyinformation”onpage1
.
Chapter10.ReplacingFRUs(machinetypes:10AU,10AW,10BF,and10BG)161