
Specifications


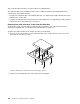


11.Connectoneendofthesignalcabletotherearofthenewopticaldriveandtheotherendtoanavailable
SATAconnectoronthesystemboard.See“Locatingpartsonthesystemboard”onpage79.Then,
locateanavailablefive-wirepowerconnectorandconnectittotherearofthenewopticaldrive.
Figure80.Connectingtheopticaldrive
12.Lowerthedrivebayassembly.
Whattodonext:
•Toworkwithanotherpieceofhardware,gototheappropriatesection.
•Tocompletetheinstallationorreplacement,goto“Completingthepartsreplacement”onpage171.
Replacingtheslimcardreader
Attention:Donotopenyourcomputerorattemptanyrepairbeforereadingandunderstanding“Important
safetyinformation”onpage1.
Thissectionprovidesinstructionsonhowtoreplacetheslimcardreader.
Note:Theslimcardreaderisonlyavailableinsomemodels.
Toreplacetheslimcardreader,dothefollowing:
1.Removeallmediafromthedrivesandturnoffallattacheddevicesandthecomputer.Then,disconnect
allpowercordsfromelectricaloutletsanddisconnectallcablesthatareconnectedtothecomputer.
2.Removethecomputercover.See“Removingthecomputercover”onpage124.
3.Removethefrontbezel.See“Removingandreinstallingthefrontbezel”onpage124.
4.Recordthecableroutingoftheinstalledslimcardreaderanddisconnectthecableoftheslimcard
readerfromthesystemboard.
5.Removethescrewthatsecurestheslimcardreaderbracketandthenremovethebracketfromthe
chassis.
Chapter10.ReplacingFRUs(machinetypes:10AU,10AW,10BF,and10BG)137