
User Guide


Checking the oil pumps for wear
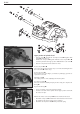
– Place inner and outer rotors into the engine casing such that the marks
are adjacent to one another.
– Now, carry out the following wear measurements with a feeler
gauge
B:
outer rotor - oil pump housing: max. 0.20 mm (0.0078 in)
outer rotor - inner rotor: max. 0.20 mm (0.0078 in)
5-9C
A
Checking the piston
– Replace the piston in the case of excessive oil consumption or grooves
in the piston skirt.
– If reinstalling the old piston perform the following steps:
1. Piston bearing surface - check for damage.
2. Piston ring grooves - the piston rings must move easily in the groove.
Old piston rings or sandpaper (400 grit) may be used to clean the
piston ring grooves.
3. Piston rings - check for damage and end gap (see below).
Mount the oil scraper ring with the labeling "TOP" facing upwards.
Mount the rectangular ring with the labeling "O" facing upwards.
4. Piston pin: If the piston pin is heavily discolored or has score marks it
must be replaced. Also insert the piston pin into conrod and check its
bearing for play.
NOTE: When in place, the piston pin may not have any play. It must be
possible to shift it with slight counterpressure.
Piston ring end gap
– Insert piston ring into the cylinder and adjust. Piston ring must be
approx. 10 mm (0.4 in) from top of cylinder.
– The end gap can now be checked which a feeler gauge
A.
Compression rings: max. 0.80 mm (0.0315 in)
Oil scraper ring: max. 1.00 mm (0.0393 in)
If the end gap is larger, check piston and cylinder for wear. If piston and
cylinder wear are within the permitted tolerance limits, replace the piston
ring.
B
B