
Installation Guide


Instale el surtidor (cont.)
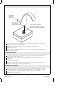
Presione el botón tapón en la parte posterior del surtidor. El tapón botón debe
estar al ras de la superficie del surtidor.
4. Install the Handles
Remove the plaster guards.
Measure the distance from the top of the valve stem to the finished surface.
For a valve stem height between 1-13/16″ (4.6 cm) and 2-1/8″ (5.4 cm) use a brass
spline adapter and screw. For a valve stem height between 2-1/8″ (5.4 cm) and
2-5/16″ (5.9 cm) use a plastic spline adapter.
If the brass spline adapter is required, attach using the screw supplied. The plastic
spline adapter slides on with no attachment.
Position the handle assemblies facing in opposite directions away from the spout.
NOTE: The spline adapter allows fine adjustment of the handle alignment. To adjust,
remove the handle and reposition the spline adapter.
Align the handle.
Reinstall the handle and check alignment.
Installation Checkout
With the handles in the closed position, turn on the main water supply.
Check for leaks. Adjust as needed.
Handle/Poignée/Manija
Screw/Vis/Tornillo
Apply plumbers putty.
Appliquer du mastic de plombier.
Aplique masilla de plomería.
Brass Spline Adapter
Adaptateur à cannelures en laiton
Adaptador de ranuras de latón
Plastic Spline Adapter
Adaptateur à cannelures en plastique
Adaptador de ranuras de plástico
Valve Stem
Tige de valve
Espiga de la válvula
Height Measurement
Hauteur
Medida de la altura
Finished Surface
Surface finie
Superficie acabada
Cold
Froid
Fría
Hot
Chaud
Caliente
Handle Orientation
Orientation de la poignée
Orientación de la manija
Kohler Co. 7 1158791-2-B