Homeowners Guide Wall-Hung Toilet with Cleansing Seat K-5402 Français, page ″Français-1″ Español, página ″Español-1″ 1247364-5-B
IMPORTANT SAFEGUARDS When using electrical products, especially when children are present, basic safety precautions should always be followed, including the following: READ ALL INSTRUCTIONS BEFORE USING DANGER: Risk of electric shock. Connect only to a circuit protected by a Ground-Fault Circuit-Interrupter (GFCI)*. WARNING: Risk of personal injury. UV light emitted from this light can cause injury to skin or eyes. Avoid exposure to unshielded lamp. WARNING: Risk of personal injury.
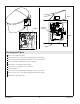
Rear Wash Dual Flush Actuator Power Low Light Sensor Spray Wand Front Wash Night Light Side Control Panel Seat Sensor Area Manual Operation NOTE: When the cleansing wash features are activated from the side control panel, they will default to the middle temperature, pressure, and wand position settings. ″rear″ - Press the icon to activate rear wash. Press again to stop rear wash. ″dryer″ - Press the icon to activate the dryer. Press again to stop the dryer.
Docking Station Side Control Panel Power Button Remote Control – Setup NOTE: The remote control must be charged to operate. The ″Stop″ icon will blink when the remote needs to be charged. Charging the Remote Verify that the docking station has batteries installed. Refer to the ″Replacing the Batteries″ section. Place the remote control on docking station. The remote is fully charged when the ″Stop″ icon stops blinking.
Docking Station Power Button Remote Control – General Features IMPORTANT! To activate features using the remote control, the remote must be paired with the toilet. Refer to the ″Remote Control – Setup″ section. Power - Press the power button to turn the remote control on or off. Seat Cover - With the seat unoccupied, press this ″Cover″ icon to open or close the cover. Seat - With the seat unoccupied, press the ″Seat″ icon to open or close the seat.
Remote Control – Cleansing Features IMPORTANT! To activate features using the remote control, the remote must be paired with the toilet. Refer to the ″Remote Control – Setup″ section. NOTE: Water temperature, water pressure, wand position, and massage action are adjustable while the front or rear wash is in use. The dots to the left of the icons indicate the current setting. Front Wash - Press the ″Front″ icon to activate water spray from the front of the wand.
Side Control Panel Enable/Disable Automatic Features NOTE: Automatic features come enabled from the factory. Cover Open/Close When enabled, the seat cover automatically opens when the toilet is approached. The seat and seat cover will automatically close 3 minutes after the toilet has been used. Press and hold the ″lighting″ icon on the side control panel until the night light blinks three times. Press the ″Cover″ icon on the remote control.
Enable/Disable Automatic Features (cont.) Press the ″Seat temp″ icon on the remote control. The night light blinks once quickly when the feature is enabled, or blinks slowly when disabled. UV Disinfection When enabled, ultra violet rays and water sterilize the spray wand daily. This feature only operates when the seat is closed. Press and hold the ″lighting″ icon on the side control panel until the night light blinks three times. Press the ″UV″ icon on the remote control.
Spray Wand Servicing the Wand and Deodorizer Cleaning the Spray Wand On the remote control, press and hold the ″Wand″ icon to extend the wand forward. Clean the spray wand with a soft-bristled brush and hot water. Press and hold the ″Wand″ or ″Stop″ icon to retract the wand. Cleaning or Replacing the Deodorizer Remove the filter cover. Remove the filter from the housing and inspect it for damage. If the filter is damaged, replace it. If the filter is clogged, remove all debris. Install the filter.
Filter Internal Switch Handle Filter Servicing the Filters Remove the right side panel. Turn off the power to the toilet by flipping the internal switch. Turn off the water by turning the handle to the closed position. Remove the filters and inspect them for damage. If the filters are damaged, replace them. If the filters are clogged, remove all debris. Install the filters. Turn on the water by turning the handle to the open position. Turn on the power to the toilet by flipping the internal switch.
Back of Docking Station Replacing the Batteries NOTE: The red light on the docking station will blink when the batteries are low. The ″Stop″ icon on the remote control will blink when it has a low charge and should be returned to the docking station. If the remote control is secured to the docking station, remove it and set aside. Remove the docking station from the wall by carefully lifting up and out. Open the back compartment on the docking station by pushing both tabs outward at the same time.
Troubleshooting (cont.) General Symptoms 4. 5. 6. 7. 8. The heated seat is not working. Water stops flowing from the spray wand before cleansing is complete. The deodorizer is not working. The UV disinfection feature is not working. The toilet does not flush automatically. Probable Causes B. The inlet hose from the water supply stop to the toilet is kinked or looped too tight. C. The sensor does not detect the user. D. The filters are blocked or damaged. A. The heated seat is not enabled. B.
Remote Control Compliance FCC ID: N82-KOHLER015, N82-KOHLER018 IFT: Certification Number RCPKO1215-2233 and RCPKO1215-2234. This device complies with Part 15 of the FCC Rules. Operation is subject to the following two conditions: 1. This device may not cause harmful interference, and 2. This device must accept any interference received, including interference that may cause undesired operation.
Warranty (cont.) part or product, or make appropriate adjustment where Kohler Co.’s inspection discloses any such defect. Damage caused by accident, misuse, or abuse is not covered by this warranty. Improper care and cleaning will void the warranty*. Proof of purchase (original sales receipt) must be provided to Kohler Co. with all warranty claims. Kohler Co. is not responsible for labor charges, installation, or other incidental or consequential costs other than those noted above.
Guide du propriétaire Toilette fixée au mur avec siège de nettoyage MESURES DE SÉCURITÉ IMPORTANTES Lors de l’utilisation de produits électriques, et en particulier en présence d’enfants, toujours observer les mesures de sécurité fondamentales, notamment: LIRE TOUTES LES INSTRUCTIONS AVANT UTILISATION DANGER: Risque de choc électrique. Raccorder uniquement à un circuit protégé par un disjoncteur de fuite de terre (GFCI)*. AVERTISSEMENT: Risque de blessures.
MESURES DE SÉCURITÉ IMPORTANTES (cont.) Ne pas utiliser ce dispositif à l’extérieur et ne pas le faire fonctionner en présence de produits aérosols ou si l’on administre de l’oxygène. Ce produit doit être connecté à un système de câblage métallique permanent et mis à la terre, ou un conducteur de mise à la terre de l’équipement doit être acheminé avec les conducteurs du circuit et connecté à la borne ou au fil de mise à la terre de l’équipement sur le produit.
Lavage arrière Actionneur de chasse double Mise en marche/arrêt Capteur d'éclairage faible Baguette de vaporisation Lavage avant Veilleuse Panneau de commande latéral Zone de capteur de siège Fonctionnement manuel REMARQUE: Lorsque les fonctions de nettoyage et de lavage sont activées à partir du panneau de commande latéral, elles se mettent par défaut aux réglages moyens de température, de pression et de position de baguette. ″rear″ (arrière) - Appuyer sur l’icône pour activer le lavage arrière.
Station d'accueil Bouton Marche/Arrêt Panneau de commande latéral Télécommande – Configuration REMARQUE: La télécommande doit être chargée pour fonctionner. L’icône ″Stop″ clignotera lorsque la télécommande doit être chargée. Chargement de la télécommande Vérifier que des piles ont été installées dans la station d’accueil. Se référer à la section ″Remplacer les piles″. Placer la télécommande sur la station d’accueil. La télécommande est entièrement chargée lorsque l’icône ″Stop″ s’arrête de clignoter.
Station d'accueil Bouton Marche/Arrêt Télécommande – Fonctions générales IMPORTANT! La télécommande doit être appariée avec la toilette pour que les fonctions puissent être activées à l’aide de la télécommande. Se référer à la section ″Télécommande – Configuration″. Marche/Arrêt - Appuyer sur le bouton Marche/Arrêt pour activer ou désactiver la télécommande. Couvercle de siège - Avec le siège non occupé, Appuyer sur l’icône ″Cover″ pour ouvrir ou fermer le couvercle.
Télécommande – Fonctions de nettoyage IMPORTANT! La télécommande doit être appariée avec la toilette pour que les fonctions puissent être activées à l’aide de la télécommande. Se référer à la section ″Télécommande – Configuration″. REMARQUE: La température de l’eau, la pression de l’eau, la position de la baguette, et l’action de massage sont réglables pendant que le lavage avant ou arrière est en cours d’utilisation. Les points situés à gauche des icônes indiquent le réglage actuel.
Panneau de commande latéral Fonctions d’activation/de désactivation automatiques REMARQUE: Les fonctions automatiques sont activées au départ d’usine. Ouverture/Fermeture de couvercle Si cette fonction est activée, le couvercle du siège s’ouvre automatiquement lorsque l’on s’approche de la toilette. Le siège et le couvercle de siège se ferment automatiquement 3 minutes après utilisation de la toilette.
Fonctions d’activation/de désactivation automatiques (cont.) La veilleuse clignote une fois rapidement lorsque la fonction est activée, ou elle clignote lentement lorsque la fonction est désactivée. Mode d’économie d’énergie Lorsque ce mode est activé, la toilette conserve de l’énergie en réduisant la température du siège chauffé lorsque la toilette n’est pas utilisée. Appuyer et continuer à appuyer sur l’icône ″lighting″ sur le panneau de commande latéral jusqu’à ce que la veilleuse clignote trois fois.
Baguette de vaporisation Entretien de la baguette et du désodorisant Nettoyage de la baguette de vaporisation Sur la télécommande, appuyer et continuer à appuyer sur l’icône ″Wand″ pour prolonger la baguette vers l’avant. Nettoyer la baguette de vaporisation avec une brosse à poils doux et de l’eau chaude. Appuyer et continuer à appuyer sur l’icône ″Wand″ ou ″Stop″ pour rétracter la baguette. Nettoyage ou remplacement du désodorisant Retirer le couvercle du filtre.
Filtre Poignée Interrupteur interne Filtre Entretien des filtres Retirer le panneau latéral droit. Couper l’alimentation électrique à la toilette en basculant l’interrupteur interne. Couper l’eau en tournant la poignée en position fermée. Retirer les filtres et les inspecter pour y rechercher des dommages. Si les filtres sont endommagés, les remplacer. Si les filtres sont obstrués, retirer tous les débris. Installer les filtres. Ouvrir l’eau en tournant la poignée en position ouverte.
Arrière de la station d'accueil Remplacement des piles REMARQUE: Le voyant rouge de la station d’accueil clignotera lorsque les piles sont faibles. L’icône ″Stop″ de la télécommande clignotera lorsque sa charge est basse et si elle doit être retournée à la station d’accueil. Si la télécommande est sécurisée sur la station d’accueil, la retirer et la mettre de côté. Retirer la station d’accueil du mur en la levant avec précaution pour la faire sortir.
Dépannage (cont.) Généralités Symptômes 3. L’eau ne sort pas de la baguette ou le jet est faible lorsqu’il est activé. Causes probables A. Le robinet d’arrêt d’alimentation en eau est fermé ou est seulement ouvert partiellement. B. Le tuyau d’arrivée en provenance du robinet d’arrêt d’alimentation en eau vers la toilette est déformé ou enroulé de manière trop serrée. C. Le capteur ne détecte pas l’utilisateur. D. 4. Le siège chauffé ne fonctionne pas. A. B. 5. 6. 7. 8.
Dépannage (cont.) Télécommande Symptômes 2. La télécommande ne se connecte pas à la toilette. Causes probables A. La télécommande est trop éloignée de la toilette pour recevoir un signal. A. La télécommande n’est pas appariée avec la toilette. Action recommandée A. Amener la télécommande plus près de la toilette pour regagner la connexion. B. Apparier la télécommande à la toilette. Se référer à la section ″Télécommande – Configuration″.
Conformité de la télécommande (cont.) Cet émetteur et son antenne sont conformes aux limites d’exposition RF d’Industrie Canada pour le public général/l’exposition non contrôlée. Cet appareillage numérique de classe B est conforme à la norme canadienne NMB-003. Garantie Garantie limitée de trois ans de la toilette intelligente et du siège de nettoyage C3 de KOHLER Kohler Co.
Guía del propietario Inodoro de montaje a la pared con asiento de limpieza Advertencias importantes de seguridad Al emplear productos eléctricos, en especial cuando haya niños presentes, siempre cumpla las precauciones básicas de seguridad, incluidas las siguientes: LEA TODAS LAS INSTRUCCIONES ANTES DE USAR PELIGRO: Riesgo de sacudidas eléctricas. Conecte solo a un circuito protegido por un interruptor de circuito con pérdida a tierra (GFCI)*. ADVERTENCIA: Riesgo de lesiones personales.
Advertencias importantes de seguridad (cont.) No lo utilice a la intemperie ni en lugares en los que se empleen aerosoles o en los que se administre oxígeno. Este producto debe conectarse a un sistema de cableado permanente, metálico, con conexión a tierra, o se debe tender un conductor de conexión a tierra de equipo con los conductores de circuito y conectarse al terminal o al cable conductor de tierra del equipo en el producto.
Lavado posterior Accionador de descarga doble Encendido/ Apagado Sensor de poca luz Varilla de rociado Lavado frontal Luz nocturna Panel lateral de control Área del sensor del asiento Funcionamiento manual NOTA: Cuando se activan las funciones de limpieza por medio del panel lateral, quedan por diseño en las selecciones intermedias de temperatura, presión y posición de varilla. ″rear″ (posterior) - Oprima el icono para activar el lavado posterior. Oprímalo de nuevo para detener el lavado posterior.
Estación de conexión Botón de encendido Panel lateral de control Configuración del control remoto NOTA: El control remoto debe estar cargado para que pueda funcionar. El icono de paro, ″Stop″, parpadea cuando el control remoto debe ser cargado. Carga del control remoto Verifique que la estación de conexión tenga instaladas las pilas. Consulte la sección ″Cambio de pilas″. Coloque el control remoto en la estación de conexión.
Estación de conexión Botón de encendido Características generales del control remoto ¡IMPORTANTE! Para activar funciones por medio del control remoto, este debe estar vinculado al inodoro. Consulte la sección ″Configuración del control remoto″. Encendido - Oprima el botón de encendido para encender y apagar el control remoto. Tapa del asiento - Cuando el asiento esté desocupado, oprima este icono de tapa, ″Cover″, para abrir o cerrar la tapa.
Funciones de limpieza del control remoto ¡IMPORTANTE! Para activar funciones por medio del control remoto, este debe estar vinculado al inodoro. Consulte la sección ″Configuración del control remoto″. NOTA: La temperatura del agua, la presión del agua, la posición de la varilla, y el masaje son ajustables mientras el lavado posterior está en uso. Los puntos a la izquierda de los iconos indican la selección actual.
Panel lateral de control Habilitar/Inhabilitar funciones automáticas NOTA: Las funciones automáticas vienen habilitadas de fábrica. Abrir y cerrar la tapa Cuando esta función está habilitada, la tapa del asiento se abre en forma automática cuando alguien se acerca al inodoro. El asiento y la tapa del asiento se cierran automáticamente 3 minutos después de que se ha usado el inodoro.
Habilitar/Inhabilitar funciones automáticas (cont.) La luz nocturna parpadea una vez rápidamente cuando la función está habilitada, o lentamente cuando está inhabilitada. Modo de ahorro de energía Cuando esta función está habilitada, el inodoro conserva energía al reducir la temperatura del asiento cuando el inodoro no está en uso. Oprima y sostenga oprimido el icono de iluminación, ″lighting″, en el panel lateral de control hasta que la luz nocturna parpadee tres veces.
Varilla de rociado Servicio a la varilla y al desodorizante Limpieza de la varilla de rociado En el control remoto, oprima y sostenga oprimido el icono de varilla ″Wand″ para extender la varilla hacia adelante. Limpie la varilla de rociado con un cepillo de cerdas suaves y agua caliente. Oprima y sostenga oprimido el icono de varilla ″Wand″ o el de parar ″Stop″ para retraer la varilla. Limpieza o cambio del desodorizante Retire la tapa del filtro.
Filtro Manija Interruptor interno Filtro Dé servicio a los filtros Retire el panel lateral derecho. Cambie de posición el interruptor interno para apagar el suministro eléctrico al inodoro. Gire la manija a la posición cerrada para cerrar el suministro de agua. Retire los filtros y verifique que no estén dañados. Si los filtros están dañados, cámbielos. Si los filtros están tapados, retire todos los desperdicios. Instale los filtros. Gire la manija a la posición abierta para abrir el suministro de agua.
Parte posterior de la estación de conexión Cambio de pilas NOTA: La luz roja en la estación de conexión parpadea cuando las pilas están bajas. El icono de paro, ″Stop″, en el control remoto parpadea cuando las pilas están bajas y debe ser devuelto a la estación de conexión. Si el control remoto está fijo en la estación de conexión, retírelo y colóquelo a un lado. Retire la estación de conexión de la pared levantándola hacia arriba y hacia fuera con cuidado.
Resolución de problemas (cont.) General Síntomas 2. El inodoro tiene suministro eléctrico, pero no descarga. 3. No sale agua de la varilla o el flujo es muy débil cuando se activa. 4. La función de calefacción del asiento no está funcionando. Causas probables A. No fluye agua al inodoro. Acción recomendada A. Abra por completo la llave de paso del agua. A. La llave de paso de suministro de agua está cerrada o solo parcialmente abierta. B.
Resolución de problemas (cont.) Control remoto Síntomas 1. El control remoto no enciende. 2. El control remoto no está conectando con el inodoro. Causas probables A. Las pilas no están bien instaladas. B. Las pilas no tienen carga. A. El control remoto está demasiado lejos del inodoro para recibir una señal. B. El control remoto no está vinculado al inodoro. Acción recomendada A. Vuelva a instalar las pilas. Consulte la sección ″Cambio de pilas″. B. Cambie las pilas.
Conformidad del control remoto (cont.) 2. Este equipo debe aceptar cualquier interferencia, incluida la interferencia que pueda causar funcionamiento no deseado. Este transmisor con su antena cumple con los límites de exposición de radiofrecuencia (RF) de la Industria de Canadá para la exposición no controlada/población general. Este aparato digital Clase B cumple la norma canadiense ICES-003. Garantía Garantía limitada de tres años del asiento de limpieza C3 y del inodoro inteligente KOHLER Kohler Co.
Garantía (cont.) disolventes u otros productos no recomendados para acero inoxidable o para plástico de polipropileno. Esto anula la garantía. Kohler Co.
USA/Canada: 1-800-4KOHLER México: 001-800-456-4537 kohler.com ©2016 Kohler Co.