
Installation Sheet


2. Prepare the Site
CAUTION: Risk of hazardous gases. If the new toilet is not installed immediately, temporarily
place a rag in the closet flange.
NOTE: If the rough-in distance is less than 12″ (305 mm) the seat may strike the wall when it is opened.
Confirm that the rough-in is 12″ (305 mm) before installing the toilet.
Remove the old toilet.
Remove the wax residue from the flange.
NOTE: Do not install the wax ring at this time.
Move the toilet into the installation position.
Confirm that the toilet is properly aligned with the floor flange.
Using the toilet as a template, mark the location of the stud holes.
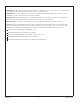
Verify that the supply stop and electrical outlet are located within the supplied dimensions.
Remove the toilet from the temporary position.
Using a 3/16″ bit, drill holes at the marked locations.
For tile installations, drill a relief hole in the tile.
Install the electrical outlet at the location shown.
Floor Flange
Location
Supply Stop
Location
5" (127 mm) Min
7" (178 mm) Max
5-1/2" (140 mm) Min
8" (203 mm) Max
3" (76 mm) Min
6" (152 mm) Max
Centerline
Stud Hole
Location
12"
(305 mm)
3" (76 mm) Min
6" (152 mm) Max
Kohler Co. 5 1357210-2-C