
Installation Guide


3
113425-2-CA (9501)
Kohler Co., Kohler, WI
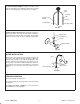
Attach weight and hose.
NOTE: Weight must be installed to act as a pull stop and
to prevent damage to hose from kinking.
For optimal performance, attach weight to hose approxi-
mately 26” from loose end of hose. If desired, the weight
may be moved to adjust the pullout length of the hose.
Carefully tighten weight screw - do not overtighten. Care-
fully bend supply tubes slightly to allow access for hose
connection.
CAUTION: Excessive bending of supply tubes
may cause hose guide to dislodge from inside
threaded shank. If this happens, reinstall hose
guide. Place gasket between faucet fitting and
hose, and begin threading hose onto fitting. To avoid
damage to fitting, use one wrench to hold fitting
stationary while using another wrench to tighten the
hose.
Fig. #4
Weight Screw
Hose
Weight 26”
Supply
Tube
ATTACH VACUUM BREAKER (K-14502-B
and -BP Models Only)
Place insert into top of tee. Thread tee to bottom of check
valve fitting.
NOTE: Tee has a left hand thread.
Fig. #5
Check Valve Fitting
Insert
Tee
Spray
Hose
Left Hand
Thread
Set vacuum breaker into sink hole. Secure from below
with nut. Using thread sealant, thread vacuum breaker
hose to vacuum breaker. Using thread sealant, thread
vacuum breaker hose to tee.
Fig. #6
Nut
Spray
Hose
Insert
Tee
Vacuum
Breaker
Vacuum
Breaker
Hose
ATTACH HOSE
For vacuum breaker models: set the gasket between
the tee and the spray hose. Thread the spray hose into the
tee.
Note: Do not overtighten this connection.
For non-vacuum breaker models: Thread the spray
hose and gasket into the check valve fitting outlet.
Note: Do not overtighten this connection.
Fig. #7
Spray
Hose
Gasket
Turn Clockwise
Until Tight
Hold Flexible
Hose Stationary
Tee
Spray
Hose