
Owner's Manual


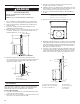


Table Of Contents
- Vent System Safety
- Installation Requirements
- Installation Instructions INTERIOR-MOUNTED VENT MOTOR
- INSTALLATION INSTRUCTIONS EXTERIOR-MOUNTED VENT MOTOR
- VENT SYSTEM USE
- VENT SYSTEM CARE
- Troubleshooting
- Wiring Diagrams
- Assistance or service
- SÉCURITÉ DU SYSTÈME DE VENTILATION
- EXIGENCES D'INSTALLATION
- INSTRUCTIONS D’INSTALLATION VENTILATEUR MONTÉ À L’INTÉRIEUR
- INSTRUCTIONS D’INSTALLATION VENTILATEUR MONTÉ À L’EXTÉRIEUR
- Méthodes d’évacuation
- Installation du conduit d’évacuation
- Achever l’installation
- Installation du ventilateur en ligne (type externe) du système d’extraction par le bas
- Raccordements électriques du système de ventilation en ligne
- Raccordement de l’alimentation électrique au système d’extraction par le bas
- Contrôle du fonctionnement
- UTILISATION DU SYSTÈME D’EXTRACTION
- ENTRETIEN DU SYSTÈME D’ÉVACUATION
- Dépannage
- SCHÉMA DE CÂBLAGE
- ASSISTANCE OU SERVICE

15
5. Install the left and right undercounter mounting brackets to
the vent box. Slide the keyhole slots over the guide tabs and
push the brackets up to set them in place.
6. Drill two pilot holes through each of the undercounter
mounting brackets into the underside of the countertop. Using
two screws (not provided) of the appropriate length, mount the
brackets to the countertop.
IMPORTANT: Select a screw length that will not allow the
screws to go through the countertop when tightened.
7. Check that the downdraft vent is level as shown below.
Loosen the lower support leg screws and position the legs
against the cabinet oor.
8. Fasten the lower support legs to the cabinet oor with
screws (not provided).
9. Tighten the lower support legs screws.
10. Attach the left and right end caps to the vent box. Place the
tab into the mounting slot at each end of the downdraft vent,
as shown, and push down to lock into place.
D
A
B
C
A. Vent box
B. Undercounter mounting bracket
C. Keyhole slots
D. Guide tabs
A
B
C
A. Screws
B. Backsplash
C. Countertop
A
B
A
B
A. Downdraft
B. Level
A
A. Screw (not provided)
A
B
A. End cap tab
B. Mounting slot