UNDERCOUNTER DISHWASHER Use & Care Guide For questions about features, operation/performance, parts accessories or service, call: 1-800-422-1230 In Canada, call for assistance 1-800-461-5681, for installation and service, call: 1-800-807-6777 or visit our website at... www.kitchenaid.com or www.KitchenAid.ca LAVE-VAISSELLE ENCASTRÉ Guide d’utilisation et d’entretien Au Canada, pour assistance composez le 1-800-461-5681, pour installation ou service composez le 1-800-807-6777 ou visitez notre site web à...
TABLE OF CONTENTS DISHWASHER SAFETY.............................................................. 3 Before Using Your Dishwasher....................................................4 PARTS AND FEATURES ............................................................ 5 START-UP GUIDE ..........................................................................6 Using Your New Dishwasher .......................................................6 DISHWASHER LOADING........................................................
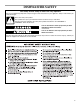
DISHWASHER SAFETY Your safety and the safety of others are very important. We have provided many important safety messages in this manual and on your appliance. Always read and obey all safety messages. This is the safety alert symbol. This symbol alerts you to potential hazards that can kill or hurt you and others. All safety messages will follow the safety alert symbol and either the word “DANGER” or “WARNING.
Before Using Your Dishwasher Tip Over Hazard Do not use dishwasher until completely installed. Do not push down on open door. Doing so can result in serious injury or cuts. Electrical Shock Hazard Electrically ground dishwasher. Connect ground wire to green ground connector in terminal box. Do not use an extension cord. Failure to follow these instructions can result in death, fire, or electrical shock. ■ Install where dishwasher is protected from the elements.
PARTS AND FEATURES 1. 2. 3. 4. 5. Upper spray arm Top rack Model and serial number label Water inlet opening [in tub wall] FLEXI-FOLD DOWN™ flexible tines 6. 4-way HYDRO SWEEP™ spray arm 7. Bottom rack 8. Detergent dispenser 9. Vent system 10. Middle spray arm 11. 12. 13. 14. 15.
7. Push door firmly closed. The door latches automatically. START-UP GUIDE Before using your dishwasher, remove all packaging materials. Read this entire Use and Care Guide. You will find important safety information and useful operating tips. Using Your New Dishwasher NOTE: If the dishwasher is not started before closing the door, the cycle and options will revert to the last cycle and options completed. 1. Scrape large food soil and hard items (toothpicks or bones) from dishes. 2.
Loading Top Rack The top rack is designed for cups, glasses, and smaller items. Many items, up to 9 in. (22 cm), fit in the top rack. (See recommended loading patterns shown.) NOTE: The features on your dishwasher rack may vary from the drawings shown. Loading Bottom Rack The bottom rack is designed for plates, pans, casseroles, and utensils. Many items, up to 13 in. (33 cm) tall, fit in the bottom rack. (See recommended loading patterns shown.
■ Load cookie sheets, cake pans, and other large items at the sides and back. Loading such items in front can keep the water spray from reaching the detergent dispenser. Loading Silverware Basket Load the silverware basket while it is in the bottom rack or take the basket out for loading on a counter or table. NOTE: Unload or remove the basket before unloading the racks to avoid spilling water droplets on the silverware. Mixed load ■ Secure heavily soiled cookware face down in the rack.
How much detergent to use DISHWASHER USE ■ The amount of detergent to use depends on the hardness of your water and the type of detergent. If you use too little, dishes won’t be clean. If you use too much in soft water, glassware will etch. Detergent Dispenser ■ Water hardness can change over a period of time. Find out your water’s hardness by asking your local water department, water softener company, or county extension agent. ■ You can order a water hardness test strip. In the U.S.A.
Rinse Aid Dispenser Dishwasher Efficiency Tips Rinse aids prevent water from forming droplets that can dry as spots or streaks. They also improve drying by allowing water to drain off of the dishes during the final rinse by releasing a small amount of the rinse aid into the rinse water. Your dishwasher is designed to use a liquid rinse aid. Do not use a solid or bar-type. Hot water dissolves and activates the dishwashing detergent.
Cycle Selection Charts Use this rinse cycle for rinsing dishes, glasses, and silverware that will not be washed right Do not use detergent away. with this cycle. Select the wash cycle and options desired. Or press START to repeat the same cycle and options as the previous cycle. NOTE: If the last cycle you completed was a rinse cycle, the dishwasher will run the last full wash cycle and options that you selected when you press Start.
Control Lock Adding Items During a Cycle You can add an item anytime before the main wash starts. Open the door and check the detergent dispenser. If the cover is still closed, you can add items. To add items 1. Carefully open the door slightly to stop the cycle. Wait for the spraying action to stop before opening the door. 2. Open the door. If the detergent dispenser cover is still closed, add the item. 3. Close the door firmly until it latches.
Vent System The vent, located on the top left side of the door, serves several purposes. During the cycle, it closes to lock sound in the dishwasher. After the cycle has finished, the vent remains closed until the dishes have cooled down. Between cycles, the vent stays open for airflow, reducing the buildup of odors. It also helps relieve air pressure, allowing you to close the dishwasher door more easily.
DISHWASHER CARE Cleaning Cleaning the exterior Drain Air Gap Check the drain air gap anytime your dishwasher isn’t draining well. Some state or local plumbing codes require the addition of a drain air gap between a built-in dishwasher and the home drain system. If a drain is clogged, the drain air gap protects your dishwasher from water backing up into it.
TROUBLESHOOTING Dishes are not completely clean ■ Is the dishwasher loaded correctly? Refer to the “Dishwasher Loading” section. First try the solutions suggested here and possibly avoid the cost of a service call... Is the water temperature too low? For best dishwashing results, water should be 120°F (49°C) as it enters the dishwasher. Refer to the “Dishwasher Efficiency Tips” section.
Is the home water pressure high enough for proper dishwasher filling? Home water pressure should be 20 to 120 psi (138 to 828 kPa) for proper dishwasher fill. A booster pump on the water supply can be added if pressure is too low. Dishes do not dry completely ■ Did you load your dishwasher to allow proper water drainage? Do not overload. Refer to the “Dishwasher Loading” section. Use a liquid rinse aid to speed drying. NOTE: To remove spots and film from dishes, try a white vinegar rinse.
ASSISTANCE OR SERVICE Before calling for assistance or service, please check “Troubleshooting.” It may save you the cost of a service call. If you still need help, follow the instructions below. When calling, please know the purchase date and the complete model and serial number of your appliance. This information will help us to better respond to your request. If you need replacement parts If you need to order replacement parts, we recommend that you only use factory specified parts.
KITCHENAID® DISHWASHER WARRANTY ONE-YEAR FULL WARRANTY For one year from the date of purchase, when this dishwasher is operated and maintained according to instructions attached to or furnished with the product, KitchenAid will pay for replacement parts and repair labor to correct defects in materials or workmanship. Service must be provided by a KitchenAid designated service company.
8531131 © 2002. All rights reserved. Tous droits réservés. ® Registered Trademark/TM Trademark of KitchenAid, U.S.A., KitchenAid Canada licensee in Canada ® Marque déposée/TM Marque de commerce de KitchenAid, U.S.A., Emploi licencié par KitchenAid Canada au Canada 6/02 Printed in U.S.A. Imprimé aux É.-U.