Use & Care Guide Electric and Gas Dryers A Note to You........................2 Understanding Dryer Safety ......................3-4 Parts and Features ..............5 Checking Your Vent ............6 Operating Your Dryer ..........8 Starting your dryer ..........8 Selecting the right cycle and temperature setting..9 Loading ..........................10 Automatic cycle ............10 Timed Dry cycle ............11 Air Tumble cycle ............12 Using the drying rack....13 Caring for Your Dryer ........
A Note To You Thank you for buying a KITCHENAID* appliance! KitchenAid designs the best tools for the most important room in your house. To ensure that you enjoy many years of trouble-free operation, we developed this Use and Care Guide. It contains valuable information concerning how to operate and maintain your new appliance properly and safely. Please read it carefully. Also, please complete and mail the enclosed Product Registration Card.
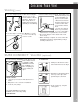
Understanding Dryer Safety Your safety and the safety of others is very important. We have provided many important safety messages in this manual and on your appliance. Always read and obey all safety messages. This is the safety alert symbol. This symbol alerts you to hazards that can kill or hurt you and others. All safety messages will be preceded by the safety alert symbol and the word “DANGER” or “WARNING.
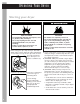
Understanding Dryer Safety IMPORTANT SAFETY INSTRUCTIONS WARNING – To reduce the risk of fire, electric shock, or injury to persons when using the dryer, follow basic precautions, including the following: • Read all instructions before using the dryer. • Do not dry articles that have been previously cleaned in, washed in, soaked in, or spotted with gasoline, dry-cleaning solvents, other flammable, or explosive substances as they give off vapours that could ignite or explode.
Parts and Features This manual covers several different models. The dryer you have purchased may have some or all of the parts and features listed below. Temperature selector (p. 8) Extra care selector† (p. 8) End of cycle signal selector (p. 8) Start button (p. 9) Cycle control knob (pp. 8-13) Lint screen (p. 14) Model and serial number label (p. 2) Exhaust grille Electronic dryness sensor (p. 10) Drum light (p. 16) Dryer drum (p.
Checking Your Vent Your dryer must be properly installed and vented to achieve maximum drying efficiency and shorten drying times. Use the minimum recommended installation clearances (found in your Installation Instructions) to avoid blocking the flow of combustion and ventilation air. Install your dryer in a wellventilated room where the temperature is always above 7°C (45°F). Also make sure that your dryer is leveled. Refer to your Installation Instructions for more information.
Checking Your Vent Venting (cont.) 4. Use the straightest path possible when routing the exhaust vent. Use the fewest number of elbows and turns. Allow room when using elbows or making turns. Bend vent gradually to avoid kinking. 5. Use duct tape to seal all joints. Do not use screws to secure vent. Lint may catch on screws. 6. Clean exhaust vent periodically, depending on use, but at least every 2 years, or when installing your dryer in a new location.
Operating Your Dryer Starting your dryer wWARNING Explosion Hazard Keep flammable materials and vapours, such as gasoline, away from dryer. Do not dry anything that has ever had anything flammable on it (even after washing). Failure to follow these instructions can result in death, explosion, or fire. Before using your dryer, wipe the dryer drum with a damp cloth to remove dust from storing and shipping. 1. Load clothes loosely into the dryer and close the door.
Operating Your Dryer Starting your dryer (cont.) 6. Push the Start button. Stopping and restarting your dryer You can stop your dryer anytime during a cycle. To stop your dryer: Open the dryer door or turn the Cycle Control knob to Off. NOTE: The Cycle Control knob should point to an Off area when the dryer is not in use. To restart your dryer: Close the door, select a new cycle and temperature (if desired), and push the Start button. NOTE: Your dryer stops automatically when a cycle ends.
Operating Your Dryer Loading Loading suggestions The chart below provides some guidelines on various types of drying loads. Load clothes loosely into the dryer. Do not pack the dryer; allow space for clothes to tumble freely.
Operating Your Dryer Timed Dry cycle Use the Timed Dry cycle to complete drying if some items are damp after Automatic drying. 30 • Heavyweight and OFF bulky items, such as bedspreads and work clothes, and large loads 20 require a long drying 30 time. Set your Cycle 40 Control knob for 50 to 50 60 70 70 minutes, and your Temperature selector to a heat setting that matches the care label directions. • Lightweight items, such as lingerie, blouses, and knits, require a short drying time.
Operating Your Dryer Air Tumble cycle Use the unheated Air Tumble cycle for items that require drying without heat. Since this cycle has no heat, the Tem10 perature selector setting 20 will have no effect. The 30 following chart includes examples of items that require drying without heat. Use the Air Tumble cycle or place 20 the items on a line or rack to air dry. More • Line dry bonded or laminated fabrics. • Always follow care label directions when they are available.
Operating Your Dryer Using the drying rack (on some models) The drying rack lets you dry items without tumbling them. The rack does not move, but the drum turns. 1. Fit rear legs of the rack into spaces in the back wall of the dryer. Lower the front so the legs rest on the dryer opening. 4. Select the Timed Dry cycle and temperature, or the Air Tumble cycle. 5. Push the Start button. 2. Put wet items on top of the rack. • Leave space between the items so air can reach all surfaces.
Caring for Your Dryer Proper care of your dryer can extend its life and help your dryer operate efficiently. Cleaning the lint screen Every load cleaning As needed cleaning The lint screen is located under a lid on top of the dryer. Clean it before each load. A screen blocked by lint can increase drying time. Laundry detergents and fabric softeners can cause a residue buildup on the lint screen.
Caring for Your Dryer Cleaning the dryer interior Garments which contain unstable dyes, such as denim blue jeans or brightly coloured cotton items, may discolour the dryer interior. These stains are not harmful to your dryer and will not stain future loads of clothes. It may be helpful to dry unstable dye items inside out to prevent dye transfer. wWARNING NOTE: Even after cleaning, these stains may reappear when similar loads are dried. To clean dryer drum: 1.
Caring for Your Dryer Changing the drum light The dryer light automatically turns on inside the dryer drum when you open the door. To change drum light: 1. Unplug dryer or disconnect power. 2. Open the dryer door. Remove the light bulb cover from the back wall of the dryer by removing the screw located in the lower right corner of the cover. 5. Replace the light bulb cover. 6. Plug in dryer or reconnect power. 3. Remove the light bulb by turning it counterclockwise. 4.
Troubleshooting Common laundry problems Problem... Cause... Slow drying or clothes still wet • • • Incorrect cycle or temperature setting selected. Full or clogged lint screen. (See page 14.) • Dryer is not level. The clothes are not contacting the electronic dryness sensor. (See page 10 and Installation Instructions.) Dryer located in room with temperature below 7°C (45°F). Load too large and bulky to dry quickly.
Troubleshooting Common dryer problems 1. Dryer will not start. 3. No heat For gas dryers, is the valve open on the supply line? Also, some dryers may have an internal gas valve. Is the dryer door firmly closed? ▼ ▼ For electric dryers, have you blown a fuse or tripped a circuit breaker? Electric dryers use 2 household fuses or breakers. The drum may be turning but you may not have heat.
Requesting Assistance or Service If you need assistance or service in Canada … For assistance throughout Canada, call the KitchenAid Canada Consumer Assistance Centre toll free, 8:30 a.m. – 6. p.m. (EST): 1-800-461-5681. When calling: Please know the purchase date, and the complete model and serial number of your appliance (see the “A Note to You” section). This information will help us to better respond to your request.
Dryer Warranty LENGTH OF WARRANTY KITCHENAID CANADA WILL PAY FOR KITCHENAID CANADA WILL NOT PAY FOR TWO YEAR FULL WARRANTY FROM DATE OF PURCHASE Replacement parts and repair labour costs to correct defects in materials or workmanship. Service must be provided by an authorized KitchenAid servicing outlet.
G UIDE D ’ UTILISATION ET D ’ ENTRETIEN Sécheuses électriques et à gaz Note à l’utilisateur ................2 Sécurité de la sécheuse ..3 à 4 Pièces et caractéristiques ....5 Vérification du conduit d’évacuation............................6 Fonctionnement de la sécheuse ..................................8 Mise en marche de la sécheuse ........................8 Sélection du réglage de programme et de la température corrects ....10 Chargement ....................10 Programme automatique....................
Note a l’utilisateur Nous vous remercions de votre achat d’un appareil ménager KITCHENAID*! KitchenAid conçoit les meilleurs outils pour la pièce la plus importante dans votre maison. Nous avons préparé ce Guide d’utilisation et d’entretien pour que votre appareil puisse vous fournir de nombreuses années de service sans problème. Il contient des renseignements importants concernant l’utilisation et l’entretien convenables et en sécurité de votre nouvel appareil. Veuillez le lire attentivement.
Sécurité de la sécheuse Votre sécurité et celle des autres est très importante. Nous donnons de nombreux messages de sécurité importants dans ce manuel et sur votre appareil ménager. Assurez-vous de toujours lire tous les messages de sécurité et de vous y conformer. Voici le symbole d’alerte de sécurité. Ce symbole d’alerte de sécurité vous signale les dangers susceptibles de causer le décès et des blessures graves.
Sécurité de la sécheuse IMPORTANTES INSTRUCTIONS DE SÉCURITÉ AVERTISSEMENT – Pour réduire le risque d’incendie, de choc électrique ou de blessure lors de l’utilisation de la sécheuse, il convient d’observer certaines précautions élémentaires dont les suivantes : • Lire toutes les instructions avant d’utiliser la sécheuse.
Pièces et caractéristiques Les schémas dans ce manuel peuvent varier selon le modèle de votre sécheuse. Ces dessins servent à montrer les différentes caractéristiques de tous les modèles couverts par ce manuel. Il se peut que votre modèle ne présente pas toutes les caractéristiques. Sélecteur de température✝ (p. 8) Sélecteur de Extra soin✝ (p. 9) Bouton de sélection de programmes (pp. 8-14) Plaque signalétique (numéros de modèle et de série) (p. 2) Sélecteur de signal de fin de programme (p.
Verification du conduit d’évacuation La sécheuse doit être bien installée et munie d’un système adéquat d’évacuation de l’air pour donner une efficacité maximale de séchage. Installer la sécheuse dans un endroit bien aéré où la température est toujours au-dessus de 7°C (45°F). S’assurer également que la sécheuse est d’aplomb. Voir les pour plus de renseignements. Évacuation wAVERTISSEMENT Risque d’incendie Utiliser un conduit d’évacuation en métal lourd.
Verification du conduit d’évacuation Évacuation (suite) 5. Sceller chaque joint avec du ruban adhésif pour conduits. Ne pas utiliser de vis pour fixer le conduit d’évacuation. La charpie risque de s’accrocher aux vis. 6. Nettoyer périodiquement le conduit d’évacuation, selon l’utilisation, mais au moins à tous les 2 ans ou lors de l’installation de la sécheuse à un nouvel endroit. • Déconnecter le conduit d’évacuation de la sécheuse et nettoyer une section à la fois jusqu’au clapet d’évacuation.
Fonctionnement de la sécheuse Mise en marche de la sécheuse wAVERTISSEMENT Risque d’explosion Garder les matières et les vapeurs inflammables, telle que l’essence, loin de la sécheuse. Ne pas faire sécher un article qui a déjà été touché par un produit inflammable (même après un lavage). Le non-respect de ces instructions peut causer un décès, une explosion ou un incendie.
Fonctionnement de la sécheuse Mise en marche de la sécheuse (suite) 5. (ÉTAPE FACULTATIVE) Votre sécheuse peut avoir un sélecteur de soin additionnel On/Off (mise en marche/arrêt). Les caractéristiques de soin additionnel protègent votre linge contre le froissement lorsque vous n’enlevez pas le linge de la sécheuse aussitôt qu’elle s’arrête.
Fonctionnement de la sécheuse Sélection du réglage de programme et de la température corrects Conseils sur les programme et la température • Au cours du programme automatique (séchage par détecteur), le système de séchage FLOTHRU* réduit automatiquement la chaleur près de la fin du programme pour empêcher le surséchage.
Fonctionnement de la sécheuse Programme automatique Votre sécheuse comporte le programme automatique Sensor Dry (séchage par détecteur). Le séchage par détecteur utilise un détecteur électronique qui détecte le degré d’humidité dans la charge et arrête la sécheuse lorsque le séchage choisi est atteint. Le bouton de commande de programme ne se déplacera pas avant que la charge soit presque sèche.
Fonctionnement de la sécheuse Programme de séchage minuté Utiliser le programme Timed Drying (Séchage minuté) pour terminer 30 le séchage de certains articles qui sont encore OFF humides après un séchage automatique. Le programme de 20 séchage minuté est 30 également utile pour : 40 50 • Articles lourds et 60 70 épais, tels que les descentes de lit et les vêtements de travail et les grosses charges qui exigent un temps de séchage prolongé. Régler le sélecteur de programme pour une durée de 50 à 70 minutes.
Fonctionnement de la sécheuse Programme de culbutage de séchage à l'air Utiliser le programme Air Tumble (culbutage de séchage à l’air) sans chaleur pour les articles qui exigent 10 d’être séches sans 20 chaleur. Comme ce 30 programme ne comporte pas de chaleur, le réglage du sélecteur de température n’aura 20 aucun effet. More • Faire sécher sur une corde les tissus doublés ou combinés. • Toujours suivre les directives d’entretien sur l’étiquette lorsqu’elles sont disponibles.
Fonctionnement de la sécheuse Utilisation de la grille de séchage (sur certains modèles) La grille de séchage permet de sécher des articles sans culbutage. La grille ne se déplace pas, mais le tambour tourne. 1. Engager les deux pieds (à l’arrière de la grille) dans les cavités de la paroi arrière du tambour. Abaisser l’avant, de sorte que les pieds reposent sur l’ouverture de la sécheuse. 3. Fermer la porte. 4.
Entretien de la sécheuse Le bon entretien de la sécheuse peut en prolonger la durée d’utilisation et contribuer à son fonctionnement efficace. Nettoyage du filtre à charpie Nettoyage à chaque utilisation Le filtre à charpie se trouve sous un couvercle sur le dessus de la sécheuse. Le nettoyer avant chaque séchage. Un filtre obstrué de charpie peut augmenter le temps requis de séchage. Nettoyage : 1. Ouvrir le couvercle et retirer le filtre à charpie vers soi. 2.
Entretien de la sécheuse Nettoyage de l’intérieur de la sécheuse Les vêtements contenant des teintures instables tels que jeans en denim ou les articles en coton de couleur peuvent décolorer l’intérieur de la sécheuse. Ces taches ne sont pas nuisibles à votre sécheuse, et ne tacheront pas les futures charges de vêtements. Il est utile de sécher les articles à teintures instables à l’envers, pour empêcher le transfert de la teinture.
Entretien de la sé∆ c heuse Comment enlever la charpie accumulée de l'intérieur de la sécheuse La charpie peut s’accumuler à l’intérieur de la sécheuse et constituer un risque d’incendie. La charpie doit être enlevée à tous les 2 ans, ou plus souvent, selon l’utilisation de la sécheuse. Le nettoyage doit être effectué par une personne qualifiée. Changement de l’ampoule de du tambour La lampe de la sécheuse s’allume automatiquement dans le tambour de la sécheuse dès l’ouverture de la porte.
Diagnostic 18 Problème ... Cause... Séchage lent ou vêtements encore humides • Sélection incorrecte de programme ou de réglage de température. • Filtre à charpie rempli ou obstrué (Voir page 15). • Conduit d’évacuation obstrué, restreint ou trop long (Voir pages 6 et 7 et instructions d’installation). • Sécheuse non d’aplomb, pour permettre aux vêtements de contacter le détecteur électronique de séchage. • Sécheuse située dans une pièce avec température ambiante au-dessous de 7°C (45°F).
Diagnostic Problèmes courants de la sécheuse 3. Pas de chaleur 1. La sécheuse ne se met pas en marche. Pour les sécheuses à gaz, les soupapes sont-elles ouvertes sur le conduit d’alimentation? Aussi, certaines sécheuses peuvent avoir une soupape interne de gaz.
Demande d’assistance ou de service Demande d’assistance ou de service au Canada ... Pour obtenir de l’aide dans tout le Canada, contacter sans frais le Centre d’assistance à la clientèle de KitchenAid Canada, 8 h 30 – 18 h (HNE): 1-800-461-5681. Lors du contact : Veuillez communiquer la date d’achat ainsi que le numéro de série et le numéro de modèle complet de l’appareil (voir la section “Note à l’utilisateur”). Cette information nous aidera à mieux satisfaire vos besoins.
Demande d’assistance ou de service Pour acheter des pièces de rechange ... Si vous avez besoin de commander des pièces de rechange, nous recommandons l’emploi uniquement de pièces autorisées par l’usine. Ces pièces seront facilement installées et fonctionneront bien parce qu’elles sont fabriquées avec la même précision mise en oeuvre dans la fabrication de chaque appareil ménager KITCHENAID* neuf.
Notes 22
Notes 23
Garantie de la sécheuse DURÉE DE LA GARANTIE KITCHENAID CANADA PAIERA POUR KITCHENAID CANADA NE PAIERA PAS POUR GARANTIE COMPLÈTE DE DEUX ANS À COMPTER DE LA DATE D’ACHAT Pièces de rechange et la maind’oeuvre pour corriger les vices de matériau ou de fabrication. Les travaux doivent être exécutés par un établissement de service autorisé KitchenAid.