LED Ceiling Fan Audio Light Kit Featuring BLUETOOTH® Technology 380950 Instruction Manual ETL Model #Bluetooth Audio LK
1 1. SAFETY RULES (READ AND SAVE THESE INSTRUCTIONS) 1. To reduce the risk of electric shock, insure electricity has been turned off at the circuit breaker or fuse box before beginning. 2. All wiring must be in accordance with the National Electrical Code and local electrical codes. Electrical installation should be performed by a qualified licensed electrician. 3. CAUTION: All glass is fragile, use care when handing the glass bowl. 4.
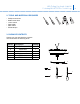
LED Ceiling Fan Audio Light Kit Featuring BLUETOOTH® Technology 2 2. TOOLS AND MATERIALS REQUIRED • • • • • • Phillips screw driver Blade screw driver 11mm wrench Step ladder Wire cutters Electrical tape 3. PACKAGE CONTENTS Unpack your fan and check the contents. You should have the following items: Part No.
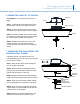
3 4. PREPARING THE FAN Step 1. Remove the ceiling fan switch cup cover from the ceiling fan assembly by removing the three mounting screws. Mounting screws Switch cup cover Center plug 5. PREPARING THE LIGHT KIT Hex nut Threaded nipple Step 2. Remove the center plug from the switch cup cover. Switch cup cover Lockwasher Light kit Step 1. Insert the black wire and white wire from the light kit through the center hole of the ceiling fan switch cup cover. Step 2.
LED Ceiling Fan Audio Light Kit Featuring BLUETOOTH® Technology 6. WIRING THE LIGHT KIT TO THE FAN REMEMBER to turn off the power before you begin. 4 Switch cup Screws Step 1. Locate the blue and white wires inside the ceiling fan switch cup for light connection. Switch cup cover Step 2. Connect the blue wire form the ceiling fan switch cup to the black wire from the light kit. Light kit Step 3.
5 8. BLUETOOTH® PAIRING NOTE: The ceiling fan audio light kit with BLUETOOTH® Technology is compatible with iPhone, iPad, Android, Blackberry, or similar devices whose BLUETOOTH protocol is compatible with 4.1 protocol. To pair, ensure the light kit is powered up. Step 1. Pull the chain switch of the light kit to ensure the light kit is powered up. The BLUETOOTH® function turns on automatically. Step 2.
LED Ceiling Fan Audio Light Kit Featuring BLUETOOTH® Technology 6 9. BLUETOOTH® AUDIO PRIMARY AND SECONDARY FUNCTION The primary instructions: Step 1. If you are using the product without other Audio Light Kits, the switch on the top of the light kit should be placed into the Primary mode. When the unit is in Primary mode, it can be connected via BLUETOOTH allowing audio to be enjoyed via the speakers. Primary Mode Secondary Mode Step 2.
Kichler® Lighting 7711 East Pleasant Valley Road P.O. Box 318010 Cleveland, Ohio 44131-8010 Customer Service 866.558.
Luminaire à audio pour ventilateur de plafond à DEL Avec la technologie BLUETOOTH® 380950 Guide d’instructions Modèle ETL, luminaire à audio Bluetooth
1 1. CONSIGNES DE SÉCURITÉ (LISEZ ET CONSERVEZ CES INSTRUCTIONS) 1. Pour réduire les risques d’électrocution, s’assurer que le courant est coupé au niveau de la boîte de disjoncteurs ou de fusibles avant de procéder à l’installation. 4. ATTENTION : Pour éviter toute brûlure accidentelle, laissez l’ampoule et le diffuseur en verre refroidir complètement avant de les toucher ou de les remplacer. 2. Tout le câblage doit être conforme aux codes électriques locaux et au Code électrique national.
Luminaire à audio pour ventilateur de plafond à DEL Avec la technologie BLUETOOTH® 2 2. OUTILS ET ÉQUIPEMENT REQUIS • • • • • • Tournevis cruciforme Tournevis plat Clé de 11 mm Escabeau Coupe-fils Ruban isolant 3. CONTENU DE L’EMBALLAGE Déballez votre ventilateur et vérifiez le contenu de l’emballage.
3 4. PRÉPARATION DU VENTILATEUR Étape 1. Enlevez le couvercle de la boîte de branchement du ventilateur de plafond en retirant les trois vis de montage. Vis de montage Couvercle de la boîte de branchement Bouchon central Tige filetée Écrou hexagonal Couvercle de la boîte de branchement Rondelle de blocage Luminaire Étape 2. Retirez le bouchon central du couvercle de la boîte de branchement. 5. PRÉPARATION DU LUMINAIRE Étape 1.
Luminaire à audio pour ventilateur de plafond à DEL Avec la technologie BLUETOOTH® 6. BRANCHEMENT DU LUMINAIRE AU VENTILATEUR N’OUBLIEZ PAS de couper l’alimentation électrique avant de commencer. 4 Boîte de branchement Vis Étape 1. Repérez les fils bleu et blanc qui se trouvent à l’intérieur de la boîte de branchement du ventilateur de plafond pour connecter le luminaire. Couvercle de la boîte de branchement Étape 2.
5 8. JUMELAGE BLUETOOTH® REMARQUE : Le luminaire à audio du ventilateur de plafond avec technologie BLUETOOTH® est compatible avec les iPhone, iPad, Android, Blackberry et autres appareils similaires dont le protocole BLUETOOTH est compatible avec le protocole 4.1. Pour jumeler, assurez-vous que le luminaire est sous tension. Étape 1. Pour mettre le luminaire sous tension, il vous suffit de tirer sur l’interrupteur à chaîne du luminaire. La fonction BLUETOOTH® se met automatiquement en marche. Étape 2.
Luminaire à audio pour ventilateur de plafond à DEL Avec la technologie BLUETOOTH® 6 9. FONCTION BLUETOOTH® AUDIO PRIMAIRE ET SECONDAIRE Les directives primaires : Étape 1. Si vous utilisez le produit sans autre luminaire à audio, l’interrupteur sur le dessus du luminaire doit être placé en mode primaire. Une fois que l’appareil est en mode primaire, il peut être connecté par l’entremise de BLUETOOTH, pour vous permettre de profiter de l’audio par les enceintes. Mode primaire Mode secondaire Étape 2.
Kichler® Lighting 7711 East Pleasant Valley Road P.O.