KDC-4554U KDC-4054UB KDC-4054UR KDC-3454UQ KDC-3354UGY KDC-3254URY KDC-3054UG KDC-3054UR KDC-3054URY KDC-316UR CD-RECEIVER INSTRUCTION MANUAL CD-RECEIVER BEDIENUNGSANLEITUNG РAДИОПРИЕMНИК С KOMПAKT–ДИСKAMИ ИHCTPУKЦИЯ ПO ЭKCПЛУATAЦИИ АВТОМАГНІТОЛА ІНСТРУКЦІЯ З ЕКСПЛУАТАЦІЇ Изделие изготовлено в Индонезии © 2011 JVC KENWOOD Corporation Cover_KDC-4054UB[E]f.
CONTENTS Safety 3 Function settings 15 Preparation 4 Troubleshooting 17 Installation/connection 19 How to attach/detach the faceplate How to reset your unit Basic operations 5 Getting started 7 Canceling the display demonstration Setting the demonstration mode Adjusting the clock Initial settings before operations Listening to the radio Specifications 10 Start playing a disc Connecting a USB device Connecting an iPod (for ) Selecting Repeat Play Selecting Random Play Selecting a folder/tr
WARNING Stop the car before operating the unit. Important to know... To prevent a short circuit, never put or leave any metallic objects (such as coins or metal tools) inside the unit. Caution: Adjust the volume so that you can hear sounds outside the car. Driving with the volume too high may cause an accident. Condensation: When the car is airconditioned, moisture may collect on the laser lens. This may cause disc read errors. In this case, remove the disc and wait for the moisture to evaporate.
Preparation How to attach/detach the faceplate If this unit fails to operate properly, press the reset button. 1 2 How to reset your unit 1 Do not expose the faceplate to direct sunlight, excessive heat, or humidity. Also avoid places with too much dust or the possibility of water splashing. Keep the faceplate in its casing while detached. The faceplate is a precision piece of equipment and can be damaged by shocks or jolts.
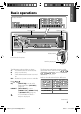
ENGLISH Basic operations Display window Loading slot Ejects the disc Volume knob USB terminal Detaches the faceplate Auxiliary input jack The following indicator lights up when... ST : A stereo broadcast is received (FM). IN : A disc is in the unit. TI : Traffic Information function is turned on. RDS : Radio Data System service is available. : : [PRESET EQ] is set to an EQ mode other than [NATURAL]. (page 15) B.BOOST : [BASS BOOST] is set to [B.BOOST LV1], [B.BOOST LV2] or [B.BOOST LV3].
When you press or hold the following button(s)... Button SRC General operation Turns on. Turns off if pressed and held. Selects the available sources (TUNER, USB/ iPod, CD, AUX, STANDBY), if the power is turned on. • If the source is ready, playback also starts. • “iPod” or “CD” is selectable only when an iPod is connected or a disc is loaded. Volume knob (turn) Adjusts the volume level. Selects items. Volume knob (press) Confirms selection. Enters [FUNCTION] settings.
ENGLISH Getting started Canceling the display demonstration The display demonstration is always turned on unless you cancel it. When you turn on the power (or after you reset the unit), the display shows: [CANCEL DEMO] \ [PRESS] \ [VOLUME KNOB] 1 Press the volume knob. [YES] is selected as the initial setup. 2 Press the volume knob again to confirm. [DEMO OFF] appears.
Item PRESET TYPE KEY BEEP RUSSIAN SET P-OFF WAIT BUILT-IN AUX/ BUILTIN AUX CD READ Selectable setting (Preset: *) NORMAL/ NORM *: Memorizes one station for each preset button in each band (FM1/ FM2/ FM3/ MW/ LW). ; MIX: Memorizes one station for each preset button regardless of the selected band (FM1/ FM2/ FM3/ MW/ LW). ON */ OFF: Activates/deactivates the keypress tone. ON: Folder name, file name, song title, artist name, album name are displayed in Russian (if applicable). ; OFF *: Cancels.
ENGLISH Adjust [SETTINGS] mode settings While listening to the radio... 1 Press the volume knob to enter [FUNCTION] mode. 2 Turn the volume knob to select [SETTINGS], then press to enter. 3 Turn the volume knob to make a selection, then press to confirm. See table below for selection. 4 Hold to finish the procedure.
Listening to a disc/ USB device/ iPod Loading slot Ejects the disc. (“NO DISC” appears and “IN” indicator goes off.) Press to select track/file. Hold to fast-forwards/reverses. Press to select previous/next folder. • Not available if “ALL RANDOM” is selected. Start playing a disc 1 Press SRC to turn on the power. 2 Insert a disc into the loading slot. Playback starts automatically. 3 Press number button 6 ( ) to resume/pause playback (if necessary).
Press number button 4 (REP) repeatedly to make a selection. Audio CD : TRACK/ TRAC (track) REPEAT, REPEAT OFF AAC/MP3/WMA : FILE REPEAT, FOLDER/ FOLD (folder) REPEAT, REPEAT OFF iPod : FILE REPEAT, REPEAT OFF Selecting Random Play Press number button 3 (ALL RDM) or repeatedly to make a selection. Audio CD : DISC RANDOM, RANDOM OFF AAC/MP3/WMA/iPod : FOLDER/ FOLD (folder) RANDOM, RANDOM OFF For AAC/MP3/WMA/iPod : Press and hold number button 3 (ALL RDM) or to select “ALL RANDOM.
Functions of with iPod Selecting a song by alphabet Adjust [SETTINGS] mode settings 1 Press to enter Music Search mode. “SEARCH” appears. 2 Turn the volume knob to select a category, then press to confirm. 3 Press again to enter alphabet search mode. “SEARCH <– – –>”/ “SRCH <– – –>” appears. 4 Turn the volume knob to select the character to be searched for. 5 Press 4 / ¢ to move to the entry position. You can enter up to three characters. 6 Press the volume knob to start searching.
ENGLISH Listening to the other external components Preparation : Make sure [ON] is selected for [BUILT-IN AUX] / [BUILTIN AUX]. (page 7, 8) 1 Press SRC to select “AUX.” 2 Turn on the external component and start playing. 3 Turn the volume knob to adjust the volume. Auxiliary input jack 3.5 mm stereo mini plug (commercially available) Portable audio device (commercially available) Using the remote controller (RC-405) Equipped for Remote sensor Do not expose to bright sunlight.
RC-405 Caution: Do not set the remote control in hot places such as on the dashboard. Lithium battery. Danger of explosion if the battery is incorrectly replaced. Replace only with the same or equivalent type. The battery pack or batteries shall not be exposed to excessive heat such sunshine, fire or the like. Keep battery out of reach of children and in original package until ready to use. Dispose of used batteries promptly. If swallowed contact physician immediately. (Not used.
1 Press the volume knob to enter [FUNCTION] mode. 2 Turn the volume knob to select [AUDIO CONTROL] / [AUDIO CTRL] or [SETTINGS], then press to enter. 3 Turn the volume knob to make a selection, then press to confirm. See table below for selection. Repeat step 3 until the desired item is selected/activated. Press to return to the previous item. 4 Hold to finish the procedure. ENGLISH Function settings [AUDIO CONTROL] / [AUDIO CTRL] : While listening to any source except in STANDBY state...
[AUDIO CONTROL] / [AUDIO CTRL] : While listening to any source except in STANDBY state... Item Selectable setting (Preset: *) DETAILED SET/ DETAIL SET : LPF SUBWOOFER/ Except for THROUGH *: All signals are sent to the subwoofer. ; 85HZ/ 120HZ/ 160HZ: Frequencies higher than LPF SUB-W 85 Hz/ 120 Hz/ 160 Hz are cut off. : SUB-W PHASE Except for REVERSE/ REV (180°)/ NORMAL/ NORM (0°) *: Selects the phase angle of the subwoofer output to be in line with the speaker output for optimum performance.
Item Selectable setting (Preset: *) DISPLAY (for ) DISP DIMMER ON: Dims the display illumination. ; OFF *: Cancels. TEXT SCROLL AUTO */ ONCE: Selects to scroll the display information automatically, or scroll only once. ; OFF: Cancels. TUNER SET TI/ NEWS SET/ AF SET/ REGIONAL/ AUTO ATP SEEK/ ATP SEEK: Selectable only if any source other than tuner source is selected. (For details, see page 9.) ENGLISH [SETTINGS] Troubleshooting Symptom Remedy/Cause Sound cannot be heard.
Symptom Remedy/Cause “COPY PRO” appears. A copy-protected file is played. “READ ERROR” appears. Copy the files and folders for the USB device again. If the error message is still displayed, initialize the USB device or use other USB devices. “NO DEVICE” appears. No USB device is connected. Connect an USB device, and change the source to USB again. “NO MUSIC” appears. The connected USB device contains no playable audio file. “NA DEVICE” appears.
Part list: A Faceplate.............................................................. B Escutcheon......................................................... C Mounting sleeve ............................................. D Casing for faceplate ...................................... E Wiring harness.................................................. F Removal tool .....................................................
Wiring connection For : FRONT REAR/SW REAR/SW R L Rear/subwoofer output terminals R L Front output terminals Rear/subwoofer output terminals Fuse (10 A) Antenna terminal (JASO) Light blue/yellow (Steering remote control wire) Blue/White (Power control wire/ Antenna control wire) Brown (Mute control wire) STEERING WHEEL REMOTE INPUT REMOTE CONT ANT CONT P.
ENGLISH For : Fuse (10 A) Antenna terminal (JASO) White White/Black To front speaker (left) Gray To front speaker (right) Gray/Black Green Green/Black To rear speaker (left) Purple Purple/Black To rear speaker (right) Blue (Antenna control wire) Blue/White (Power control wire) Brown (Mute control wire) ANT CONT P. CONT MUTE To the antenna control terminal in the vehicle. (Not used.) To the terminal that is grounded when either the telephone rings or during conversation.
Installing the unit 1 2 Connect the wiring harness to the unit. Other wiring connection has been completed earlier. (page 20, 21) Before attaching, make sure the direction of the escutcheon is correct. (Wider hooks on the top side.) Dashboard of your car Bend the appropriate tabs to hold the mounting sleeve firmly in place. Removing the unit 1 Detach the faceplate. 2 Engage the catch pin on the removal tools into the holes on both sides of the escutcheon, then pull it out.
FM tuner section Frequency range: FM1/ FM2/ FM3 (50 kHz space): 87.5 MHz — 108.0 MHz For : FM1/ FM2 (50 kHz space): 87.5 MHz — 108.0 MHz FM3 (30 kHz space): 65.00 MHz — 74.00 MHz Usable sensitivity (S/N= 26 dB): 1.0 μV/75 Ω Quieting sensitivity (DIN S/N = 46 dB): 2.