Stage Piano MP4 Owner’s Manual
Important Safety Instructions SAVE THESE INSTRUCTIONS INSTRUCTIONS PERTAINING TO A RISK OF FIRE, ELECTRIC SHOCK, OR INJURY TO PERSONS WARNING TO REDUCE THE RISK OF FIRE OR ELECTRIC SHOCK, DO NOT EXPOSE THIS PRODUCT TO RAIN OR MOISTURE. CAUTION RISK OF ELECTRIC SHOCK DO NOT OPEN AVIS : RISQUE DE CHOC ELECTRIQUE - NE PAS OUVRIR. TO REDUCE THE RISK OF ELECTRIC SHOCK, DO NOT REMOVE COVER (OR BACK). NO USER-SERVICEABLE PARTS INSIDE. REFER SERVICING TO QUALIFIED SERVICE PERSONNEL.
When disconnecting the AC power cord's plug, always hold the plug and pull it to remove it. ● Pulling the AC power cord itself may damage the cord, causing a fire, electric shock or short-circuit. The product is not completely disconnected from the power supply even when the power switch is turned off. If the product will not be used for a long time, unplug the AC power cord from the AC outlet. ● Failure to do so may cause fire in case of lightning.
Do not place naked flame sources, such as lighted candles on the product. The product should be serviced by qualified service personnel when: ● The power supply cord or the plug has been damaged. ● Objects have fallen, or liquid has been spilled into the product. ● The product has been exposed to rain. ● The product does not appear to operate normally or exhibits a marked change in performance. ● The product has been dropped, or the enclosure damaged.
WELCOME TO THE MP4 Thank you for purchasing the KAWAI MP4. The MP4 Stage Piano features 64 Internal Sounds of the highest quality. The MP4 can also be used as a MIDI master controller. On stage, at home, or in the studio, the MP4 has been designed to offer quick and easy access to many sophisticated features. BASIC FEATURES of the MP4 4 ASSIGNABLE ZONES The MP4 keyboard can be divided into 4 zones. Each zone can be set to INT, EXT or BOTH individually.
TABLE OF CONTENTS WELCOME TO THE MP4.....5 6.2.9 Bank MSB/LSB (Ext only).....31 6.2.10 Key Range Hi/Lo .....31 6.2.11 Velocity Switch.....32 6.2.12 Velocity Switch Value.....32 6.2.13 Velocity Compression.....32 6.2.14 Velocity Offset.....33 6.2.15 Zone Transpose.....33 6.2.16 Transmitting Volume (Ext only).....33 6.2.17 Volume.....33 6.2.18 Transmitting Control Change.....33 6.2.19 Pan.....33 6.2.20 Fine Tune.....34 6.2.21 Damper.....34 6.2.22 Foot Switch.....34 6.2.23 Expression Pedal.....34 6.2.
9. OTHER.....44 9.1 MIDI IN.....44 9.2 SETUP Program Number Table.....44 9.3 SOUND Program Number List.....45 9.4 Notes about USB.....46 Specifications.....47 MP4 MIDI Implementation.....48 1. Recognized Data.....49 1.1 Channel Voice Message.....49 1.2 Channel Mode Message.....51 1.3 System Realtime Message.....52 2. Transmitted Data.....52 2.1 Channel Voice Message.....52 2.2 Channel Mode Message.....54 2.3 System Realtime Message.....55 3. Exclusive Data.....55 3.1 Universal Realtime Exclusive Message.
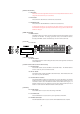
1. NAMES AND FUNCTIONS 1.1 FRONT PANEL [FADER SECTION] 1. VOLUME Fader The VOLUME fader controls the master volume level of the MP4. 2. ZONE SELECT buttons The ZONE SELECT buttons are used to select one of the four zones for editing. Only one zone can be selected at a time. The front panel setting represents the current zone status. 3. ON/OFF buttons The ON/OFF buttons are used to turn zones ON/OFF. When the button is lit, the zone is active.
[EFFECT BUTTONS] 11. SW button This button turns the assigned function ON or OFF. Many different functions can be assigned to this switch for your convenience. 12. EFX button This button turns the EFX ON or OFF for the selected zone. 13. REVERB button This button turns the REVERB ON or OFF for the selected zone. To change the function or type assigned to the above buttons, press and hold the desired button to display the currently selected function or type, then use the VALUE buttons to change it.
1.2 REAR PANEL 1. POWER SWITCH Turns the MP4 ON or OFF. 2. POWER RECEPTACLE Connect the power cable, which is included in the MP4 package, to this receptacle. 3. MIDI JACKS These jacks are used to connect the MP4 with external MIDI devices such as a MIDI sound module or a MIDI sequencer. 4. USB JACK This jack is used to connect the MP4 with a personal computer. See page xx for details. 5. FOOT CONTROLLERS EXP JACK An expression pedal can be connected to this jack.
Keyboard amplifier PA equipments (Ex. Mixer, Multi-track recorder) 1 3 4 6 5 2 7 F-1 Footswitch (optional) MIDI devices (Ex.
2. Basic Operations 2.1 Getting Ready Since the MP4 has no built-in speakers, you will need to connect a mixer, keyboard amplifier or headphones in order to listen. Turn the MP4 on, using the POWER SWITCH on the rear panel. It is recommended to turn the MP4 on before turning on any amplifiers in order to avoid switching noise. What you need to know before starting: Please read this part for a better understanding of the MP4 structure. Basically there is no difference between SOUND and SETUP mode.
Note: Internal sounds or Setups can be also selected using the VALUE buttons. You should also listen to the preprogrammed Setups. Setups are organized in 8 Banks with 8 Numbers each (total 64 Setups). Press the SETUP button to change to SETUP mode and select a Setup by pressing one of the Bank buttons in the upper row followed by a Number button in the lower row. The display shows the currently selected Setup name. In Sound mode, the “1” in the display indicates that the zone 1 is currently selected.
While still holding down the ZONE SELECT button for zone 1, select the highest note for zone 1, for example, B2 by pressing B2 key on the keyboard. 1KeyRange(Both) =IA-1 > B2 Repeat the same procedure for zone 2 while holding down the ZONE SELECT button for zone 2 and set the key range from C3 to C7. 2KeyRange(Both) =IC3 > C7 Now the keyboard is split as follows. ZONE 1 ZONE 2 B2 C3 Note: In this method, the key ranges for internal and external zones always change together.
Use the MENU buttons to change the volume. Note: The metronome tempo is also used as MIDI clock tempo to control an external sequencer. See page 20 for details. 2.7 Transpose When the Transpose function is “ON” the MP4’s key can be raised or lowered in half steps. The available range of transposition is 24 semitones, either up or down. While holding down the TRANSPOSE button, press any key on the MP4 keyboard to select a new transposed key.
To exit from MENU, press both MENU UP and DOWN buttons simultaneously. Any notes played on the keyboard or any movements of the Knobs, sliders, etc. will be transmitted to any external MIDI devices connected to the MIDI out of the MP4 on the selected MIDI channel. Sending Program Change Number The MP4 can send MIDI program change numbers from 1 to 64 in SOUND mode. Simply press the SOUND SELECT buttons and the corresponding program number will be transmitted. See the program number table below.
3. SW Button The SW button is a programmable realtime switch which can be assigned to one of 8 different functions. Press and hold the SW button. The display shows the currently assigned function. Press the SW button again to exit without changing the function. SW TYPE 1: Panel Lock Use the VALUE buttons to change the function. The display will automatically return to SOUND or SETUP mode after you change the function. 3.
Rotary Speed Fast When the SW button is OFF: The display briefly shows as follows and the rotary speed changes to slow. Rotary Speed Slow Note: When the Rotary effect is not in use, the display briefly shows as follows. Rotary is not selected. 3.4 EQ Bypass On/Off You can temporary bypass the EQ by turning the SW button on. When the SW button is lit the EQ Bypass is on. EQ Bypass On: The display briefly shows as follows and the sound bypasses the EQ.
Wheel Lock Off: The display briefly shows as follows and the wheels are unlocked. Wheel Lock Off Note: Whe the Wheel Lock is turned on and the wheels are used, the display briefly shows as follows. Wheel Lock >Press[SW]button 3.6 Foot Switch Lock You can lock the assignable foot switch to avoid unnecessary movement by accident. First, connect a foot switch to the FSW jack on the rear panel of the MP4. When the SW button is lit the Foot Switch Lock is on.
EXP Lock On Expression Pedal Lock Off: The display briefly shows as follows and the expression pedal is unlocked. EXP Lock Off Note: When the EXP Lock is turned on and the expression pedal is used, the display briefly shows as follows. EXP Lock >Press[SW]button 3.8 External Sequencer Start/Stop You can start and stop the external sequencer connected to the MP4 with SW button. First, connect an external sequencer to the MIDI OUT jack on the rear panel of the MP4.
4. EFX/REVERB The internal sounds of the MP4 can be enhanced using the built in REVERB and EFX generators. There are 7 REVERB types and 20 different EFX types to choose from. 4.1 EFX The MP4 contains 20 high quality EFX types, designed to complement the internal sounds. Each internal sound has a preset effect assigned as the default. The EFX button turns the EFX generator ON or OFF for the selected sound. To turn the EFX “ON” for the current sound, press the EFX button and the button will light up.
Auto Wah: Auto Wah creates an automatic filter sweep at the attack of Pedal Wah: each note. Pedal Wah creates a filter sweep with the expression pedal Enhancer: connected to the MP4. Enhancer produces a crisper tone, so the sound is more easily Overdrive: discernible. Overdrive effect adds tube-amp style distortion. Note: EFX type is common to all internal zones. You can not select different types for each zone. But you can individually turn on/off the EFX for each zone. 4.
5. Control Knobs Select the function with the buttons on the left and use the knobs to change the values. You can also move the cursor with the MENU buttons and change the value with the VALUE buttons while the display is showing Control Knobs function. 5.1 EFFECT Make sure that the EFFECT button in the CONTROL KNOBS section is lit. If the EFFECT button is turned off, press it to turn it ON. The CONTROL KNOBS are now active and assigned to the EFX/REVERB parameters for the selected zone.
17. AUTO WAH sense 0 -100 (%) wet balance 18. PEDAL WAH 19. ENHANCER sense intensity 0 -100 (%) 0 -100 (%) wet balance send level 20. OVERDRIVE drive 0 -100 (%) wet balance REVERB parameter list 1. HALL 1 REVERB Time rev.time 0.3 - 5.0S REVERB Depth send level 2. HALL 2 3. STAGE 1 rev.time rev.time 0.3 - 5.0S 0.3 - 3.0S send level send level 4. STAGE 2 5. ROOM 1 rev.time rev.time 0.3 - 3.0S 0.3 - 3.0S send level send level 6. ROOM 2 7. PLATE rev.time rev.time 0.3 - 3.0S 0.3 - 3.
different types of sounds. TONE MODIFY settings can be done for each zone individually. The following parameters are provided: CUTOFF, ATTACK, DECAY and RELEASE. Make sure that the TONE MODIFY button in the CONTROL KNOBS section is lit. If the TONE MODIFY button is turned off, press it to turn it ON. The CONTROL KNOBS are now active and assigned to the Tone Modify parameters for the current sound. Use the CONTROL KNOBS to change the current settings for the selected zone.
This powerful feature allows for editing the sounds of an external sound module in Real Time during performance, or for recording Real Time performance edits to a MIDI sequencer. Some control changes are also effective to internal sounds. Make sure that the MIDI CC# button in the CONTROL KNOBS section is lit. If the MIDI CC# button is turned off, press it to turn it ON. The CONTROL KNOBS are now active and assigned to the MIDI CC parameters.
Note: When the selected zone is set to INT, only the following parameters can be selected. 10 Panpot PAN 11 70 Expression Sustain Level EXP STN 71 76 Resonance Vibrato Rate RSN VbR 77 78 Vibrato Depth Vibrato Delay VbD VbY 93 Chorus Depth ChD When the selected zone is set to BOTH and the internal section is selected in edit mode, the parameters not available for INT section show as XXX.
6. MENU The MENU buttons allow access to the edit parameters in the MP4. This collection of settings together with other editable parameters can be stored as a SETUP. The MP4 provides 64 SETUPs, and all are user programmable. A SETUP consists of four zones. Each zone can be set as Internal, External or Both individually. Inside each of the four zones, a multitude of features and effects can be programmed and combined together into one exciting SETUP. A total of 64 SETUPs may be programmed in this way.
6.1 Editing Procedure and Parameters First, press the ZONE SELECT button for the zone to be edited. Next, press the MENU buttons until the parameter you want to edit appears in the DISPLAY. When a zone is set as Both, pressing the ZONE SELECT button again will switch the menu list from Internal to External or vice versa. Set the value of the parameter using the VALUE buttons. Since each parameter has a different value range, consult the following pages for the details.
the piano response for each player and each sound. The effect is only available for the internal piano sounds. Other sounds cannot use this parameter. Normal: Produces the normal tone of an acoustic piano throughout the entire Mellow: dynamic range. Reproduces the effect of a softer hammer surface. It produces a mellower tone throughout the entire dynamic range. Dynamic: This setting is not possible with an acoustic piano.
6.2.8 TX Bank (Ext only) 3External TX Bank = On This parameter determines if Program Bank Numbers (MSB, LSB) will be transmitted (On) or not (Off) when a SETUP is recalled. If your external MIDI device requires a Bank Select message, turn on this function. 6.2.9 Bank MSB/LSB (Ext only) 3ExternalMSB LSB Bank = 000 000 This parameter determines which MSB and LSB Number will be transmitted when this SETUP is recalled. When the TX Bank is set to Off, this page won’t be displayed.
6.2.11 Velocity Switch 1 Concert Grand Vel SW =Loud Velocity switching is an extremely useful and creative tool for customizing a performance. Using Velocity Switching, it is possible to have either one sound switch to another sound at a set velocity, or even for a second sound to be added in once a certain velocity has been reached, or to have a sound drop out above or below a set velocity level. This parameter sets the velocity switch type. Off : No effect. The sound plays normally.
6.2.14 Velocity Offset 1 Concert Grand Vel Offset = 100 This parameter sets the velocity value used, when Velocity Compression is lower than 10. For example to get a “No-Velocity” Organ type of playing feeling, set Velocity Compression to 0 and adjust the velocity level with this parameter to 100 or any other wanted level of velocity. If Velocity Compression is set to 10, Velocity Offset has no effect. 6.2.15 Zone Transpose 1 Concert Grand Zone Trans.
6.2.20 Fine Tune 1 Concert Grand Fine Tune = 0 Int: This is a fine tuning function for values smaller than a semi-tone. Ext: This is used to transmit fine tuning settings to external sound modules. If the TX CC is “On”, the value is transmitted when a SETUP is recalled. When the TX CC is “Off”, this page won’t be displayed. The value changes from -63 to +63. 6.2.
6.2.27 Bender Range Int: 1 Concert Grand Bendr Rng = 2 Ext: This sets the Bender Range in semitone steps. The value changes from 0 to 7. This is used to transmit Bender Range information to external sound modules. If the Tx Bender Range is “On”, the value is transmitted when a SETUP is recalled. The value changes from 0 to 12. When the Bender is “Off”, this page won’t be displayed. 6.2.28 Solo 1 Concert Grand Solo = On This parameter turns the Solo Mode On/Off.
6.3.2 Temperament This parameter sets the temperament of the MP4. COMMON Tempr =Pure Maj Equal: This is the most popular tuning method that divides the scale into twelve equal semitones. This produces the same chordal intervals in all twelve keys, and has the advantage of limitless modulation of the key. However the tonality of each key Pure Maj: (Min): Pythagor: becomes less characteristic and no chord is in pure consonance.
6.3.5 FSW Control Change Number COMMON FootSW CC# = SST This parameter assigns a Control Change Number to the Footswitch connected to the FSW jack on the rear panel. See page 58 for the list of Control Change numbers. 6.3.6 EXP Control Change Number COMMON ExpPdl CC# = EXP This parameter assigns a Control Change Number to the Expression Pedal connected to the EXP jack on the rear panel. See page 58 for the list of Control Change numbers.
7. STORE You can save the changes of the settings you made as a SETUP. You can store up to 64 SETUPs. The following groups of parameters are stored in a SETUP. Sound Selection, Zone On/Off Status (see p. 12) Fader, Control Knob settings (see p. 13, 23) EFX/REVERB settings (see p.21) Function SW setting (see p.17) MATER TRANSPOSE setting (see p.15) MENU settings (see p.28) 7.1 Storing the settings as a SETUP Press the STORE button. The display will show the SETUP number to store.
8. SYSTEM Use this mode to set the System parameters of MP4. To enter the SYSTEM mode, press the SYSTEM button. 8.1 System Menu Use the MENU buttons to scroll through the System parameters. [System Parameter] System Channel Touch System Tune Volume Slider Action Local Control On/Off Multitimbre On/Off Receive Channel On/Off LCD Contrast LED Brightness Out Mode [System Dump] Dump Current Dump All [System Reset] Reset One SETUP Reset All Make sure the SYSTEM button is lit.
8.2.2 Touch This parameter adjusts the touch response curve of the keyboard. SYSTEM Touch =Normal Heavy+: This Curve has a steep rise as velocity increases, and a shallower curve at low velocities. (see 1) This curve requires the most striking louder Heavy: volume. (see 2) This curve is perfect for those with strong fingers. Normal: This curve recreates the touch response of an average acoustic volume level softer softer force to produce a loud volume.
The piano will analyze your playing and create a custom touch curve for you based upon your playing style. The new curve is automatically saved and will be used until you change the touch curve again or record a new one. 8.2.3 System Tuning SYSTEM SysTune = 440.0 This parameter sets the global master tuning of the MP4. The value changes from 427.0 to 453.0 (Hz). 8.2.4 Volume Slider Action This selects how the volume sliders react, when you change the volume.
8.2.8 LCD Contrast SYSTEM LCD Cont. = 10 This parameter adjusts the contrast of the LCD display. As the value changes higher, the contrast gets sharper. The value changes from 0 to 10. 8.2.9 LED Brightness SYSTEM LED Bright.=High This adjusts the brightness of the LEDs. You can choose from High or Low. The Low setting is designed for dark stages, while the High setting is good for bright ambience. 8.2.
Dump All Press VALUE UP Press the SYSTEM button. Then press the MENU-UP button until “Dump All” appears on the display. Press the VALUE-UP button. The display will ask for confirmation. Dump All Sure? Dump All Completed!! To cancel Dump All at this point, press the VALUE-DOWN button. Otherwise, press the VALUE-UP button again. When the data is done transmitting, the display will change to read “Completed!!”. Dump All is complete.
9. OTHER 9.1 MIDI IN When the Multi-Timbral Mode is Off, the MP4 receives the MIDI information coming in the System Channel only. (See page 39.) For changing the internal sounds via MIDI, refer to the SOUND Program Number List on the next page. Note: If the MP4 receives the Program Number from 65 to 128 in the System Channel (See page 39.), the MP4 will switch to SETUP mode and the corresponding SETUP is recalled. (See the SETUP Program Numbr Table below.
9.3 SOUND Program Number List Sound Name 1. PIANO 1 Concert Grand 2 Concert Grand 2 3 Studio Grand 4 Studio Grand 2 5 Mellow Grand 6 Mellow Grand 2 7 Modern Piano 8 Rock Piano Prg# Sound Name Prg# 1 2 3 4 5 6 7 8 5. ORGAN 2/HARPSI 1 Drawbar 2 Drawbar 2 3 Hi-Lo 4 Soft Solo 5 Rock Organ 2 6 Church Organ 7 Diapason 8 Harpsichord 33 34 35 36 37 38 39 40 9 10 11 12 13 14 15 16 6. STRINGS/BRASS 1 String Pad 2 Beautiful Str. 3 String Ens.
9.4 Notes about USB The MP4 can be connected with a personal computer with a USB cable for exchanging MIDI data. You need a USB driver installed in your computer. [For Windows XP/Me users] A standard USB driver is already installed in your computer. You don’t need to install a new driver. [For Windows 2000/98SE users] You need to install the designated driver in your computer. Visit the KAWAI web site at http://www.kawai.co.jp/english/Download1.html and download the program.
Specifications Keyboard # of Zone # of Internal Sound Polyphony Effect Internal Memory Display Jack 88 keys with Advanced Hammer Action IV 4 zones 64 sounds Maximum 96 7 Reverbs, 20 Effects, 4-band Equalizer 64 SETUPs 16 x 2 LCD w/backlight 1/4” Out (L/MONO, R), Headphones, MIDI IN/OUT/THRU, USB, Damper/Soft Pedal, FSW, EXP, AC Inlet Dimensions (WxDxH) 1356 x 340 x 172 mm (53 3/8” x 13 3/8” x 6 7/8”) Weight 20.
MP4 MIDI Implementation Version 1.0 Contents 1. Recognized data 1.1 Channel Voice Message 1.2 Channel Mode Message 1.3 System Real time Message 2. Transmitted data 2.1 Channel Voice Message 2.2 Channel Mode Message 2.3 System Real time Message 3. Exclusive data 3.1 Universal Realtime Exclusive Nessage 3.2 Damp Message 3.3 Setup Data Format 4. Table 4.
1. Recognized Data 1.1 Channel Voice message Note off Status 8nH 9nH 2nd Byte kkH kkH n=MIDI channel number kk=Note Number vv=Velocity Note on Status 9nH 2nd Byte kkH n=MIDI channel number kk=Note Number vv=Velocity 3rd Byte vvH 00H :0H-fH(ch.1 - ch.16) :00H - 7fH(0 - 127) :00H - 7fH(0 - 127) 3rd Byte vvH :0H-fH(ch.1 - ch.16) :00H - 7fH(0 - 127) :00H - 7fH(0 - 127) Control Change Bank Select (MSB) Status BnH 2nd Byte 00H n=MIDI channel number vv = Bank Number 3rd Byte vvH :0H-fH(ch.1 - ch.
Damper Pedal Status BnH 2nd Byte 40H n=MIDI channel number vv = Control Value Sostenuto Pedal Status BnH 2nd Byte 42H n=MIDI channel number vv = Control Value Soft Pedal Status BnH 2nd Byte 43H n=MIDI channel number vv = Control Value Sound controllers #1-9 Status BnH BnH BnH BnH BnH BnH BnH BnH BnH 2nd Byte 46H 47H 48H 49H 4aH 4bH 4cH 4dH 4eH n=MIDI channel number vv = Control Value Effect Control Status BnH BnH BnH BnH :0H-fH(ch.1 - ch.
01H 64H 01H 66H mmH mmH Decay time Release time mm:00H - 7FH(-64 - 0 - +63) mm:00H - 7FH(-64 - 0 - +63) Default = 40H Default = 40H * Ignoring the LSB of data Entry * It is not affected in case of modifying cutoff if tone does not use the dcf. RPN MSB/LSB Status BnH BnH 2nd Byte 65H 64H 3rd Byte mmH llH n=MIDI channel number mm=MSB of the RPN parameter number ll=LSB of the RPN parameter number :0H-fH(ch.1 - ch.
Reset All Controller Status BnH 2nd Byte 79H n=MIDI channel number All Note Off Status BnH 2nd Byte 7bH n=MIDI channel number MONO Status 2nd Byte BnH 7eH 3rd Byte 00H :0H-fH(ch.1 - ch.16) 3rd Byte 00H :0H-fH(ch.1 - ch.16) 3rd Byte mmH n=MIDI channel number mm=mono number :0H-fH(ch.1 - ch.16) :01H(M=1) POLY Status 2nd Byte BnH 7fH n=MIDI channel number 3rd Byte 00H :0H-fH(ch.1 - ch.16) 1.3 System Realtime Message Status FEH Active sensing 2. Transmitted Data 2.
n=MIDI channel number vv = Modulation depth Data Entry Status BnH BnH 2nd Byte 06H 26H :0H-fH(ch.1 - ch.
Effect Control Status BnH BnH BnH BnH 2nd Byte 5bH 5cH 3rd Byte vvH vvH 5dH 5eH vvH vvH n=MIDI channel number vv = Control Value RPN MSB/LSB Status BnH BnH 2nd Byte 65H 64H Reverb depth Rotary speaker speed(0-63:Slow,64-127:Fast) *Only when rotary speaker selected Chorus depth Effect deoth :0H-fH(ch.1 - ch.16) :00H - 7fH(0 - 127) 3rd Byte mmH IIH n=MIDI channel number mm=MSB of the RPN parameter number ll=LSB of the RPN parameter number :0H-fH(ch.1-ch.
2.3 System Realtime Message Status F8H Clock FAH Start FCH Stop *Sending [SW] External Seq. Start/Stop 3. Exclusive Data 3.1 Universal Realtime Exclusive Message Master Volume Format :F0 7F 7F 04 01 ll mm F7 mm=MSB of Master Volume ll=LSB of Master Volume MP4 can receive these dump data, and also can transmit by the panel operation with System switch. Also,MP4 can receive MP9000/9500’s dump data.(Please see the manual of MP9000/9500 about the format.
55 56 57 58 59 60 61 62 63 64-75 76 77-84 FSW CC# EXP CC# Transpose SW Transpose Value Function SW Type Function SW Stretch Tuning Temperament Key of Temperament User C-B Tuning Master Volume -undefined- 0-120 (120:Function SW) 0-120 (120:After Touch) 0,1 (0:off, 1:on) 40~64~88 (-24~0~+24) 0-8 (see p.17) 0,1 (0:off,1:on) 0-4 (0:Off,1:On,2:Piano,3:On Wide,4:Piano Wide) 0-7 (see p.36) 0-11(0:C,1:C#,~,9:A,10:Bb,11:B) 14~64~114 (-50~0~+50[cent]) 0-127 3.3.2 Zone 1-4 Internal DATA No.
24 25 26 27 28 29 30 31 32 33-34 Cutoff Attack Time Decay Time Release Time CC# A Value CC# B Value CC# C Value CC# D Value Velo Offset -undefined- 14~64~114(-50~0~+50) 14~64~114(-50~0~+50) 14~64~114(-50~0~+50) 14~64~114(-50~0~+50) 0-127 0-127 0-127 0-127 0-127 57
4.
[STAGE PIANO] Model: KAWAI MP4 Function Basic Channel Mode Note Number: Velocity Afer Touch Touch Pitch Bend Control Change MIDI Implementation Chart Transmit Default Changed Default Messages Altered True Voice Note ON Note OFF Key’s Ch’s 0, 32 1 6, 38 7 10 11 64 66 67 70, 71 72, 73, 74, 75 76, 77, 78 91 92 93 94 98, 99 100, 101 0-119 Prog Change: True # System Exclusive : Song Position Common : Song Select : Tune System : Clock Real Time : Commands : All Sound Off : Reset All Controller Aux : Local ON/
MP4 Owner’s Manual OW981E-L0501 Printed in Indonesia Eng