
Operating instructions


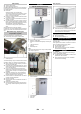


Table Of Contents
- Deutsch
- Inhaltsverzeichnis
- Sicherheit
- Umweltschutz
- Allgemeine Hinweise
- Transport
- Bestimmungsgemäße Verwendung
- Funktion
- Gerät anschließen
- Inbetriebnahme
- Bedienung
- Stilllegung
- Inbetriebnahme nach Stilllegung
- Lagerung
- Pflege und Wartung
- Wartungshinweise
- Wartungsplan
- Eingangssieb reinigen
- Chemische Reinigung
- Spülung nach chemischer Reinigung
- Beprobung
- Filter aus- und einbauen
- UV-Leuchtmittel aus- und einbauen
- Tropfschale leeren
- Kanister (Option) leeren
- Allgemeine Hinweise zum Umgang mit CO2-Flaschen
- CO2-Flasche tauschen
- 425 g CO2-Flasche tauschen
- Verbrauchsmaterial
- Zubehör
- Hilfe bei Störungen
- Technische Daten
- Ersatzteile
- Garantie
- EU-Konformitätserklärung
- Wartungsblatt WPD 100 / 200 / 600
- English
- Contents
- Safety
- Environmental protection
- General notes
- Transport
- Proper use
- Function
- Connecting the appliance
- Start up
- Operation
- Shutdown
- Startup after shutdown
- Storage
- Care and maintenance
- Maintenance instructions
- Maintenance schedule
- Cleaning inlet sieve
- Chemical cleaning
- Rinsing after chemical cleaning
- Sampling
- Installing/removing filter
- Uninstalling and installing the UV-lamp
- Emptying the drip pan
- Emptying the can (option)
- General information on handling CO2 bottles
- Replacing the CO2 bottle
- Replacing the 425 g CO2 bottle
- Consumables
- Accessories
- Troubleshooting
- Technical specifications
- Spare parts
- Warranty
- EU Declaration of Conformity
- Maintenance sheet WPD 100 / 200 / 600
- Français
- Table des matières
- Sécurité
- Protection de l’environnement
- Consignes générales
- Transport
- Utilisation conforme
- Fonction
- Raccorder l'appareil
- Mise en service
- Utilisation
- Remisage
- Mise en service après remisage
- Entreposage
- Entretien et maintenance
- Consignes pour la maintenance
- Plan de maintenance
- Nettoyer le tamis d'entrée
- Nettoyage chimique
- Rinçage après le nettoyage chimique
- Prélèvement
- Montage et démontage du filtre
- Montage et démontage de l'ampoule de la lampe UV
- Vider le bac d'égouttage
- Vider le bidon (option)
- Remarques générales relatives à la manipulation avec des bouteilles CO2
- Remplacer la bouteille CO2
- Remplacer la bouteille 425 g CO2
- Matériel de consommation
- Accessoires
- Assistance en cas de panne
- Caractéristiques techniques
- Pièces de rechange
- Garantie
- Déclaration UE de conformité
- Fiche d'entretien WPD 100 / 200 / 600
- Italiano
- Indice
- Sicurezza
- Protezione dell’ambiente
- Avvertenze generali
- Trasporto
- Uso conforme a destinazione
- Funzione
- Collegamento dell'apparecchio
- Messa in funzione
- Uso
- Fermo dell'impianto
- Messa in funzione dopo periodi di fermo
- Immagazzinaggio
- Cura e manutenzione
- Note per la manutenzione
- Schema di manutenzione
- Pulitura del filtro in entrata
- Pulitura chimica
- Lavaggio dopo pulitura chimica
- Campionatura
- Smontaggio e montaggio del filtro
- Smontare/montare la lampadina UV
- Svuotare il gocciolatoio
- Svuotare la tanica (opzione)
- Avvertenze generali riguardo all'uso di bombole di CO2
- Sostituzione della bombola di CO2
- Sostituzione della bombola di CO2 da 425 g
- Materiale di consumo
- Accessori
- Guida alla risoluzione dei guasti
- Dati tecnici
- Ricambi
- Garanzia
- Dichiarazione di conformità UE
- Scheda di manutenzione WPD 100 / 200 / 600
- Nederlands
- Inhoudsopgave
- Veiligheid
- Zorg voor het milieu
- Algemene instructies
- Transport
- Doelmatig gebruik
- Functie
- Apparaat aansluiten
- Ingebruikneming
- Bediening
- Stillegging
- Inbedrijfstelling na stillegging
- Opslag
- Onderhoud
- Onderhoudsinstructies
- Onderhoudsschema
- Ingangszeef reinigen
- Chemische reiniging
- Spoeling na chemische reiniging
- Monsterneming
- Filter uit- en inbouwen
- UV-verlichtingsmiddel uit- en inbouwen
- Druppelschaal leegmaken
- Jerrycan (optie) leegmaken
- Algemene instructies voor de omgang met CO2-flessen
- CO2-fles vervangen
- 425 g CO2-fles vervangen
- Verbruiksmateriaal
- Toebehoren
- Hulp bij storingen
- Technische gegevens
- Reserveonderdelen
- Garantie
- EU-conformiteitsverklaring
- Onderhoudsblad WPD 100 / 200 / 600
- Español
- Índice de contenidos
- Seguridad
- Protección del medio ambiente
- Indicaciones generales
- Transporte
- Uso previsto
- Función
- Conectar el equipo
- Puesta en marcha
- Manejo
- Parada
- Puesta en servicio después de parada
- Almacenamiento
- Cuidados y mantenimiento
- Indicaciones de mantenimiento
- Plan de mantenimiento
- Limpiar el filtro de entrada
- Limpieza química
- Enjuague tras la limpieza química
- Muestreo
- Desmontar y montar el filtro
- Desmontar y montar la luminaria UV
- Vaciar la bandeja recoge gotas
- Vaciar el bidón (opcional)
- Indicaciones generales para la manipulación de las botellas CO2
- Cambiar la botella de CO2
- Cambiar la botella de CO2 de 425 g
- Material de uso
- Accesorios
- Ayuda en caso de avería
- Datos técnicos
- Piezas de repuesto
- Garantía
- Declaración UE de conformidad
- Ficha de mantenimiento WPD 100 / 200 / 600
- Português
- Índice
- Segurança
- Proteção do meio-ambiente
- Instruções gerais
- Transporte
- Utilização conforme o fim a que se destina a máquina
- Funcionamento
- Conectar o aparelho
- Colocação em funcionamento
- Manuseamento
- Desactivação da máquina
- Colocação em funcionamento após desactivação da máquina
- Armazenamento
- Conservação e manutenção
- Indicações de manutenção
- Plano de manutenção
- Limpar a peneira de entrada
- Limpeza química
- Lavagem após a limpeza química
- Amostra
- Desmontar e montar filtro
- Montar e desmontar a lâmpada UV
- Esvaziar a pingadeira
- Esvaziar a vasilha (opção)
- Avisos gerais relativos à utilização de botijas de CO2
- Substituir a botija de CO2
- Substituir a botija de CO2 de 425 g
- Material de consumo
- Acessórios
- Ajuda em caso de avarias
- Dados técnicos
- Peças sobressalentes
- Garantia
- Declaração UE de conformidade
- Ficha de manutenção WPD 100 / 200 / 600
- Dansk
- Indholdsfortegnelse
- Sikkerhed
- Miljøbeskyttelse
- Generelle henisninger
- Transport
- Bestemmelsesmæssig anvendelse
- Funktion
- Tilslutte anlægget
- Ibrugtagning
- Betjening
- Afbrydning/nedlæggelse
- Ibrugtagning efter nedlæggelse
- Opbevaring
- Pleje og vedligeholdelse
- Vedligeholdelsesanvisninger
- Vedligeholdelsesskema
- Rens indgangssien
- Kemisk rensning
- Skylning efter kemisk rensning.
- Prøveaftagelse
- Isætte og fjerne filteret
- Afmonter og monter UV-pærerne
- Tøm dryppeskålen
- Tøm dunken (option)
- Generelle anvisninger mht. håndtering af CO2-flasker
- Udskift CO2-flasken
- Udskift 425 g CO2-flasken
- Forbrugsmateriale
- Tilbehør
- Hjælp ved fejl
- Tekniske data
- Reservedele
- Garanti
- EU-overensstemmelseserklæring
- Serviceblad WPD 100/200/600
- Norsk
- Innholdsfortegnelse
- Sikkerhet
- Miljøvern
- Generelle merknader
- Transport
- Forskriftsmessig bruk
- Funksjon
- Koble til maskinen
- Igangsetting
- Betjening
- Nedleggelse
- Oppstart etter lengre tids nedleggelse
- Lagring
- Pleie og vedlikehold
- Vedlikeholdsinformasjoner
- Vedlikeholdsplan
- Rengjøre innløpssilen
- Kjemisk rengjøring
- Spyling etter kjemisk rengjøring
- Prøvetaking
- Demontere og montere filter
- Demontere og montere UV-lyskilder
- Tøm dryppskålen
- Tøm beholderen (tilleggsutstyr)
- Generelle anvisninger for håndtering av CO2- flasker
- CO2-flasken skiftes ut
- 425 g CO2-flasken skiftes ut
- Forbruksmateriale
- Tilbehør
- Feilretting
- Tekniske data
- Reservedeler
- Garanti
- EU-samsvarserklæring
- Vedlikeholdsside WPD 100 / 200 / 600
- Svenska
- Innehållsförteckning
- Säkerhet
- Miljöskydd
- Allmänna hänvisningar
- Transport
- Ändamålsenlig användning
- Funktion
- Ansluta maskinen
- Idrifttagande
- Handhavande
- Nedstängning
- Idrifttagning efter stillestånd
- Förvaring
- Skötsel och underhåll
- Förbrukningsmaterial
- Tillbehör
- Åtgärder vid störningar
- Tekniska data
- Reservdelar
- Garanti
- EU-försäkran om överensstämmelse
- Underhållsblad WPD 100 / 200 / 600
- Suomi
- Sisällysluettelo
- Turvallisuus
- Ympäristönsuojelu
- Yleisiä ohjeita
- Kuljetus
- Tarkoituksenmukainen käyttö
- Toiminta
- Laitteen liittäminen
- Käyttöönotto
- Käyttö
- Seisonta-aika
- Käyttöönotto seisonta-ajan jälkeen
- Säilytys
- Hoito ja huolto
- Huolto-ohjeet
- Huoltokaavio
- Sisääntulosiivilän puhdistaminen
- Kemiallinen puhdistus
- Huuhtelu kemiallisen puhdistuksen jälkeen
- Näytteenotto
- Suodattimen purku ja asennus
- UV-valonlähteen irroittaminen ja asentaminen
- Tyhjennä tippumalja
- Kanisterin tyhjentäminen (optio)
- Ohjeita CO2-pullojen käsittelyyn
- CO2-pullon vaihtaminen
- 425 g CO2-pullon vaihtaminen
- Kulutustarvikkeet
- Tarvikkeet
- Häiriöapu
- Tekniset tiedot
- Varaosat
- Takuu
- EY-vaatimustenmukaisuusvakuutus
- Huoltosivu WPD 100 / 200 / 600

- 3
1 Drip pan
2 Device door
3 Release button
Remove the drip pan.
Push the unlocking button and open the device
door.
1 Bracket
2 Plate
3 Filter
4 Handle
1 do not touch the marked areas
몇 WARNING
Health risk due to the contamination with germs.
When replacing the filter cartridges, ensure hy-
giene and cleanliness.
Do not touch the connections of the socket and fil-
ters.
Wear sterile disposable gloves when replacing the
filter.
Do not interchange filters, observe colour coding.
Remove drip pan and open the device door.
Turn the filter so that the handle is on the left side
and insert it into the relevant support from the bot-
tom.
1 Marking
Turn the filter to the right all the way to the stop.
Check installation position.
The marking on the label on the support and on the
filter must be aligned with each other.
Close device door and insert drip pan.
The door of the base can be locked.
1 Door of the base.
2 Door lock
Unlock the door lock.
Open the door on the support leg.
Note:
Observe general information on handling CO
2
bottles
(see Chapter "Care and maintenance/general informa-
tion on handling CO
2
bottles")
1 Rotating regulator
2 Pressure reducer
3 Union joint
4 Main tap
5 Pressure gauge control pressure
6CO
2
hose
Place the CO
2
bottle in the base and secure it by
means of the tie down strap.
Briefly open the main tap so that possibly present,
liquid CO
2
can escape.
Screw the pressure reducer onto the new gas bot-
tle. Watch for correct mounting of the sealing ring!
Tighten covering nut firmly.
Connect the CO
2
hose to the pressure reducer.
Slowly open the main tap on the gas bottle.
Set 3 bar on the pressure reducer by means of the
control knob.
Close the main tap on the gas bottle.
Read the value indicated on the pressure gauge
control pressure.
The indicated value must remain constant for at
least 5 minutes.
With detectable pressure reduction:
Check if the O-ring between the gas cylinder and
the pressure reducer is present and free of dam-
age. Replace defective O-ring.
Check the correct positioning of the pressure re-
ducer.
Tighten covering nut firmly.
Check the hose coupling on the pressure reducer
and the CO
2
hose for visible damage. In case of
doubt, call the Customer Service.
If the pressure reduction cannot be remedied by
the stated measures, the pressure reducer is de-
fective and must be replaced.
Open main tap.
Set the operating pressure on the pressure reducer
by means of the control knob.
WPD 100: Presetting 4 bar, re-adjustable if neces-
sary.
WPD 200/600: Set the CO
2
pressure regulator to
approx. 3 bar (static) prior to the dispensing of wa-
ter and then check if the pressure is approx. 3.0 bar
during the dispensing of carbonated water (spar-
kling).
Close the door of the base.
1 Pressure regulator scale
2 Pressure regulator
3 Adjustment wheel
4 Screw connection of the bottle
5 425 g CO
2
bottle
Remove drip pan and open the device door.
Turn the pressure regulator to "OFF".
Remove the cover of the CO
2
bottle.
Screw the 425 g CO
2
bottle onto the bottle screw
connection of the pressure regulator.
If a resistance can be noticed, turn the 425 g CO
2
bottle slightly further until it is tightened. A short
hissing noise may be audible.
Pre-set the pressure regulator to "4".
Close device door and insert drip pan.
After initial startup, readjust the pressure on the
pressure regulator in order to achieve the desired
CO
2
concentration in the water.
Note:
Regulate strongly spraying water stream during dis-
pensing of carbonated water by lowering the CO
2
pres-
sure. If the water is not sufficiently carbonated, increase
the CO
2
pressure.
Start up
Open the device door
Insert filter
Open the door of the base.
Insert the CO
2
bottle
Inserting the 425 g CO
2
bottle
17EN