
DVD Digital Cinema System Instructions


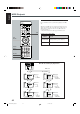


Table Of Contents
- US/UB version
- Top cover
- Warnings, Cautions and Others
- IMPORTANT FOR LASER PRODUCTS
- Table of Contents
- Parts Identification
- Getting Started
- Basic DVD Operations
- Basic VCD/CD Operations
- Basic Tuner Operations
- Ohter Basic Operations
- Speaker Settings
- Creating Reakistic Sound Fields
- Disc Introducton-DVD/VCD/CD
- Basic Disc Operations
- DVD Playback
- VCD/CD Playback
- MP3 Introduction
- MP3 Playback
- Tuner Operations
- Setting up the DVD Preferences
- Operationg JVC's Components
- Operating Other Manufacturers' TV
- Maintenance
- Trobleshooting
- Specifications
- Back cover
- UW version
- Top cover
- Warnings, Cautions and Others
- IMPORTANT FOR LASER PRODUCTS
- Table of Contents
- Parts Identification
- Getting Started
- Basic DVD Operations
- Basic VCD/CD Operations
- Basic Tuner Operations
- Other Basic Operations
- Speaker Settings
- Creating Realistic Sound Fields
- Disc Intorduction-DVD/VCD/CD
- Basic Disc Operations
- DVD Playback
- VCD/CD Playback
- MP3 Introduction
- MP3 Playback
- Tuner Operations
- Setting up the DVD Preferences
- Operating JVC's Components
- Operating Other Manufacturers'TV
- Maintenance
- Troubleshooting
- Specifications
- Back cover
- UJ version
- Top cover
- Warnigs, Cautions and Others
- Table of Contents
- Parts Identification
- Getting Started
- Basic DVD Operations
- Basic VCD/CD Operations
- Basic Tuner Operations
- Other Basic Operations
- Speaker Settings
- Creaing Realistic Sound Fields
- Disc Introduction-DVD/VCD/CD
- Basic Dics Operations
- DVD Playback
- VCD/CD Playback
- MP4 Introduction
- MP3 Playback
- Tuner Operations
- Setting up the DVD Preferences
- Operating JVC's Components
- Operating Other Manufacturers'TV
- Maintenance
- Troubleshooting
- Specifications
- Back cover

44
English
Tuner Operations
For basic tuner operations, see “Basic Tuner Operations” on page
14.
DVD FM/AM AUX MUTE
B.SEARCH F.SEARCH
VCR CHANNEL
TUNING
SOURCE
DVD player* AUX IN
FMAM
DISPLAY
B.SEARCH
DOWN
REW
UP
FF
F.SEARCH
RETURN STEP TV/VIDEO
TV VOLUME
TV CHANNEL
SUBTITLE
TOP MENU
TV
STANDBY/ON
AUDIO
VCR OFF ON
VCR
CONTROL
TUNER PRESET
ENTER
VOLUME
MENU
AUDIO/
FM MODE
VCR CHANNEL
TUNING
DVD FM/AM AUX MUTING
REMAIN
PROGRAM
D.R.C
SETUP
SLEEP
EFFECT
DSP MODE
TEST
PRO LOGIC
SETTING
SOUND
CLEAR
REPEAT
ANGLE
SLOW
SEARCH
A-B REPEAT
NTSC/PAL
23
45
6
78
ZOOM
1
9
0
FM/AM
TUNER
PRESET
UP
TUNING +
TUNER
PRESET
DOWN
TUNING –
AUDIO/
FM MODE
PROGRAM
Tuning in Stations
From the remote control:
1
Press FM/AM repeatedly
to select the band.
The last received station of the
selected band is tuned in.
• Each time you press the button, the band alternates between
FM and AM.
2
Press and hold
TUNING + or –
until you find the
frequency you want.
• TUNING + : Increases the frequency.
• TUNING – : Decreases the frequency.
The system starts searching for stations and stops when a station
of sufficient signal strength is tuned in.
On the front panel:
1
Press SOURCE repeatedly until the
desired band appears on the display.
The last received station of the selected band is tuned
in.
• Each time you press the button, the source changes as follows:
* “WAIT” appears on the display.
2
Press 7 so that “MANUAL” appears on the
display.
• Each time you press the button, the operation mode of
¢ and 4 buttons alternates between “PRESET” and
“MANUAL.”
PRESET : Select this for using ¢ and 4 as the
buttons to select the preset station.
MANUAL : Select this for using ¢ and 4 as the
buttons to change the frequency manually.
3
Press and hold ¢ or 4 until
you find the frequency you want.
• ¢ : Increases the frequency.
• 4 : Decreases the frequency.
Notes:
• When a station of sufficient signal strength is tuned in, the
indicator lights up on the display.
• When an FM stereo program is received, the indicator also
lights up.
• When you press the button repeatedly, the frequency changes step
by step.
Setting the AM Tuner Interval Spacing
Some countries space AM stations 9 kHz apart, and other countries use
10 kHz spacing.
• 9 kHz interval spacing is the initial setting.
• Each time you do the following procedure, the AM tuner interval
spacing alternates between 9 kHz and 10 kHz.
1
Select AM as the band.
2
Press 9, 1, and 0 on the remote control.
The new setting for the interval spacing appears on the display,
and the band changes into FM.
3
Press FM/AM on the remote control to select AM
as the band again.
1
9
0
EN44-45TH-A5[UW]f.pm6 01.12.24, 17:3044