KD-APD49/KD-PDR40 RECEPTOR CON CD KD-APD49/KD-PDR40 ESPAÑOL RÉCEPTEUR CD KD-APD49/KD-PDR40 FRANÇAIS ENGLISH CD RECEIVER For canceling the display demonstration, see page 6. Para cancelar la demostración en pantalla, consulte la página 6. Pour annuler la démonstration des affichages, référez-vous à la page 6. For installation and connections, refer to the separate manual. Para la instalación y las conexiones, refiérase al manual separado.
ENGLISH Thank you for purchasing a JVC product. Please read all instructions carefully before operation, to ensure your complete understanding and to obtain the best possible performance from the unit. INFORMATION (For U.S.A.) This equipment has been tested and found to comply with the limits for a Class B digital device, pursuant to Part 15 of the FCC Rules. These limits are designed to provide reasonable protection against harmful interference in a residential installation.
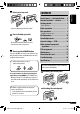
CONTENTS Control panel — KD-APD49/KD-PDR40 ... 4 Remote controller — RM-RK50........... 5 Getting started ................................ 6 ENGLISH How to reset your unit Basic operations ................................................... 6 • Your preset adjustments will also be erased. How to forcibly eject a disc • Be careful not to drop the disc when it ejects. • If this does not work, reset your unit.
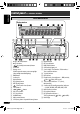
ENGLISH Control panel — KD-APD49 / KD-PDR40 Parts identification Display window 1 2 3 4 5 6 7 8 9 p q w e r t y u i 5 (up) / ∞ (down) buttons 0 (eject) button (standby/on attenuator) button Control dial Remote sensor DO NOT expose the remote sensor to strong light (direct sunlight or artificial lighting).
Remote controller — RM-RK50 ENGLISH Main elements and features Installing the lithium coin battery (CR2025) 1 For USA-California Only: This product contains a CR Coin Cell Lithium Battery which contains Perchlorate Material—special handling may apply. See www.dtsc.ca.gov/hazardouswaste/perchlorate 2 Aim the remote controller directly at the remote sensor on the unit. Make sure there is no obstacle in between.
ENGLISH Getting started Basic operations ~ Turn on the power. To drop the volume in a moment (ATT) To restore the sound, press the button again. To turn off the power Ÿ Basic settings • See also “General settings — PSM” on pages 14 and 15. 1 *1 You cannot select “CD” as the playback source if there is no disc in the unit. *2 “NO IPOD” appears if an iPod is not connected. ! 2 1 Canceling the display demonstrations For FM/AM tuner Select “DEMO,” then “DEMO OFF.
When an FM stereo broadcast is hard to receive ~ Lights up when monaural mode is activated. ENGLISH Radio operations Ÿ Lights up when receiving an FM stereo broadcast with sufficient signal strength. ! Reception improves, but the stereo effect will be lost. To restore the stereo effect, repeat the same procedure. “MONO OFF” appears and the MO indicator goes off. Start searching for a station. Storing stations in memory You can preset six stations for each band.
ENGLISH Manual presetting Ex.: Storing the FM station of 92.50MHz into preset number 4 of the FM1 band. 1 Disc operations Playing a disc in the unit All tracks will be played repeatedly until you change the source or eject the disc. 2 3 To stop play and eject the disc Preset number flashes for a while. Listening to a preset station 1 2 • Press SRC to listen to another playback source. [Hold] To fast-forward or reverse the track Select the preset station (1 – 6) you want.
To select a particular track in a folder (for MP3 or WMA discs): Changing the display information While playing an audio CD or CD Text ENGLISH • To use direct folder access on MP3/WMA discs, it is required that folders are assigned with 2-digit numbers at the beginning of their folder names— 01, 02, 03, and so on.
ENGLISH Selecting the playback modes You can use only one of the following playback modes at a time. 1 2 Select your desired playback mode. iPod operations You can play songs in an Apple iPod by connecting it with the supplied direct connection cable for iPod. You can control playback from the unit or from your iPod. • Disconnecting the iPod will stop playback. Press SRC to listen to another playback source. Caution: 7 Repeat play Mode Plays repeatedly ] TRACK RPT : The current track.
Adjust the sound as you want. (See pages 12 and 13.) Selecting a track from the menu 1 To control playback from your iPod Enter the main menu. or “IPOD MODE” appears on the display. • Press and hold this button again to control playback from the unit. “HEAD MODE” appears on the display. ENGLISH ! Now the 5/∞/4 /¢ /number buttons work as the menu selecting buttons. 2 Select the desired menu.
ENGLISH To exit from menu selecting mode To check other information while listening to an iPod or * The menu selecting mode will be canceled: – If no operations are performed for about 10 seconds. – When you confirm the selection of a track. – Pressing some other buttons such as DISP, SEL, MODE, or EQ.
3 Select a sound characteristic. 4 Adjust the sound elements of the selected sound characteristic. 1 Adjust the frequency. LOUD *4 (loudness), [LOUD ON or LOUD OFF] Boost low and high frequencies to produce a well-balanced sound at a low volume level. SUBWOOFER *1, [00 to 08, initial: 04] Adjust the subwoofer output level. VOL ADJ (volume adjust), [–05 to +05, initial: 00] Adjust the volume level of each source (except FM), in relation to the FM volume level.
ENGLISH General settings — PSM You can change PSM (Preferred Setting Mode) items listed in the table below and on page 15. 3 Adjust the PSM item selected. 4 Repeat steps 2 and 3 to adjust other PSM items if necessary. 5 Finish the procedure. 1 2 Select a PSM item. Indications Item ( : Initial) Setting, [reference page] DEMO Display demonstration • DEMO ON : The display demonstration will be activated automatically if no operation is done for about 20 seconds, [6]. : Cancels.
Item ( : Initial) Setting, [reference page] AUDIOBOOKS *2 Speed control of “Audiobook” • NORMAL • FASTER • SLOWER : You can select the playback speed of the “Audiobook” sound file in your iPod. SCROLL *3 Scroll • ONCE • AUTO • OFF : : : • L/O MODE Line output mode • REAR : Select if the REAR LINE OUT terminals are used for connecting the speakers (through an external amplifier). : Select if the REAR LINE OUT terminals are used for connecting a subwoofer (through an external amplifier). • SUB.
ENGLISH Other external component operations You can connect an external component to the AUX (auxiliary) input jack on the control panel. Title assignment You can assign names to 30 station frequencies (FM and AM) and up to 8 characters for each station name. 1 Select FM/AM. 2 Show the title entry screen. 3 Assign a title. 1 Select a character. Portable audio player, etc. 3.5 mm stereo mini plug (not supplied) ~ Ÿ ! Turn on the connected component and start playing the source. Adjust the volume.
How to clean the connectors Frequent detachment will deteriorate the connectors. To minimize this possibility, periodically wipe the connectors with a cotton swab or cloth moistened with alcohol, being careful not to damage the connectors. To play new discs New discs may have some rough spots around the inner and outer edges. If such a disc is used, this unit may reject the disc. To remove these rough spots, rub the edges with a pencil or ball-point pen, etc.
ENGLISH General Playing a CD-R or CD-RW • If you change the source while listening to a disc or an iPod, playback stops. Next time you select “CD” or “IPOD” as the playback source, playback will start from where it had been stopped/paused previously. • After ejecting a disc or disconnecting an iPod, “NO DISC” or “NO IPOD” appears and you cannot operate some of the buttons. Insert another disc, connect an iPod, or press SRC to select another playback source. • Use only “finalized” CD-Rs or CD-RWs.
• • • • Ejecting a disc • If the ejected disc is not removed within 15 seconds, it is automatically inserted into the loading slot again to protect it from dust. Playback starts automatically. iPod operations • Controllable iPod: – iPod mini – iPod G4 – iPod photo – iPod nano (1st & 2nd Generation) – iPod with video (5th Generation) • Update your iPod to the latest software version before using it with this unit. • When you turn on this unit, the iPod is charged through this unit.
ENGLISH Preset value setting for each sound mode Preset value Sound mode USER ROCK CLASSIC POP HIP HOP JAZZ BASS (bass) Freq. Level 60 Hz 00 100 Hz +03 80 Hz +01 100 Hz +02 60 Hz +04 80 Hz +03 MID (mid-range) Q Q1.0 Q1.0 Q1.0 Q1.0 Q1.0 Q1.0 Freq. Level 1.0 kHz 00 1.0 kHz 00 1.0 kHz 00 1.0 kHz +01 1.0 kHz –02 1.0 kHz 00 Q Q1.25 Q1.25 Q1.25 Q1.25 Q1.0 Q1.25 TRE (treble) Freq. Level 7.5 kHz 00 10.0 kHz +02 10.0 kHz +03 10.0 kHz +02 10.0 kHz +01 10.0 kHz +03 LOUD (loudness) Q Q1.25 Q1.25 Q1.25 OFF Q1.
MP3/WMA playback Remedies/Causes • Disc cannot be played back. • Use a disc with MP3/WMA tracks recorded in a format compliant with ISO 9660 Level 1, Level 2, Romeo, or Joliet. • Add the extension code <.mp3> or <.wma> to the file names. • Noise is generated. Skip to another track or change the disc. (Do not add the extension code <.mp3> or <.wma> to non-MP3 or WMA tracks.) ENGLISH Symptoms • A longer readout time is required (“READING” Do not use too many hierarchical levels and folders.
ENGLISH Specifications AUDIO AMPLIFIER SECTION Power Output: 20 W RMS × 4 Channels at 4 Ω and ≤ 1% THD+N Signal-to-Noise Ratio: 80 dBA (reference: 1 W into 4 Ω) Load Impedance: 4 Ω (4 Ω to 8 Ω allowance) Tone Control Range: Bass: ±12 dB (60 Hz, 80 Hz, 100 Hz, 120 Hz) Mid-range: ±12 dB (500 Hz, 1 kHz, 1.5 kHz, 2.5 kHz) Treble: ±12 dB (7.5 kHz, 10 kHz, 12.5 kHz, 15 kHz) Q (Q-slope): Q0.5 to Q2.
Type: Compact disc player Signal Detection System: Non-contact optical pickup (semiconductor laser) Number of Channels: 2 channels (stereo) Frequency Response: 5 Hz to 20 000 Hz Dynamic Range: 96 dB Signal-to-Noise Ratio: 98 dB Wow and Flutter: Less than measurable limit MP3 Decoding Format: (MPEG1/2 Audio Layer 3) Max. Bit Rate: 320 kbps WMA (Windows Media® Audio) Decoding Format: Max. Bit Rate: 320 kbps ENGLISH CD PLAYER SECTION GENERAL Power Requirement: Operating Voltage: DC 14.
Muchas gracias por la compra de un producto JVC. Como primer paso, por favor lea detenidamente este manual para comprender a fondo todas las instrucciones y obtener un máximo disfrute de esta unidad. ESPAÑOL IMPORTANTE (EE.UU.) Este equipo se ha sometido a todo tipo de pruebas y cumple con las normas establecidas para dispositivos de Clase B, de conformidad con la Parte 15 de las reglas de la FCC (Comisión Federal de Comunicaciones).
CONTENIDO Panel de control — KD-APD49/ KD-PDR40 ....................................... 4 Control remoto — RM-RK50 ............... 5 Procedimientos iniciales .................. 6 Operaciones básicas ............................................. 6 • También se borrarán los ajustes preestablecidos por usted. Cómo expulsar el disco por la fuerza • Tenga cuidado de no dejar caer el disco al ser expulsado. • Si esto no funciona, intente reposicionar su receptor.
Panel de control — KD-APD49 / KD-PDR40 Identificación de las partes ESPAÑOL Ventanilla de visualización 1 2 3 4 5 6 7 8 9 p q w e r t y u i Botones 5 (arriba) / ∞ (abajo) Botón 0 (expulsión) Botón (atenuador/en espera encendido) Disco de control Sensor remoto NO exponga el sensor remoto a una luz potente (luz solar directa o iluminación artificial).
Control remoto — RM-RK50 Elementos principales y funciones 1 Botón Sólo para EE.UU.-California: Este producto contiene una batería de litio CR de tipo botón que contiene perclorato (puede requerirse una manipulación especial). Visite www.dtsc.ca.gov/hazardouswaste/ perchlorate 2 Apunte el control remoto directamente hacia el sensor remoto del receptor. Asegúrese de que no hayan obstáculos entremedio.
Procedimientos iniciales Operaciones básicas ESPAÑOL ~ Encienda la unidad. Para disminuir el volumen en un instante (ATT) Para restablecer el sonido, presione el botón otra vez. Para apagar la unidad Ÿ Ajustes básicos • Véase también “Configuraciones generales — PSM” en las páginas 14 y 15. 1 *1 No podrá seleccionar “CD” como fuente de reproducción si no hay ningún disco en la unidad. *2 Aparece “NO IPOD” si el iPod no está conectado.
Operaciones de la radio Cuando una radiodifusión en FM estéreo sea difícil de recibir ~ Ÿ Se enciende cuando se recibe una radiodifusión FM estéreo con una intensidad de señal suficiente. Se consigue mejorar la recepción, pero se pierde el efecto estereofónico. ESPAÑOL Se enciende cuando se activa el modo monaural. Para restablecer el efecto estereofónico, repita el procedimiento. Aparece “MONO OFF” y el indicador MO se apaga. ! Comience la búsqueda de la emisora.
Preajuste manual Ej.: Almacenando una emisora FM de 92,50MHz en el número de preajuste 4 de la banda FM1. ESPAÑOL 1 Operaciones de los discos Para reproducir un disco en el receptor Todas las pistas se reproducen repetidamente hasta que usted cambie la fuente o extraiga el disco. 2 3 El número de preajuste parpadea durante unos momentos. Cómo escuchar una emisora preajustada 1 2 Seleccione la emisora preajustada (1 – 6) deseada.
Para seleccionar una pista específica de una carpeta (para discos MP3 o WMA): Otras funciones principales Salto rápido de las pistas durante la reproducción • Si es un disco MP3 o WMA, podrá saltar pistas dentro de la misma carpeta. Ej.
Cómo seleccionar los modos de reproducción ESPAÑOL Podrá utilizar solamente uno de los siguientes modos de reproducción a la vez. 1 2 Operaciones del iPod Puede reproducir canciones con un iPod Apple conectándolo con el cable de conexión directa para iPod suministrado. Puede controlar la reproducción desde la unidad o desde su iPod. • Si desconecta el iPod la reproducción se detendrá. Pulse SRC para escuchar otra fuente de reproducción. Seleccione el modo de reproducción deseado.
! Ajuste el sonido según se desee. (Consulte las páginas 12 y 13). Seleccionar una pista en el menú 1 Ingrese al menú principal. Para controlar la reproducción desde el iPod • Pulse y mantenga pulsado este botón nuevamente para controlar la reproducción desde la unidad. Aparece “HEAD MODE” en la pantalla. Ahora los botones 5/∞/4 /¢ / números funcionan como los botones de selección de menú. 2 Seleccione el menú deseado. ESPAÑOL o Aparece “IPOD MODE” en la pantalla.
Para salir del modo de selección de menús Para comprobar otra información mientras escucha un iPod ESPAÑOL o * El modo de selección de menú será cancelado: – Si no se realiza ninguna operación durante aproximadamente 10 segundos. – Cuando usted confirma la selección de una pista. – Si presiona algún otro botón, tal como DISP, SEL, MODE o EQ.
Indicación, [Margen] 3 Seleccione una característica de sonido. 4 Ajuste los elementos de sonido de la característica de sonido seleccionada. 1 Ajuste la frecuencia. SUBWOOFER *1, [00 a 08, inicial: 04] Ajusta el nivel de salida del subwoofer. VOL ADJ (ajuste de volumen), [–05 a +05, inicial: 00] Ajuste el nivel de volumen para cada fuente (excepto FM) en relación con el nivel de volumen de FM. El nivel de volumen aumenta o disminuye automáticamente al cambiar la fuente.
Configuraciones generales—PSM ESPAÑOL Puede cambiar los elementos de PSM (Modo de ajustes preferidos) enumerados en la siguiente tabla y en la página 15. 3 Ajuste la opción de PSM seleccionada. 4 Repita los pasos 2 y 3 para ajustar las otras opciones de PSM, si fuera necesario. 5 Finalice el procedimiento. 1 2 Seleccione una opción de PSM.
Opción ( : Inicial) Ajuste, [página de referencia] • NORMAL AUDIOBOOKS *2 Control de velocidad • FASTER de “Audiobook” • SLOWER : Puede seleccionar la velocidad de reproducción de un archivo de sonido “Audiobook” en su iPod. SCROLL *3 Desplazamiento • ONCE • AUTO • OFF : : : • L/O MODE Modo de salida de línea • REAR : Selecciónelo si los terminales REAR LINE OUT se utilizan para conectar los altavoces (a través de un amplificador externo).
Operaciones del otro componente externo ESPAÑOL Puede conectar un componente externo al jack de entrada AUX (auxiliar) en el panel de control. Asignación de título Puede asignar nombres a 30 frecuencias de emisoras (FM y AM) y hasta un máximo de 8 caracteres para cada nombre de emisora. 1 Selecciona FM/AM. 2 Muestre la pantalla de entrada de título. 3 Asigne un título. 1 Seleccione un carácter. Reproductor de audio portátil, etc.
Cómo limpiar los conectores Un desmontaje frecuente producirá el deterioro de los conectores. Para reducir esta posibilidad al mínimo, limpie periódicamente los conectores con un palillo de algodón, teniendo cuidado de no dañar los conectores. Para reproducir discos nuevos Los discos nuevos podrían presentar ciertas irregularidades en sus bordes interior y exterior. Si intenta utilizar un disco en tales condiciones, el receptor podría rechazar el disco.
ESPAÑOL General Reproducción de un CD-R o CD-RW • La reproducción cesa si cambia la fuente mientras escucha un disco o un iPod. La próxima vez que seleccione “CD” o “IPOD” como fuente de reproducción, la reproducción comenzará desde el lugar en el que fue detenida/pausada previamente. • Después de expulsar un disco o desconectar un iPod, aparecerá “NO DISC” o “NO IPOD” y algunos botones quedarán inoperantes. Inserte otro disco, conecte un iPod, o presione SRC para seleccionar otra fuente de reproducción.
• • • • Expulsión del disco • Si no saca el disco expulsado en el lapso de 15 segundos, será reinsertado automáticamente en la ranura de carga para protegerlo contra el polvo. La reproducción se inicia automáticamente. Operaciones del iPod • iPod controlable: – iPod mini – iPod G4 – iPod photo – iPod nano (1ª y 2ª generación) – iPod con Vídeo (5ta. generación) • Actualice su iPod a la versión de software más reciente antes de utilizarlo con esta unidad.
Configuración del valor preajustado para cada modo de sonido Valor preajustado Modo de sonido BASS (graves) ESPAÑOL Frec. Nivel MID (rango medio) Q Frec. Nivel TRE (agudos) Q Frec. Nivel LOUD (sonoridad) Q USER 60 Hz 00 Q1.0 1.0 kHz 00 Q1.25 7.5 kHz 00 Q1.25 ROCK 100 Hz +03 Q1.0 1.0 kHz 00 Q1.25 10.0 kHz +02 Q1.25 80 Hz +01 Q1.0 1.0 kHz 00 Q1.25 10.0 kHz +03 Q1.25 100 Hz +02 Q1.0 1.0 kHz +01 Q1.25 10.0 kHz +02 Q1.25 HIP HOP 60 Hz +04 Q1.0 1.0 kHz –02 Q1.
Reproducción del iPod Soluciones/Causas • No se puede reproducir el disco. • Utilice un disco con pistas MP3/WMA grabadas en un formato compatible con ISO 9660 Nivel 1, Nivel 2, Romeo o Joliet. • Añada el código de extensión <.mp3> o <.wma> a los nombres de archivos. • Se generan ruidos. Salte a otra pista o cambie el disco. (No añada el código de extensión <.mp3> o <.wma> a pistas que no sean MP3 o WMA). • Se requiere mayor tiempo de lectura (“READING” permanece parpadeando en la pantalla).
Especificaciones ESPAÑOL SECCIÓN DEL AMPLIFICADOR DE AUDIO Salida de potencia: 20 W RMS × 4 canales a 4 Ω y ≤ 1% THD+N Relación señal a ruido: 80 dBA (referencia: 1 W en 4 Ω) Impedancia de carga: 4 Ω (tolerancia de 4 Ω a 8 Ω) Gama de control de tono: Graves: ±12 dB (60 Hz, 80 Hz, 100 Hz, 120 Hz) Rango medio: ±12 dB (500 Hz, 1 kHz, 1,5 kHz, 2,5 kHz) Agudos: ±12 dB (7,5 kHz, 10 kHz, 12,5 kHz, 15 kHz) Q (curva Q): Q0.5 a Q2.
Tipo: Reproductor de discos compactos Sistema de detección de señal: Captor óptico sin contacto (láser semiconductor) Número de canales: 2 canales (estereofónicos) Respuesta de frecuencias: 5 Hz a 20 000 Hz Gama dinámica: 96 dB Relación señal a ruido: 98 dB Lloro y trémolo: Inferior al límite medible Formato de decodificación MP3: (MPEG1/2 Audio Layer 3) Máx. velocidad de bits: 320 kbps Formato de decodificación WMA (Windows Media® Audio): Máx.
FRANÇAIS Merci pour avoir acheté un produit JVC. Veuillez lire attentivement toutes les instructions avant d’utiliser l’appareil afin de bien comprendre son fonctionnement et d’obtenir les meilleures performances possibles. Précautions: Tout changement ou modification non approuvé par JVC peut annuler l’autorité de l’utilisateur d’utiliser l’appareil. IMPORTANT POUR PRODUITS LASER 1. PRODUIT LASER CLASSE 1 2. ATTENTION: N’ouvrez pas le couvercle supérieur.
Comment réinitialiser votre appareil TABLE DES MATIERES Panneau de commande — KD-APD49/KD-PDR40 .......................... 4 Télécommande — RM-RK50 ............... 5 Pour commencer.............................. 6 Opérations de base............................................... 6 Comment forcer l’éjection d’un disque • Faites attention de ne pas faire tomber le disque quand il est éjecté. • Si cela ne fonctionne pas, essayez de réinitialiser l’autoradio.
Panneau de commande — KD-APD49 / KD-PDR40 Identification des parties FRANÇAIS Fenêtre d’affichage 1 Touches 5 (haut) / ∞ (bas) 2 Touche 0 (éjection) 3 Touche (attente/sous tension atténuation) 4 Molette de commande 5 Capteur de télécommande 6 7 8 9 p q w e r t y u i N’EXPOSEZ PAS le capteur de télécommande à une forte lumière (lumière directe du soleil ou éclairage artificiel).
Télécommande — RM-RK50 Mise en place de la pile-bouton au lithium (CR2025) 1 Touche Pour Californie des États-Unis seulement: Cet appareil contient une pile-bouton CR au lithium qui contient du perchlorate—une manipulation spéciale peut être requise. Voir www.dtsc.ca.gov/hazardouswaste/perchlorate 2 Dirigez la télécommande directement sur le capteur de télécommande de autoradio. Assurezvous qu’il n’y a pas d’obstacle entre les deux.
Pour commencer Opérations de base ~ Mise sous tension de l’appareil. Pour couper le volume momentanément (ATT) Pour rétablir le son, appuyez de nouveau sur la touche. Pour mettre l’appareil hors tension Ÿ FRANÇAIS Réglages de base • Référez-vous aussi aux “Réglages généraux — PSM” aux pages 14 et 15. 1 * Vous ne pouvez pas choisir “CD” comme source de lecture s’il n’y a pas de disque dans l’appareil. *2 “NO IPOD” apparaît si aucun iPod n’est connecté.
Quand une émission FM stéréo est difficile à recevoir ~ S’allume quand le mode monophonique est mis en service. Ÿ La réception est améliorée, mais l’effet stéréo est perdu. S’allume lors de la réception d’une émission FM stereo avec un signal suffisamment fort. ! Pour rétablir l’effet stéréo, répétez la même procédure. “MONO OFF” apparaît et l’indicateur MO s’éteint. FRANÇAIS Fonctionnement de la radio Mémorisation des stations Démarrez la recherche d’une station.
Préréglage manuel Ex.: Mémorisation de la station FM de fréquence 92,50MHz sur le numéro de préréglage 4 de la bande FM1. 1 Opérations des disques Lecture d’un disque dans l’autoradio Toutes les plages sont reproduites répétitivement jusqu’à ce que vous changiez la source ou éjectiez le disque. FRANÇAIS 2 3 Pour arrêter la lecture et éjecter le disque Le numéro de préréglage clignote un instant. Écoute d’une station préréglée 1 2 Choisissez la station préréglée (1 – 6) souhaitée.
Pour choisir une plage particulière dans un dossier (pour les disques MP3 ou WMA): Autres fonctions principales Pour sauter les plages rapidement pendant la lecture • Pour les disques MP3 ou WMA, vous pouvez sauter des plages à l’intérieur du même dossier. Ex.
Sélection des modes de lecture Vous pouvez utiliser un des modes de lecture suivants à la fois. 1 2 Choisissez le mode de lecture souhaité. Utilisation de iPod Vous pouvez reproduire les morceaux d’un iPod Apple en réalisant une connexion avec le câble de connexion directe pour iPod. Vous pouvez commander la lecture à partir de ce appareil ou de votre iPod. • Déconnecter iPod arrête la lecture. Appuyez sur SRC pour écouter une autre source de lecture.
Sélection d’une plage à partir du menu Ajustez le son comme vous le souhaitez. (Voir les pages 12 et 13). Pour commander la lecture à partir de votre iPod 1 ou “IPOD MODE” apparaît sur l’affichage. • Maintenez de nouveau pressée cette touche pour commander la lecture à partir de cet appareil. “HEAD MODE” apparaît sur l’affichage. Entrez dans le menu principal. Maintenant les touches 5/∞/4 /¢ / touches numériques peuvent être utilisées comme touches de sélection du menu.
Pour quitter le mode de sélection de menu Pour vérifier les autres informations tout en écoutant un iPod ou FRANÇAIS * Le mode de sélection de menu est annulé: – Si aucune opération n’est effectuée pendant environ 10 secondes. – Quand vous validez le choix d’une plage. – Appuyer sur d’autres touches telles que DISP, SEL, MODE ou EQ.
Indication, [Plage] LOUD*4 (loudness), [LOUD ON ou LOUD OFF] Accentue les basses et hautes fréquences pour produire un son plus équilibré aux faibles niveaux de volume. 3 Choisissez une caractéristique sonore. 4 Ajustez les éléments du son de la caractéristique sonore choisie. 1 Ajustez la fréquence. SUBWOOFER *1, [00 à 08, réglage initial: 04] Ajuste le niveau de sortie du caisson de grave. 2 Ajustez le niveau. VOLUME, [00 à 50 ou 00 à 30 ]*5 Ajuste le volume. 3 Ajustez la pente de qualité (Q).
Réglages généraux — PSM Vous pouvez changer les options PSM (mode des réglages préférés) du tableau ci-dessous et de la page 15. 3 Ajustez l’option PSM choisie. 4 Répétez les étapes 2 et 3 pour ajuster les autres options PSM si nécessaire. 5 Terminez la procédure. 1 Choisissez une option PSM.
Élément ( : Réglage initial) • NORMAL • FASTER • SLOWER Réglage, [page de référence] • ONCE • AUTO • OFF : : : • L/O MODE Mode de sortie de ligne • REAR : • SUB.W : SUB.
Utilisation d’un autre appareil extérieur FRANÇAIS Vous pouvez connecter un appareil extérieur à la prise d’entrée AUX (auxiliaire) sur le panneau de commande. Affectation d’un titre Vous pouvez affecter un nom à 30 fréquences de station (FM et AM) et un maximum de 8 caractères pour chaque nom. 1 Choisissez FM/AM. 2 Affiche l’écran d’entrée de titre. 3 Affectez un titre. 1 Choisissez un caractère. Lecteur audio portable, etc.
Pour reproduire un disque neuf Comment nettoyer les connecteurs Un détachement fréquent détériorera les connecteurs. Pour minimiser ce problème, frottez périodiquement les connecteurs avec un coton tige ou un chiffon imprégné d’alcool, en faisant attention de ne pas endommager les connecteurs. Les disques neufs ont parfois des ebarbures sur le bord intérieur et extérieur. Si un tel disque est utilisé, cet autoradio risque de le rejeter.
Généralités Lecture d’un CD-R ou CD-RW • Si vous changez la source pendant l’écoute d’un disque ou de iPod, la lecture s’arrête. La prochaine fois que vous choisissez “CD” ou “IPOD” comme source de lecture, la lecture commence à partir du point où elle a été interrompue précédemment. • Après avoir éjecté un disque ou déconnecté un iPod, “NO DISC” ou “NO IPOD” apparaît et certaines touches ne fonctionnent pas.
• • • • Éjection d’un disque • Si le disque éjecté n’est pas retiré avant 15 secondes, il est réinséré automatiquement dans la fente d’insertion pour le protéger de la poussière. La lecture démarre automatiquement. Utilisation de iPod • iPod pouvant être commandé – iPod mini – iPod G4 – iPod photo – iPod nano (1e et 2e génération) – iPod avec vidéo (5e génération) • Mettez le logiciel de votre iPod à jour à dernière version avant de l’utiliser avec cet appareil.
Valeur préréglée pour chaque mode sonore Valeur préréglée Mode sonore MID (médiums) TRE (aigus) LOUD Fréq. Niveau Q (loudness) 7.5 kHz 00 Q1.25 USER Q Fréq. Niveau Q1.0 1.0 kHz 00 Q Q1.25 ROCK 100 Hz +03 Q1.0 1.0 kHz 00 Q1.25 10.0 kHz +02 Q1.25 80 Hz +01 Q1.0 1.0 kHz 00 Q1.25 10.0 kHz +03 Q1.25 100 Hz +02 Q1.0 1.0 kHz +01 Q1.25 10.0 kHz +02 Q1.25 HIP HOP 60 Hz +04 Q1.0 1.0 kHz –02 Q1.0 10.0 kHz +01 Q1.25 JAZZ 80 Hz +03 Q1.0 1.0 kHz 00 Q1.25 10.0 kHz +03 Q1.
Remèdes/Causes • Le disque ne peut pas être reproduit. • Utilisez un disque avec des plages MP3/WMA enregistrées dans un format compatible avec ISO 9660 Niveau 1, Niveau 2, Romeo ou Joliet. • Ajoutez le code d’extension <.mp3> ou <.wma> aux noms de fichier. • Du bruit est produit. Sautez à une autre plage ou changez le disque. (N’ajoutez pas le code d’extension <.mp3> ou <.wma> à des plages non MP3 ou WMA).
Spécifications SECTION DE L’AMPLIFICATEUR AUDIO Puissance de sortie: 20 W RMS × 4 canaux à 4 Ω et avec ≤ 1% THD+N Rapport signal sur bruit: 80 dBA (référence: 1 W pour 4 Ω) Impédance de charge: 4 Ω (4 Ω à 8 Ω admissibles) FRANÇAIS Plage de commande de tonalité: Graves: ±12 dB (60 Hz, 80 Hz, 100 Hz, 120 Hz) Médiums: ±12 dB (500 Hz, 1 kHz, 1,5 kHz, 2,5 kHz) Aigus: ±12 dB (7,5 kHz, 10 kHz, 12,5 kHz, 15 kHz) Q (pente Q): Q0.5 à Q2.
SECTION DU LECTEUR CD Type: Lecteur de disque compact Système de détection du signal: Capteur optique sans contact (laser semiconducteur) Nombre de canaux: 2 canaux (stéréo) Réponse en fréquence: 5 Hz à 20 000 Hz Plage dynamique: 96 dB Rapport signal sur bruit: 98 dB Pleurage et scintillement: Inférieur à la limite mesurable Débit binaire maximum: 320 kbps Format de décodage WMA (Windows Media® Audio): Débit binaire maximum: 320 kbps Tension de fonctionnement: CC 14,4 V (11 V à 16 V admis
Having TROUBLE with operation? Please reset your unit Refer to page of How to reset your unit Still having trouble?? USA ONLY Call 1-800-252-5722 http://www.jvc.com We can help you! EN, SP, FR © 2007 Victor Company of Japan, Limited Rear_KD-APD49[J]f.