
Detailed User Guide


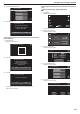

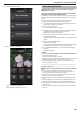

Table Of Contents
- Getting Started
- Verifying the Accessories
- Turning on this Unit
- Opening the Terminal Cover (SD Card Cover)
- Charging
- Resetting this Unit
- Quad Proof
- Grip Adjustment
- Attaching the Lens Cap
- Attaching the Core Filter
- Inserting an SD Card
- Using the Touch Screen
- Clock Setting
- Changing the Display Language
- Holding this Unit
- Tripod Mounting
- Using this Unit Overseas
- Optional Accessories
- Recording
- Taking Videos in Auto Mode
- Taking Still Images in Auto Mode
- Zooming
- Manual Recording
- Shooting under Water
- Recording with Effects (RECORDING EFFECT)
- Recording with Animation Effects (ANIMATION EFFECT)
- Capturing Subjects Clearly (TOUCH PRIORITY AE/AF)
- Reducing Camera Shake
- Recording at Intervals (TIME-LAPSE RECORDING)
- Recording with a Part of the Screen Enlarged in Sub Screen (CLOSE-UP SUB-WINDOW)
- Using the Self-timer
- Recording at a Fixed Interval and Playing Back Repeatedly
- Recording Videos with Date and Time
- Recording Videos with Time Counter
- Checking the Remaining Recording Time
- Playback
- Editing
- Copying
- Using Wi-Fi
- Wi-Fi Capabilities
- Operating Environment
- Precautions on Using Wi-Fi
- Image Monitoring via Direct Connection (DIRECT MONITORING)
- Recording the Location Information
- Image Monitoring via an Access Point at Home (INDOOR MONITORING)
- Image Monitoring via the Internet (OUTDOOR MONITORING)
- Changing the Settings
- Using Smartphone Applications
- Troubleshooting
- Wi-Fi Specifications
- Using Wi-Fi by Creating a QR Code
- Settings Menu
- Names of Parts
- Indications on the LCD monitor
- Troubleshooting
- Maintenance
- Specifications
- Trademarks

o
Regular Operation
Connecting the Smartphone to the Camera Wirelessly
o
Connection by entering the Wi-Fi password
1
Tap “MENU”.
(Operation on this camera)
Set the camera to the recording mode.
.
REC
≪PLAY
MENU
0
The top menu appears.
2
Tap the “Wi-Fi” (Q) icon.
(Operation on this camera)
.
OFF
SETUP
TOP MENU
Wi-Fi
SETTING
RECORD
SETTINGS
CONNECTION
3
Tap the “DIRECT CONNECTION” (N) icon in the “Wi-Fi” menu.
(Operation on this camera)
.
Wi-Fi
Wi-Fi SETTING
ACCESS POINT
CONNECTION
CONNECTION
DIRECT
0
When
“50p” is selected for “SYSTEM SELECT”, the following display
appears and recording mode is switched to the 50i mode.
0
This display disappears automatically after approximately 3 seconds,
but disappears immediately if the screen is tapped.
.
WHEN USING Wi-Fi
VIDEO RECORDING AT 50i
DIRECT CONNECTION
4
Check the SSID and the PASS being displayed on the screen of the
camera.
.
WPS
PASS:********************************
SSID:********************************
DIRECT CONNECTION
CONNECTING DEVICE
SET UP Wi-Fi SETTING ON
OK
5
Select
the SSID in step 4 from the Wi-Fi network selection screen of your
smartphone, and enter the PASS on the password screen.
(Operation on the smartphone)
.
0
For
details on connecting your smartphone to a Wi-Fi network, please
refer to the instruction manual of the device in use.
6
A connection is established and Q appears on the camera’s screen.
.
REC
0:00:00 [2:04]
0:00:00 [2:04]
STOP
DIRECT MONITORING
o
Connection by Wi-Fi Protected Setup (WPS)
1
Tap “MENU”.
(Operation on this camera)
Set the camera to the recording mode.
.
REC
≪PLAY
MENU
0
The top menu appears.
2
Tap the “Wi-Fi” (Q) icon.
(Operation on this camera)
.
OFF
SETUP
TOP MENU
Wi-Fi
SETTING
RECORD
SETTINGS
CONNECTION
3
Tap the “DIRECT CONNECTION” (N) icon in the “Wi-Fi” menu.
(Operation on this camera)
.
Wi-Fi
Wi-Fi SETTING
ACCESS POINT
CONNECTION
CONNECTION
DIRECT
0
When
“50p” is selected for “SYSTEM SELECT”, the following display
appears and recording mode is switched to the 50i mode.
0
This display disappears automatically after approximately 3 seconds,
but disappears immediately if the screen is tapped.
Using Wi-Fi by Creating a QR Code
134