AV32EK_cover.fm Page 1 Tuesday, December 19, 2000 9:17 AM AV28WT5EI/AV24WT5EI Colour Television AV28WT5EI AV24WT5EI Contents Safety precautions . . . . . . . . . . . . . . . . . . . . . . . . . . . 2 Setting up your TV . . . . . . . . . . . . . . . . . . . . . . . . . . . 4 T-V LINK functions. . . . . . . . . . . . . . . . . . . . . . . . . . . 7 Using your TV–the basics . . . . . . . . . . . . . . . . . . . . . 8 Remote control buttons and functions . . . . . . . . . . . . 11 Using the TV’s menus . . .
AV32EK_WARNING.fm Page 2 Tuesday, December 19, 2000 9:19 AM Thank you for buying this colour television. To make sure you fully understand how to use your new TV, please read this manual thoroughly before you begin. 6DIHW\#SUHFDXWLRQV ■ :DUQLQJ ■ :DUQLQJ To prevent fire or shock hazard, do not expose this appliance to rain or moisture. DO NOT cut off the mains plug from this equipment.
AV32EK_WARNING.fm Page 3 Tuesday, December 19, 2000 9:19 AM ■ *XLGHOLQHV#IRU#VDIH#RSHUDWLRQ This equipment has been designed and manufactured to comply with international safety standards. However, as with any electrical appliance, care must be taken to ensure optimal results and operational safety. • Before attempting to use this equipment, read the operating instructions thoroughly. • Ensure that all electrical connections (including the mains plug, extension leads, etc.
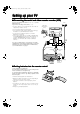
WFT1EK_E1.fm Page 4 Tuesday, December 19, 2000 9:21 AM 6HWWLQJ#XS#\RXU#79 ■ &RQQHFWLQJ#WKH#DHULDO#DQG#YLGHR#FDVVHWWH#UHFRUGHU#+9&5, If you are connecting a VCR, follow A → B → C → D in the diagram opposite. If you are not connecting a VCR, follow 1 → 2. • For more details, see the manuals that came with the equipment you want to connect. • The connecting cables are not provided. • You can watch a video using the VCR without doing C. For details, see your VCR instruction manual.
WFT1EK_E1.fm Page 5 Wednesday, December 20, 2000 4:26 PM Setting up your TV ■ ,QLWLDO#VHWWLQJV When the TV is first turned on, it goes into the initial setting mode, and you will see the JVC logo. Follow the instructions on the screen to make the initial settings. 1 Press the main power button on the TV The power lamp lights red (for power on), then green (for TV on) and the JVC logo is appears. • If the power lamp stays red and does not change to green: your TV is in the standby mode.
WFT1EK_E1.fm Page 6 Tuesday, December 19, 2000 9:21 AM Setting up your TV 4 Press the 3 button to start the AUTO PROGRAM function The AUTO PROGRAM menu appears and the TV channels you receive are automatically stored in the programme numbers list (PR). To cancel the AUTO PROGRAM function: Press the 4 button. 5 After the TV channels have been registered in the programme numbers list (PR), the EDIT menu appears If you want to, you can now edit the programme numbers (PR) using the EDIT/MANUAL function.
WFT1EK_E1.fm Page 7 Tuesday, December 19, 2000 9:21 AM 709#/,1.#IXQFWLRQV When you have a T-V LINK compatible VCR connected to the EXT-2 Terminal on the TV, it is easier to set up the VCR and to view videos. T-V LINK uses the following features: ■ 79#DXWR#SRZHU#RQ29&5# ■ 3UH0VHW#GRZQORDG When the VCR starts playing, the TV automatically turns on and the images from the EXT-2 terminal appear on the screen. The VCR will automatically download the registered data on the TV channels from the TV.
WFT1EK_E1.fm Page 8 Tuesday, December 19, 2000 9:21 AM 8VLQJ#\RXU#79²WKH#EDVLFV ■ 7XUQ#WKH#PDLQ#SRZHU#RQ Press the main power button on the TV The power lamp lights red and your TV is in the standby mode. If the Power lamp lights green, the TV is already on. To turn the main power off: Press the main power button again. The power lamp goes off. To save energy, turn the main power off if you are not using the TV for a long time.
WFT1EK_E1.fm Page 9 Tuesday, December 19, 2000 9:21 AM Using your TV–the basics 2 Press the ì and ë buttons to choose a programme number (PR). Then press the 3 button. • For Programme numbers (PR) where you have the CHILD LOCK function set, the @ (CHILD LOCK) mark appears next to the programme number (PR) in the PR LIST. • You cannot use the ë buttons to choose a Programme number (PR) which has the CHILD LOCK set.
WFT1EK_E1.
WFT1EK_E1.fm Page 11 Tuesday, December 19, 2000 9:21 AM 5HPRWH#FRQWURO#EXWWRQV#DQG#IXQFWLRQV 1 0XWLQJ#EXWWRQ You can turn the sound off instantly. Press the > (muting) button to turn off the sound. Pressing the > (muting) button again restores the previous volume level 1 2 3 4 5 6 7 8 9 0 P TV 2 1XPEHU#EXWWRQV You can choose a programme number (PR) by entering the programme number AV MENU OK P Example: • PR12 → press ~ and Ÿ . • PR6 → press ¤.
WFT1EK_E1.fm Page 12 Tuesday, December 19, 2000 9:21 AM Remote control buttons and functions PANORAMIC: This stretches the left and right sides of a normal picture (4:3 aspect ratio) to fill the screen, without making the picture appear unnatural. • The top and bottom of the picture are slightly cut off. 14:9 ZOOM: This zooms up the wide picture (14:9 aspect ratio) to the upper and lower limits of the screen. 2 Press the ë buttons to choose a ZOOM mode.
WFT1EK_E1.fm Page 13 Tuesday, December 19, 2000 9:21 AM Remote control buttons and functions 5#,QIRUPDWLRQ#EXWWRQ 9 &RORXU#EXWWRQV You can display the PR LIST or the current time on the screen. The colour buttons are used for the teletext operations or the menu operations. For details, see “~ Teletext control buttons and VCR/(/DVD switch” on page 14 or “Using the TV’s menus” on page 16. Press the 9 (information) button Pressing the 9 (information) button changes the display as follows: 0 2.
WFT1EK_E1.fm Page 14 Tuesday, December 19, 2000 9:21 AM Remote control buttons and functions 7HOHWH[W#FRQWURO#EXWWRQV#DQG#9&52( (2'9' 2'9'#VZLWFK ■ ~#7HOHWH[W#FRQWURO#EXWWRQV#DQG#9&52 #VZLWFK 4 Choose a teletext page by pressing the ë buttons, number buttons or colour buttons To return to the TV mode: P TV Press the 4 button or : (Text) button. MENU OK • If you have trouble receiving teletext broadcasts, contact your local dealer or the teletext station. • In Text mode, the ZOOM mode is fixed to FULL.
WFT1EK_E1.fm Page 15 Tuesday, December 19, 2000 9:21 AM Remote control buttons and functions +ROG 6L]H You can hold a teletext page on the screen for as long as you want, even while several other teletext pages are being received. You can double the height of the teletext display. Press the ÷ button. Press the û button Hold indication To cancel the Hold function: Press the û button again. 6XE0SDJH Some teletext pages include sub-pages that are automatically displayed.
WFT1EK_E2.fm Page 16 Tuesday, December 19, 2000 9:22 AM 8VLQJ#WKH#79·V#PHQXV# This TV has a number of functions you can operate using menus. To use all your TV’s functions fully, you need to understand how to use the basic menus. 1 Press the 3 button to display the MENU (main menu) The MENU (main menu) appears. In it, the titles of the menus are displayed. 2 Press the ë buttons to choose a menu title, and press the 3 button The menu appears.
WFT1EK_E2.fm Page 17 Tuesday, December 19, 2000 9:22 AM 3LFWXUH#VHWWLQJ • You can change the HUE setting (picture hue) only when the colour system is NTSC 3.58 or NTSC 4.43. (See “Specifications” on page 34.) To return to the default settings in each TINT mode: Press the blue button. This returns the picture settings in the TINT mode you have chosen to the default settings, and stores them in the TINT mode.
WFT1EK_E2.fm Page 18 Tuesday, December 19, 2000 9:22 AM 3LFWXUH#IHDWXUHV 2 Press the ì buttons to choose the appropriate colour system. To display the PICTURE FEATURES menu: 1 Press the 3 button to display MENU (main menu) 2 Press the ë buttons to choose PICTURE FEATURES, and press the 3 button ■ $872#915 VNR Stands for “video noise reduction”. The AUTO VNR function reduces any “noise” (interference or snowing) in the current picture.
WFT1EK_E2.fm Page 19 Tuesday, December 19, 2000 9:22 AM 6RXQG#VHWWLQJ ■ +<3(5#6281' You can enjoy sounds with a wider ambience. 1 Press the ë buttons to choose HYPER SOUND 2 Press the ì buttons to choose ON To cancel the HYPER SOUND function: Press the ì buttons to choose OFF. To display the SOUND SETTING menu: 1 Press the 3 button to display the MENU (main menu) 2 Press the ë buttons to choose SOUND SETTING.
WFT1EK_E2.fm Page 20 Tuesday, December 19, 2000 9:22 AM (;7#6(77,1* 3 Press the 3 button to complete the setting. The menu disappears. To display the EXT SETTING menu: 1 Press the 3 button to display the MENU (main menu) 2 Press the ë buttons to choose EXT SETTING. Then press the 3 button • The EXT-1 terminal does not support S-VIDEO signal (Y/C signal) and you cannot set K (S-VIDEO input) in the EXT-1 terminal. • Setting K (S-VIDEO input) changes the head character from “E” to “S”.
WFT1EK_E2.fm Page 21 Tuesday, December 19, 2000 9:22 AM EXT SETTING 3 Press the ë buttons to choose a name. Then press the 3 button. The LIST disappears and the name is assigned to the EXT terminal. To erase a name assigned to the EXT terminal: Choose a blank space. 4 Press the 3 button to complete the setting. The menu disappears. • You cannot choose an EXT terminal name that is not on the name list (LIST). 3 Press the 3 button to complete the setting. The menu disappears.
WFT1EK_E2.fm Page 22 Tuesday, December 19, 2000 9:22 AM )($785(6 ■ %/8(#%$&. You can set the TV to automatically change to a blue screen and mute the sound if the signal is weak or absent, or when there is no input from an external device. 1 Press the ë buttons to choose BLUE BACK To display the FEATURES menu: 1 Press the 3 button to display the MENU (main menu) 2 Press the ë buttons to choose FEATURES.
WFT1EK_E2.fm Page 23 Tuesday, December 19, 2000 9:22 AM FEATURES 5 Press the blue button and set the CHILD LOCK function. @ (CHILD LOCK) appears and the TV channel is locked. To reset the CHILD LOCK function: Press the blue button again. @ (CHILD LOCK) disappears. 6 Press the 3 button to complete the setting. ■ '(&2'(5#+(;705, You can only use this function if you have a decoder connected to a T-V LINK compatible VCR, which in turn is connected to the EXT-2 terminal.
WFT1EK_E3.fm Page 24 Tuesday, December 19, 2000 9:52 AM ,167$// To cancel the AUTO PROGRAM function: Press the 4 button. 3 After the TV channels have been stored in the programme numbers (PR) list, the EDIT menu appears You can now edit the programme numbers (PR) list using the EDIT/MANUAL function. For details, see “EDIT/MANUAL” on page 25. To display the INSTALL menu: 1 Press the 3 button to display the MENU (main menu) 2 Press the ë buttons to choose the INSTALL menu.
WFT1EK_E3.fm Page 25 Tuesday, December 19, 2000 9:52 AM INSTALL ■ (',720$18$/ 2 Follow the options for the function you The EDIT/MANUAL functions are divided into two types: • editing the current programme numbers (PR) (EDIT functions); and • manually storing a TV channel you want to view a programme number (PR) (MANUAL function). 3 Press the 3 button to complete the want to use settings The T-V LINK menu appears.
WFT1EK_E3.fm Page 26 Tuesday, December 19, 2000 9:52 AM INSTALL 4 Press the ï button to change the programme number (PR) of a TV channel to a new programme number (PR) ,' 1 Press the ë buttons to choose a TV channel Every time you press the ë buttons, the programme number (PR) changes, and the picture of the TV channel stored in the programme number (PR) appears on the screen. 2 Press the red button to start the ID function • You can give your own unique channel name (ID) to the TV channel.
WFT1EK_E3.fm Page 27 Tuesday, December 19, 2000 9:52 AM INSTALL '(/(7( 1 Press the ë buttons to choose a TV channel Every time you press the ë buttons, the programme number (PR) changes over, and the picture of the TV channel stored in the programme number list (PR) appears on the screen. 2 Press the yellow button to delete the TV channel The TV channel is deleted from the programme numbers (PR) list.
WFT1EK_E3.fm Page 28 Tuesday, December 19, 2000 9:52 AM '(02 The DEMO function automatically demonstrates some of the TV functions. To display the DEMO menu: 1 Press the 3 button to display the MENU (main menu) 2 Press the ë buttons to choose DEMO. Then press the 3 button 1 Press the ë buttons to choose ON 2 Press the 3 button to complete the setting The DEMO function is set to ON, and the demonstration will start. To stop the demonstration: Press one of the buttons on the remote control.
WFT1EK_E3.fm Page 29 Tuesday, December 19, 2000 9:52 AM 2WKHU#PHQXV ■ 'RZQORDGLQJ#GDWD#WR#D#9&5 You can send to the latest programme numbers (PR) data to a VCR with the T-V LINK function. 4 Press the ë buttons to choose FEATURES. Then press the 3 button. The FEATURES menu appears. • You can only do this when a T-V LINK compatible VCR is connected to the EXT-2 terminal. • This only works when the T-V LINK menu is being displayed. 5 Press the ë buttons to choose DECODER (EXT-2) .
WFT1EK_E3.fm Page 30 Tuesday, December 19, 2000 9:52 AM )XUWKHU#SUHSDUDWLRQ ■ &RQQHFWLQJ#H[WHUQDO#HTXLSPHQW Connect the equipment to the TV, making the correct rear panel and front panel connections. Before connecting anything: • Read the manuals that came with the equipment. Depending on the equipment, the connection method may be different from the diagram. Also, the equipment settings may need to change depending on the connection method. • Turn off all the equipment including the TV.
WFT1EK_E3.fm Page 31 Tuesday, December 19, 2000 9:52 AM Further preparation (TXLSPHQW#ZKLFK#FDQ#RXWSXW#WKH# 609,'(2#VLJQDO#+<2&#VLJQDO,#VXFK#DV DQ#609+6#9&5 Connect the equipment to an EXT terminal (but not the EXT-1 terminal). You can choose between an S-VIDEO signal (Y/C signal) and a regular video signal (composite signal). For details of how to operate the equipment, see “K(S-VIDEO input)” on page 20. 709#/,1.#FRPSDWLEOH#9&5 Be sure to connect the T-V LINK compatible VCR to the EXT-2 terminal.
WFT1EK_E3.fm Page 32 Wednesday, December 20, 2000 4:33 PM 79#EXWWRQV#DQG#SDUWV ■ )URQW#SDQHO l Push to open (Behind the cover) 5 P ∨/∧ buttons / C buttons 1 Remote control sensor and ECO sensor 2 Headphone jack (mini jack) page 30 3 EXT-4 terminal pages 20 and 30 4 D (Volume) button page 10 6 Power lamp pages 5 and 8 7 Main power button pages 5 and 8 page 10 • Do not hold the TV by the front panel cover when moving the TV set. If you do, you may break the cover.
WFT1EK_E3.fm Page 33 Tuesday, December 19, 2000 9:52 AM 7URXEOHVKRRWLQJ If a problem arises while you are using the TV, please read this troubleshooting guide carefully before you ask to have the TV repaired. You may be able to fix it easily by yourself. For example, if the mains plug is disconnected from the mains outlet, or the TV aerial has problems, you may think there is a problem with the TV itself. Important: • This troubleshooting guide only covers problems whose causes are not easy to decide.
WFT1EK_E3.fm Page 34 Tuesday, December 19, 2000 9:52 AM 6SHFLILFDWLRQV Model AV28WT5EI* Item AV24WT5EI* Broadcasting systems CCIR I Colour systems PAL • The EXT terminals also support the NTSC 3.58/4.43 MHz system.
WFT1EK_E3.
AV32EK_cover.fm Page 1 Tuesday, December 19, 2000 9:17 AM AV28WT5EI/AV24WT5EI Colour Television AV28WT5EI AV24WT5EI Contents Safety precautions . . . . . . . . . . . . . . . . . . . . . . . . . . . 2 Setting up your TV . . . . . . . . . . . . . . . . . . . . . . . . . . . 4 T-V LINK functions. . . . . . . . . . . . . . . . . . . . . . . . . . . 7 Using your TV–the basics . . . . . . . . . . . . . . . . . . . . . 8 Remote control buttons and functions . . . . . . . . . . . . 11 Using the TV’s menus . . .