
Product Manual


16
9.6.7 Stock feeding angle
Some pieces, because of their dimensions, will
need to be fed into the machine at a 90° angle
(perpendicular to drum). However, even a slight
offset angle of stock will provide for more effective
stock removal. The optimum feeding angle for stock
removal is about 60°.
Angling the workpiece for stock removal provides
other advantages, such as less loading of certain
areas of the drum due to glue lines or mineral
streaks in the stock, more even wear of abrasive
strips, potentially faster feed rates, and lighter loads
on the motor. Note that to get the best final finish,
however, the stock should be fed through the
machine so it will be sanded in line with the grain of
the wood on the final one or two passes.
10.0 User-maintenance
Before doing maintenance on
the machine, disconnect it from the electrical
supply (pull out the plug), unless indicated
otherwise. Failure to comply may cause serious
injury.
10.1 Cleaning and lubrication
For best results, make cleaning the sander a regular
shop procedure. Allowing excess build-up of dust
and debris can adversely affect performance
through loading of the abrasives, slippage on the
conveyor table, and/or the accumulation of material
inside the drums which can throw off the center of
balance.
Leave the dust collector on when cleaning dust from
the drums. Also brush the conveyor belt after
cleaning operations. If not cleaned, the conveyor
belt could allow stock to slip during sanding
operations.
NOTE: Bearings are pre-sealed and require no
lubrication.
• Lubricate conveyor bushings as needed, and
check for wear.
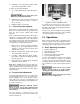
• Lubricate elevating leadscrew (A, Figure 10-1)
as needed.
• Clean sawdust from abrasive strip and brush
dust from conveyor belt.
• Keep slide areas clean (B, Figure 10-1).
• Blow dust from motors and switches. Blow dust
from inside of sanding drum, which may cause
vibration or offset the center of balance.
• Check all set screws for tightness on parts such
as bearings, conveyor table, and couplings.
Figure 10-1
10.2 Drum maintenance
The drum should not require removal from the
machine under normal circumstances. Should
maintenance ever become necessary, the drum has
been designed for easy removal and replacement.
Remove four socket head screws (C, Figure 10-2).
Carefully lift out drum with coupling (D) attached.
Figure 10-2: drum removal
10.3 Conveyor belt replacement
1. Disconnect sander from power.
2. Raise drum to highest position.
3. Turn take-up screws (Figure 8-2) on both sides
of conveyor to relieve belt tension, and slide the
driven roller fully inward.
4. Remove two (2) screws that attach conveyor
table to base.
5. Remove two (2) screws that attach conveyor
table to drum alignment bracket (E, Figure 10-
3).
6. Loosen two locks (F, Figure 10-3).
7. Lift up conveyor table and remove it from
machine. Avoid tearing the belt on any edges
underneath the conveyor table. Do not allow the
Trackers to drop, as they may break.