This .pdf document is bookmarked Operating Instructions and Parts Manual 8-inch Woodworking Jointer Models JJ-8CS and JJ-8HH Model JJ-8CS Model JJ-8HH WALTER MEIER (Manufacturing) Inc. 427 New Sanford Road LaVergne, Tennessee 37086 Ph.: 800-274-6848 www.waltermeier.com Part No. M-708458 Revision H1 05/2013 Copyright © 2013 Walter Meier (Manufacturing) Inc.
Warranty and Service Walter Meier (Manufacturing) Inc., warrants every product it sells. If one of our tools needs service or repair, one of our Authorized Service Centers located throughout the United States can give you quick service. In most cases, any of these Walter Meier Authorized Service Centers can authorize warranty repair, assist you in obtaining parts, or perform routine maintenance and major repair on your JET® tools.
Table of Contents Warranty and Service .............................................................................................................................. 2 Table of Contents .................................................................................................................................... 3 Warning................................................................................................................................................... 4 Introduction .....................
Warning 1. Read and understand the entire owners manual before attempting assembly or operation. 2. Read and understand the warnings posted on the machine and in this manual. Failure to comply with all of these warnings may cause serious injury. 3. Replace the warning labels if they become obscured or removed. 4. This jointer is designed and intended for use by properly trained and experienced personnel only.
21. Make your workshop child proof with padlocks, master switches or by removing starter keys. 22. Give your work undivided attention. Looking around, carrying on a conversation and “horse-play” are careless acts that can result in serious injury. 23. Maintain a balanced stance at all times so that you do not fall or lean against the knives or other moving parts. Do not overreach or use excessive force to perform any machine operation. 24. Use the right tool at the correct speed and feed rate.
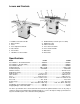
Levers and Controls 1. Handwheel for Outfeed Table 2. Outfeed Table 3. Fence 4. Fence Adjustment Handle 5. Cutter Guard 6. Infeed Table 7. Handwheel for Infeed Table 8. On/Off Switch (Pedestal style on JJ-8HH) 9. Rabbeting Ledge 10. Table Lock Knob 11. Fence Tilt Lock Handle 12. Fence Control Handle 13. Belt Guard 14. Dust Chute Specifications Model JJ-8CS JJ-8HH Stock Number – Bed and Stand Kit ................................708458K................................................
Unpacking and Cleanup Contents of Shipping Cartons Note: Unit shipped in two cartons.
Cutterhead knives dangerously sharp! extreme caution when cleaning. are Use 4. Apply a thin layer of paste wax to the bright surfaces of the fence and tables to prevent rust. Installing Bed to Stand 1. Use an assistant or hoist mechanism to place bed assembly on top of stand. Be sure identification label on the bed faces the same direction as the label on the stand (Fig. 1). Figure 1 2. Line up two holes in top of stand with holes in bed assembly by viewing through access door in stand. 3.
Installing Handwheels 1. Remove protective tape from shaft, and remove screw and washer. 2. Press handwheel (A, Fig. 4) onto shaft, aligning the keyway with the key. If necessary, use a hammer with a block of wood to tap the handwheel completely onto the shaft. 3. Re-install screw and washer (B, Fig. 4). 4. Mount handle (C, Fig. 4) onto handwheel. Figure 4 Assembling Knife-Setting Gauge (JJ8CS only) Place the two bases (A, Fig. 5) onto each end of the bar (B, Fig. 5). Snap the four E-rings (C, Fig.
Installing Cutterhead Guard Orient guard (Fig. 8) in proper position and insert post into hole in table. Tighten lock screw (A, Fig. 8). Installing Access Door Install access door by placing bottom of panel into access in stand and fastening by turning latch (Fig. 9). Figure 8 If the access door latch needs adjustment: 1. Remove the access door from the stand. 2. Loosen the hex lock nut (A, Fig. 9). Rotate the latch a quarter turn clockwise to tighten and counterclockwise to loosen. 3.
The JJ-8CS and JJ-8HH jointers are rated at 230V, single phase only. Confirm that the power at the source is compatible with the jointer before inserting plug into the outlet. The jointer is designed to be used with a plug and outlet similar to that shown in Fig. 12. Important: Make certain the receptacle in question is properly grounded. If you are not sure, have a registered electrician check the receptacle.
45° Fence Adjustment Note: Whenever making an adjustment to the fence, lift the fence up slightly after releasing the lock handle to avoid scratching the table. 1. Loosen lock handle (A, Fig. 16). Move the stop plate (B, Fig. 16) out of the way and position the fence at the 45° angle. Make sure the fence sits against the stop bolt (C, Fig. 16). 2. Place a combination square (D, Fig. 16) on the fence and table to confirm a 45° setting. Figure 16 3. To adjust, loosen lock nut (E, Fig.
5. When the outfeed table and blade number one (or knife insert) are the same height, tighten table lock screw. After the outfeed table has been set, the JJ8HH will need no further adjustments to the cutterhead – skip steps 6 through 9 below. The JJ-8CS must have its knives parallel with the outfeed table. Proceed as follows: 6.
Removing and Replacing Knives (JJ8CS only) Disconnect the machine from the power source before making any adjustment or repair. All knife lock bolts must be firmly tightened or risk ejection of the knife(s) and lock bar from the cutterhead! Failure to comply may cause serious injury! 1. Disconnect machine from power source. Figure 23 2. Remove blade guard by loosening lock screw (A, Fig. 23) and lifting up on blade guard. Caution: blades are sharp! Use great care when hands are around blade area! 3.
Each knife insert has an etched reference mark so that you can keep track of the rotations. IMPORTANT: When removing or rotating inserts, clean saw dust from the screw, the insert, and the cutterhead platform. Dust accumulation between these elements can prevent the insert from seating properly, and may affect the quality of the cut. Before installing each screw, lightly coat the screw threads with machine oil and wipe off any excess.
For jointing and planing cuts pressure is directed three ways; into the fence to ensure a square cut, forward to advance the stock, and downward to avoid chatter and vibration. For jointing when the material is higher than the fence, the left hand applies pressure into the fence and down toward the table while the right hand pushes forward from behind. Be sure to keep the right hand high up on the material. (Fig. 28) For jointing material that is lower than the fence, use push sticks to protect the hands.
Taper Cut Taper cuts require the removal of the cutterhead guard. Use extreme caution when making taper cuts and replace the guard immediately after completion! Failure to comply may cause serious injury! One of the most useful jointer operations is cutting an edge to a taper. This method can be used on a wide variety of work; tapered legs of furniture is a common example. Instead of laying the piece down on the infeed table, lower the forward end of the work onto the outfeed table.
7. Take the same amount of passes for all three blades. Maintenance When the blades have been sharpened, if they still are not cutting efficiently, trying to touch up the blades further will only cause the formation of a second beveled edge. When this starts to happen, it is time to replace blades with another set. Lubrication 1. Use a good grade of light grease on the steel adjusting screws located in the raising and lowering mechanisms of the work tables.
6. Lift assembly straight up. Studs (F, Fig. 34) will still be attached to the bearing housings. and the bearing housings of saw dust and grease so that they seat properly. 7. Before replacing the cutterhead back into the casting, thoroughly clean the “saddle” 8. To re-install the cutterhead, reverse the above steps. Troubleshooting Trouble Probable Cause Remedy Finished stock is concave on the end. Knife tip is higher than outfeed table. Raise outfeed table so it is level with knife tip.
Replacement Parts Replacement parts are listed on the following pages. To order parts or reach our service department, call 1-800-274-6848, Monday through Friday (see our website for business hours, www.waltermeier.com). Having the Model Number and Serial Number of your machine available when you call will allow us to serve you quickly and accurately.
Fence Assembly (all models) Parts List – Fence Assembly (all models) Index No. Part No. Description Size Qty 1............... JC-F01.....................Fence Body ........................................................................................... 1 2............... JC-F02.....................Fence Link............................................................................................. 1 3............... TS-0051061 .............Hex Head Screw ...........................................
Bed Assembly (all models) 22
Parts List – Bed Assembly (all models) Index No. Part No. Description Size Qty 1............... JC-T01.....................Base ...................................................................................................... 1 2............... JC-T02.....................Front Table ............................................................................................ 1 3............... JC-T03.....................Rear Table .....................................................................
Stand and Motor Assembly (JJ-8CS only) 24
Parts List – Stand and Motor Assembly (JJ-8CS only) Index No. Part No. Description Size Qty 1............... JC-M01W.................Stand .................................................................................................... 1 2............... JC-M02W.................Motor Mount .......................................................................................... 1 3............... JC-M03W.................Cover .........................................................................
Stand and Motor Assembly (JJ-8HH only) 26
Parts List – Stand and Motor Assembly (JJ-8HH only) Index No. Part No. Description Size Qty 1............... JJ8HH-301 ...............Stand .................................................................................................... 1 2............... JC-M02W.................Motor Mount .......................................................................................... 1 3............... JC-M03W.................Cover ........................................................................
Parts List – Cutterhead Assembly (JJ-8CS only) Index No. Part No. Description Size Qty 1............... JC-C01 ....................Cutterhead ............................................................................................ 1 2............... JC-C02 ....................Bearing Housing .................................................................................... 2 3............... 5H-A104 ..................Bearing..........................................................................
Parts List – Cutterhead Assembly (JJ-8HH only) Index No. Part No. Description Size Qty ................. JJ8HH-CA................Cutterhead Assembly (Index # 1 thru 11) ............................................... 1 ................. 1791222-4 ...............Helical Cutterhead Unit (Index # 1, 7, 8)................................................. 1 1............... JJ8HH-101 ...............Helical Cutterhead ................................................................................. 1 2.......
GREEN WHITE A1 BLACK Electrical Connections (JJ-8CS only) 3L2 5L3 13NO GROUND 17 BLACK WHITE GREEN 1 L2 18 4T2 6T3 14NO 2T1 4T2 6T3 98 30 WHITE BLACK BLACK WHITE GREEN Motor 97 96 95 GREEN A2 2T1
Electrical Connections (JJ-8HH only) 31
WALTER MEIER (Manufacturing) Inc. 427 New Sanford Road LaVergne, Tennessee 37086 Phone: 800-274-6848 www.jettools.com www.waltermeier.