
Instructions / Assembly


5
Installation Instructions
for Premium
™
Vinyl Multi-Slide Atlantic Exterior Pocketing Door Systems (V-4500)
(JII-90004)
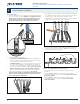
2. Outline where the sill pan sits in the opening. Mark a line along the
back and front edges of the sill pan. Mark a line along the top edge
of both side walls of the sill pan.
JELD-WEN recommends the use of sill pans based on
a best-build practice. They are suggested for use in
step-down landings and continuous slab conditions.
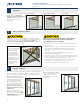
Job site Fabricated Sill Pan
1. Cut a piece of sheet material to the length shown.
2. Lightly crease folding lines 1/2" in from the two short sides and one
long side.
3. Measure the width of the sill and add 9/16".
4. Take this distance from the back edge and lightly crease a folding line
across the sheet material.
5. For step-down landings, cut 1/2" in at this line on both sides of the
sheetmaterial.
6. For continuous slab, cut across the folding line.
7. Fold the three back sides up to make a 3-sided box, and, for step-
down landings, fold the front ap down.
Length of rough opening sill plus 1"
Sealant
Nailing Fin Box Frame
Interior
Measure
frame
width
Measure
frame
width
Nail Fin
Step-Down Landing Continuous Slab Landing
Step-Down Landing Continuous Slab Landing
Install Sill Pan for Step-Down and
Continuous Slab Landings
1. Set the sill pan in the rough opening, aligning the front edge (for
continuous slab) or folded down edge (for step-down) with the
exterior of the rough opening.
Sill pan
width
3. Apply a continuous layer of liquid applied ashing, or three 3/8"
beads of sealant, along the entire width of the opening and up both
side walls of the opening, as outlined by the previous lines.
4. Place the sill pan in the rough opening. Firmly press the sill pan into
the liquid applied ashing or sealant with a J-roller. NOTE: If using a
metal sill pan and setting the pan into sealant, ensure to apply a piece
of self-adhered ashing to the complete underside of the pan to
prevent possiblecorrosion.
Sill Pan Flashing
1. Cut a piece of self-adhered ashing the length of the sill and apply
over the sill pan as shown. The bottom of the sill pan should be
covered entirely by the self-adhered ashing. For step-down landings,
fold ashing down as shown. For continuous slabs, trim ush with the
nishedopening.
Fold sides and back up
Fold corner
forward
Fold front
ap down
INSTALL SILL PAN AND/OR PREP SILL
3
Sill pan
width
Sill
width
+9/16"
Folding line for step-down landing
Interior
Sealant
Sealant
2. Smooth gaps or bubbles beneath self-adhered ashing with a J-roller
(remove and replace if necessary).
3. Seal back corners of sill pan with sealant.
4. Apply a generous color-matched sealant bead (typically a
polyurethane or silicone sealant that will match the exterior color of
the building) above the side walls of the sill pan.
5. Tool each sealant bead down into the bottom of the pan. Ensure
there are no gaps. Apply more sealant if necessary.