
Instructions / Assembly


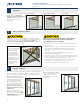


Track Filler
Inner Most Channel
10
Installation Instructions
for Premium
™
Vinyl Multi-Slide Atlantic Exterior Pocketing Door Systems (V-4500)
(JII-90004)
4. For Single Pocket units, continue to fasten along the side jamb of the
door frame by placing fasteners in each pre-drilled hole. Place shims
between the door frame and opening side wall as needed.
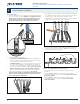
5. Apply aluminum roller tracks into the sill with the use of a soft mallet.
Make sure not to damage the stainless steel ridge cap.
Fastening Frame
1. After re-verifying the sill is level, apply screws through each pre-drilled
hole in the sill of the door frame. Make sure to apply silicone to the
threads of the screws prior to install and to apply silicone over
the head of the screws once fully seated. Refer to the Product
Approval Document for type, size and spacing of fastener.
INSTALL FRAME (CONTINUED)
6. Install the vinyl track llers in the channels between the roller tracks.
Ensure the llers snap evenly into place. NOTE: A ller will not be
installed into the inner most channel.
2. Secure the head of the door frame.
• For Box Frame/Non-Nail n product place a screw through one
of the pre-drilled holes in the head track. Use shims as needed for
spacing and to prevent frame deection/rotation.
• For Nail Fin product place a screw through the nail n at 4" from
the corner. Place an additional screw through the pre-drilled hole
in the frame track approximately 5" from the corner. Use shims as
needed to prevent frame deection/rotation. Refer to the Product
Approval Document for type, size and spacing of fastener.
3. Continue to fasten the head of the door frame by placing fasteners/
shims in each pre-drilled hole in the head track. At each new
fastener location, double-check that the head track is level and
take periodic measurements between the head and sill track to
ensure equal spacing is maintained.
Sill Detail
Sill Detail
6
Fasten Through Nail Fin (if applicable):
• For nail n products, fasteners are required through the nail n
and frame.
• Along the head and sill, place the appropriate type of fastener
(based on the substrate) at the correct spacing. Refer to the Product
Approval Document.
• Along each side, place the appropriate type of fastener (based
on the substrate) at the correct spacing. Refer to the Product
Approval Document.
Roller track