
Instructions / Assembly


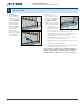


Table Of Contents

FASTEN PRODUCT (SIZE AND SPACING)
5
Window
Window
3"- 7"
Installation Instructions
for Vinyl Windows with Integral Nailing Fin (JII001)
8
Common Window Fastening
Areas such as Florida and the Texas TDI region have different
anchoring requirements based on product certication. For
information on specic products, visit www.oridabuilding.org
or www.tdi.texas.gov and follow the anchoring schedule given in
the drawings for the product instead of the anchoring schedule in
thisdocument.
NOTE: Embedment must
be a minimum of 1
1/4" into the structural
framing. Fastener
(anchor) heads must be
ush. Do not dent nailing
n. Use the table to nd
the correct product and
fasten it asdirected.
PG20 Fasten window through the nailing n holes
3"- 7" from the corners and 12" apart all the
way around the window.
PG35 - PG50
(See exceptions
below for Hung and
Fixed windows)
Fasten window through the nailing n holes
3"- 7" from the corners and 8" apart all the
way around the window.
Fixed Windows -
PG50 or above
Fasten window through each nailing n hole
(every 4") on the jambs and 8" apart along the
head and sill.
Hung Windows -
PG50 or above
Fasten window through the nailing n holes
3"- 7" from the corners. Then, install fasteners
12" on-center on the jambs, with fasteners
every 4" on both sides of the Interlock. Install
fasteners 8" apart along the head and sill.
Continuous Head
and Sill (with mull
post) - PG35
From the center line of the mull post, place a
fastener at 2" and another at 4". Repeat on
both sides and at each end of the mull post.
Continuous Head
and Sill (with mull
post) – PG50
From the center line of the mull post, place a
fastener at 2", 4" and another at 6". Repeat on
both sides and at each end of the mull post.
Mull Joints From the center line of the mull post, place
a fastener at 2", 4", 8" and another at 12".
Repeat on both sides and at each end of the
mull post.
Mull joint
Nailing
n
#8 x 1 1/4" pan/washer
head screw
4"
4" 4"
2"
2"
Mull Example
See
table
Center Line