
Installation Guide


INSTALLATION INSTRUCTIONS
for Vinyl Patio Doors with Integral Nailing Fin (JII006)
4
INSTALL SILL PAN
1MBDFUIFTJMMQBOJO
the rough opening.
"QQMZTQSBZ
adhesive/primer to
the sill area. Follow
manufacturer's
instructions
for application
methods.
6. Cut a piece of
+&-%8&/TFMG
adhesive ashing
the length of the sill
and apply over the
sill pan as shown.
The bottom of the
sill pan should be
completely covered
by the self-adhesive
ashing.
4FBMCBDLDPSOFST
of sill pan with
sealant.
10. For step-down
landings only, cut
plastic drain screen
to length of
sill + 2" and staple
1/2" below sill
edge. The drain
screen provides
a path for air to
dry any incidental
moisture in the
rough opening.
PREPARE SILL (CONTINUOUS SLAB ONLY)
.BSLBMJOFJOUIF
rough opening
across the front and
back of the sill pan
as shown. Remove
sill pan and apply
three beads of
sealant between the
marked lines.
FOR RETROFIT INSTALLATIONS
After removing the old patio door, remove sufcient siding to expose at
MFBTUPGJOUBDUCVJMEJOHXSBQ*GEBNBHFEBQQMZOFXCVJMEJOHXSBQ
in a shiplap manner. Verify trimmer studs and header are structurally
sound. Continue with the instructions.
PREPARE BUILDING WRAP
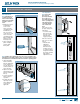
1. Trim building wrap
ush with the
edges of the rough
opening. Verify
this does not void
NBOVGBDUVSFST
warranty.
2. At the head, slit
building wrap 6"
BU¡5BQFVQBT
shown.
4
PREPARE ROUGH OPENING
Sealant
45˚
6"
S
p
r
a
y
A
d
h
e
s
i
v
e
6"
$VUUXPQJFDFTPG
+&-%8&/TFMG
adhesive ashing
6" wide and the
TJMMQBOXJEUI
long.
a. For continuous
slab landings
only, cut out the
inside corner.
Sill
pan
width
6"
Discard
(for
continuous
slab only)
Self-Sealing Corner Flash
Sill
pan
width
6"
Discard
(for
continuous
slab only)
Sill pan
width
Continuous Slab Landing
Sill pan
width
Step-Down Landing
Sill pan
width
Sealant
1"
1/2"
b. Adhere the
pieces of
ashing to the
inside corners.
8. Smooth gaps or
bubbles beneath
self-adhesive
ashing with a
J-roller (remove
and replace if
necessary).