
Instructions / Assembly


INSTALLATION INSTRUCTIONS
for Wood Patio Doors with Exterior Trim or Nailing Fin (JII026)
8
COMPLETE INSTALLATION
On the exterior of step down landings, install support trim •
underneath the sill where it extends past the landing. Position trim
snugly against the bottom of the sill toe.
Adjust patio door for best operation.•
Create a continuous air seal on the interior between the rough •
opening and the frame with low expansion foam or backer rod and
sealant.
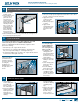
AFTER INSTALLATION
Install exterior wall •
surface within seven
days of installation.
Maintain gap of •
1/4"- 3/8" between
door frame and nal
exterior wall surface
(siding, stucco, etc.).
Seal this gap on the •
sides with backer
rod and sealant. For
step-down landings,
also seal under the
patio door sill with a
discontinuous joint.
Do not apply sealant
on top of the drip
cap.
Seal any gaps or •
openings at end
of horizontal mull
joints with sealant.
Remove protective •
lm (if applicable)
on glass within one year and immediately from cladding.
Protect recently installed units from damage from plaster, paint, etc. •
by covering the unit with plastic.
4. Ensure sealant on back dam of the sill pan fully seals to the inside
face of the sill. Apply more sealant as necessary.
5. Install lockset hardware per supplied instructions.
6. Some French double door units may require installing lock bolts at
the top and bottom of the inactive panel. Locate the center point of
each lock bolt, drill 3/8" bolt holes and install keeper plates.
ADJUST LOCK
1. Loosen the lock
hook screws in the
side jamb so it can
be moved up or
down.
2. Insert the alignment
guide into one of
the openings in the
faceplate.
3. Carefully close the
panel and raise or
lower the lock hook
until it aligns with
the slots in the faceplate. Tighten the screws.
4. To lock the door, rotate the thumb turn 90°.
Note! The thumb turn will not lock when the door is open.
INSTALL EXTERIOR TRIM
For wood exterior
doors not assembled
with brickmould
casing, attach the
pre-cut brickmould
9/16" from the interior
frame edge to the
sides and head with 2
1/2" casing nails. Seal
brickmould to frame
with silicone sealant
and tool into a llet
joint.
ADJUST SLIDING DOOR PANEL ROLLERS
Note! Adjust the panel high enough to avoid drag. Keep door stile
parallel to the locking jamb by almost closing the door and looking for
an even reveal/gap.
Roller adjustment plugs may be located on the interior bottom face
or end of each operating panel, remove each plug. Using a at head
screwdriver for face adjusted rollers or phillips for end adjusted rollers,
turn the screw counterclockwise to raise the panel or clockwise to lower
it. Reinstall plugs.
COMPLETE INSTALLATION - CONTINUED
10
© 2010 JELD-WEN, inc. | JELD-WEN, the JW icon and Reliability for real life are trademarks or registered trademarks of JELD-WEN, inc., Oregon USA.
All other trademarks are the property of their respective owners.
Please visit jeld-wen.com/resources for warranty and care
and maintenance information.
Thank you for choosing
(08/10)
Lock
hook
Faceplate
Alignment
guide
Frame
Panel
Brickmould
9/16"
gap
Gap
Backer
rod
Gap
Sealant
joint