
User Manual


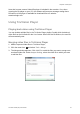


Table Of Contents
- Chapter 1 Product introduction
- Chapter 2 Physical installation
- Chapter 3 Getting started
- Chapter 4 Operating instructions
- Chapter 5 Live view
- Chapter 6 Searching files
- Chapter 7 Playback functionality
- Chapter 8 Archiving files
- Chapter 9 Display settings
- Chapter 10 Camera setup
- Chapter 11 Network settings
- Chapter 12 Recording
- Chapter 13 Alarm and event setup
- Chapter 14 Device management
- Chapter 15 Storage management
- Chapter 16 User management
- Chapter 17 System information
- Chapter 18 Using the web browser
- Appendix A Specifications
- Appendix B Port forwarding information
- Appendix C Maximum pre-recording times
- Appendix D Default menu settings
- Index

Chapter 8: Archiving files
48 TruVision NVR 22 (S/P) User Manual
If using a USB memory drive, insert the device into the USB port on the front panel.
If more than one media type is found, the USB device takes precedence over the
others.
2. Press Archive on the front panel or remote control to open the quick archive
window.
3. Click Start or press Archive on the front panel again. The unit starts to download
all the files listed.
Note: If there is a capacity limitation on the backup device, only the most recent files
will be backed up.
A message will appear to confirm when the download is complete.
Archive menu
You can insert a mini-USB hub to the USB port to attach a mouse for navigation or a
USB drive for archiving. However, the unit may not support all types of USB hubs.
The Archive options available may depend on the type of backup device selected.
You can also archive files while in 24-hour playback by clicking the File Management
icon in the playback control toolbar. See “24-hour playback modes” on page 38 for
more information.
Figure 18: Example of an archive window
Function Description
1
. Device Name Select one of the storage media for archiving. If the backup device is not
recognized:
• Click the Refresh button