Installation Manual The Evolution series by InSinkErator® is a new standard in sound and grind performance. Featuring exclusive patented SoundSeal™ and MultiGrind™ technologies, no food waste disposer grinds more with less noise. www.insinkerator.
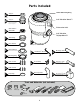
Parts Included: 1 A Lower Mounting Ring Stopper or A2 B Anti-Vibration Mount™ Stopper (Cover Control Stopper differs from standard disposer stopper.
Dimensions: D A C B E Model A B C D E Excel 6 11/16" 4" 13 1/2" 9" 5 3/4" Premier 6 11/16" 4" 12 5/8" 8 3/4" 5 3/4" Essential 6 11/16" 4" 12 5/8" 8 3/4" 5 3/4" Compact 6" 4" 12 1/8" 8" 5 3/4" Space Saver 6" 4" 12 1/8" 8" 5 3/4" Cover Control 6 11/16" 4" 13 1/2" 10" 5 3/4" SepticAssist 6 11/16" 4" 12 5/8" 8 3/4" 5 3/4" 3
Removal of old disposer: If you are replacing an existing disposer, continue to Step 2. If there is no existing disposer, disconnect sink drain and skip to Step 10. 1 WARNING SHOCK HAZARD Turn off electric power at fuse box or circuit breaker. 4 !* *WARNING: SHOCK HAZARD With the electrical supply turned off, flip disposer over and remove electrical cover plate. Save cable connector if applicable. 7 Using a screwdriver, remove the snap ring.
Installation of new disposer: CAUTION CLEAN DRAIN LINE BEFORE INSTALLING DISPOSER Failure to clean sink drain line may result in drain line blockage. With drain auger, clear all hardened waste material in horizontal drain line. 10 11 C 12 C C D E G Evenly apply 1/2” thick rope of plumber’s putty around flange (C). 13 I F Press flange (C) firmly into sink drain. Remove excess putty. Insert fiber gasket (D), backup flange (E) and mounting ring (F). Hold in place while inserting snap ring (I).
Installation of new disposer (continued): 16 !* 17 *CAUTION: DISHWASHER CONNECTION ONLY Knock out drain plug and remove plug from inside of disposer. 19 18 *WARNING: SHOCK HAZARD. Turn disposer over and remove electrical cover plate. Pull out wires. DO NOT REMOVE CARDBOARD SHIELD. *WARNING: SHOCK HAZARD. With electrical supply turned off, insert cable connector (not included) and run electrical cable through access hole on bottom of disposer. Tighten cable connector.
Installation of new disposer (continued): 22 23 23a Hang disposer by aligning 3 mounting tabs with slide-up ramps on mounting ring. 2 1 Turn mounting ring until all 3 mounting tabs lock over the ridges on the slide-up ramps. (COVER CONTROL MODEL ONLY) Turn mounting ring until all 3 mounting tabs lock over the ridges on the slide-up ramps. Attach magnetic cover control switch to the screws. Make sure plastic guides go UNDER mounting ring. 24 25 26 M N You may need to trim tube for proper fit.
INSTALLING AND REPLACING THE BIO-CHARGE™ BOTTLE (For SepticAssist Model Only.) REPLACING THE BIO-CHARGE BOTTLE: To keep your septic system operating at peak efficiency, replace the Bio-Charge™ bottle when it is empty. Bio-Charge™ is available wherever InSinkErator Septic Disposers are sold. For Bio-Charge reorders, questions or comments call toll free 1 (888) 527-1493. INSTALLING THE BIO-CHARGE BOTTLE: Use only InSinkErator Bio-Charge™.
TIPS FOR TROUBLE-FREE OPERATION • Run disposer along with a moderate to strong flow of cold water, continue run cold water for 15 seconds after grinding is complete. • Avoid using hot water when grinding food waste. It is OK to drain hot water into the disposer between grinding periods. • Avoid pouring grease or fat into your disposer or drain.
USER MAINTENANCE INSTRUCTIONS RELEASING DISPOSER JAM This disposer is equipped with a Jam-Sensor Circuit™ that will prevent jams while grinding virtually any food material. In the unlikely event that the disposer is jammed, release it by following these steps. CLEANING DISPOSER Over time, food particles may accumulate in the grind chamber and baffle. An odor from the disposer is usually a sign of grease and food buildup, caused by insufficient water flow during and after disposer use.
INSTRUCTIONS PERTAINING TO RISK OF FIRE, ELECTRIC SHOCK, OR INJURY TO PERSONS (SAVE THESE INSTRUCTIONS) WARNING When using electric appliances, basic precautions are always to be followed, including: Personal Injury: Do not position your head or body under disposer; unit could fall during removal or installation. • Read all instructions before using the appliance. WARNING • To reduce the risk of injury, close supervision is required when an appliance is used near children.