PBAxxxx PBAAxxxx PBAAAxxxx Français Mode d’emploi COMBINE REFRIGERATEUR/CONGELATEUR Sommaire Mode d’emploi, 1 Assistance, 3 Description de l’appareil, 7 Description de l’appareil, 12 Réversibilité des portes, 16 Installation, 25 Mise en marche et utilisation, 25 Maintenance and care, 27 Précautions et conseils, 27 Anomalies et remèdes, 28 Italiano Deutsch Istruzioni per l’uso COMBINATO FRIGORIFERO/CONGELATORE Sommario Istruzioni per l’uso, 1 Assistenza, 3 Descrizione dell’apparecchio, 6 Descrizione d
Română Español Manual de instrucciones COMBINADO FRIGORÍFICO/CONGELADOR Sumario Manual de instrucciones, 2 Asistencia, 4 Descripción del aparato, 8 Descripción del aparato, 13 Reversibilidad de la apertura de las puertas, 16 Instalación, 37 Puesta en funcionamiento y uso, 37 Mantenimiento y cuidados, 39 Precauciones y consejos, 39 Anomalías y soluciones, 40 Portuges Instruções para a utilização COMBINADO FRIGORÍFICO/CONGELADOR Índice Instruçőes para a utilizaçăo, 2 Assistęncia, 5 Descriçăo do aparelho,
Assistenza Assistance Comunicare: • il tipo di anomalia • il modello della macchina (Mod.) • il numero di serie (S/N) Queste informazioni si trovano sulla targhetta caratteristiche posta nel vano frigorifero in basso a sinistra. Communicating: • type of malfunction • appliance model (Mod.) • serial number (S/N) This information can be found on the data plate located on the bottom left side of the refrigerator compartment.
Kundendienst Bevor Sie sich an den Kundendienst wenden: • Prüfen Sie, ob die Störung selbst behoben werden kann (siehe Störungen und Abhilfe). • Sollte trotz aller Kontrollen das Gerät nicht funktionieren und der von Ihnen festgestellte Fehler weiter bestehen bleiben, dann fordern Sie bitte den nächstgelegenen technischen Kundendienst an und teilen Sie dort zusammen mit Ihrer Fehlerbeschreibung folgende Daten mit: Geben Sie bitte Folgendes an: • die Art der Störung • das Gerätemodell (Mod.
Assistência Asistenţă Comunique: • o tipo de anomalia • o modelo da máquina (Mod.) • o número de série (S/N) Estas informações encontram-se na placa de identificação situada no compartimento frigorífico embaixo à esquerda. Comunicaţi: • tipul de anomalie; • modelul maşinii (Mod.); • numărul de serie (S/N). Aceste informaţii se găsesc pe plăcuţa de caracteristici din frigider, în partea de jos, în stânga.
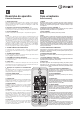
Descrizione dell’apparecchio Description of the appliance Pannello di controllo Control panel 1. ON/OFF Premendo questo tasto è possibile accendere l’intero prodotto (sia vano frigo che vano freezer). Il LED rosso indica che il prodotto è spento, il LED verde che è in funzione. 1. ON/OFF The entire product (both the refrigerator and freezer compartments) may be switched on by pressing this button. The red LED indicates that the product is switched off, while the green LED shows that it is operating. 2.
Description de l’appareil Beschreibung Ihres Gerätes Tableau de bord Bedienblende 1. ON/OFF Cette touche sert à allumer l’appareil tout entier (compartiment réfrigérateur et compartiment freezer). La LED rouge indique que l’appareil est éteint, la LED verte qu’il est en service. 1. ON/OFF-TASTE Durch Drücken dieser Taste kann das gesamte Gerät (Kühlzone und Gefrierzone) eingeschaltet werden.
Beschrijving van het apparaat Descripción del aparato Bedieningspaneel Panel de control 1. ON/OFF Door op deze knop te drukken kunt u het hele apparaat aanzetten (zowel koelkast als freezer). De rode LED geeft aan dat het apparaat uit is, de groene LED geeft aan dat hij werkt. 1. ENCENDIDO/APAGADO (ON/OFF) Presionando este botón es posible encender todo el aparato (tanto el compartimento frigorífico como el congelador).
Descrição do aparelho Opis urządzenia 1. ON/OFF (liga/desliga) Pressionando esta tecla é possível ligar e desligar o inteiro aparelho (quer o compartimento frigorífico, quer o compartimento congelador). O LED vermelho indica que o aparelho está desligado, o LED verde que está a funcionar. 1. ON/OFF Naciśnięcie tego przycisku umożliwia włączenie całego urządzenia (zarówno komory lodówki, jak i komory zamrażarki).
Descriere aparat Panoul de control 1. ON/OFF Apăsând această tastă puteţi porni şi opri întreg aparatul (atât frigiderul cât şi congelatorul). Led-ul roşu vă arată că aparatul este oprit, iar cel verde indică funcţionarea sa. 2. Reglarea Temperaturii în FRIGIDER + şi Permite modificarea temperaturii din frigider şi vă arată, pe display, temperatura pe care aţi selectat-o. 3. Display FRIGIDER Vizualizează temperatura din frigider. 4.
Descrizione dell’apparecchio Description of the appliance Vista d’insieme Overall view Le istruzioni sull’uso valgono per diversi modelli per cui è possibile che la figura presenti particolari differenti rispetto a quelli dell’apparecchio acquistato. La descrizione degli oggetti più complessi si trova nelle pagine seguenti. The instructions contained in this manual are applicable to different model refrigerators. The diagrams may not directly represent the appliance purchased.
Description de l’appareil Beschreibung Ihres Gerätes Vue d’ensemble Geräteansicht Ces instructions d’utilisation s’appliquent à plusieurs modèles, il se peut donc que les composants illustrés présentent des différences par rapport à ceux de l’appareil que vous avez acheté. Vous trouverez dans les pages suivantes la description des objets plus complexes. Die Gebrauchsanleitungen gelten für mehrere Gerätemodelle.
Beschrijving van het apparaat Descripción del aparato Algemeen aanzicht Vista en conjunto Deze gebruiksaanwijzingen gelden voor verscheidene modellen en het is daarom mogelijk dat de figuur andere details afbeeldt dan het door u aangeschafte apparaat. De beschrijving van de meest complexe elementen vind u terug in de volgende pagina’s. Las instrucciones sobre el uso son válidas para distintos modelos y por lo tanto es posible que la figura presente detalles diferentes a los del aparato que Ud.
Descrição do aparelho Opis urządzenia Visão geral Widok ogólny Estas instruções sobre a utilização são válidas para vários modelos, portanto é possível que na figura haja pormenores diferentes do aparelho que adquiriu. Há uma descrição dos assuntos mais complexos nas páginas seguintes. Instrukcje dotyczące użytkowania są takie same dla różnych modeli, dlatego też rysunki mogą przedstawiać inne szczegóły niż w zakupionym urządzeniu.
Descriere aparat Vedere de ansamblu Instrucţiunile de utilizare sunt valabile pentru mai multe modele, deci este posibil ca ilustraţiile să nu corespundă întocmai aparatului pe care l-aţi achiziţionat. Descrierea componentelor care pot varia este cuprinsă în paginile următoare. 1 SUPORT de reglare. 2 Compartimentul CONSERVARE. 3 Recipient gheaţă3 *. 4 Compartimentul CONGELARE şi CONSERVARE 5 Caseta FRUCTE şi VERDEŢURI * 6 Compartiment FRESH BOX pentru carne şi peşte * 7 WINE RACK * 8 RAFT•.
Reversibilità apertura porte Nel caso sia necessario cambiare il verso di apertura delle porte, rivolgersi al servizio di Assistenza Tecnica. Reversible doors If it is necessary to change the direction in which the doors open, please contact the Technical Assistance Centre. Réversibilité des portes 1 2 3 Si une inversion du sense d’ouverture des portes s’avère nécessaire, faire appel à notre service d’assistance technique.
Installazione ! È importante conservare questo libretto per poterlo consultare in ogni momento. In caso di vendita, di cessione o di trasloco, assicurarsi che resti insieme all’apparecchio per informare il nuovo proprietario sul funzionamento e sui relativi avvertimenti. ! Leggere attentamente le istruzioni: ci sono importanti informazioni sull’installazione, sull’uso e sulla sicurezza. Posizionamento e collegamento Posizionamento 1. Posizionare l’apparecchio in un ambiente ben aerato e non umido. 2.
I È riconoscibile dalla presenza di celle d’aerazione poste sulle pareti posteriori dei vani. Il No Frost gestisce un flusso continuo di aria fredda che raccoglie l’umidità e impedisce la formazione di ghiaccio e brina: nel vano frigorifero mantiene il giusto livello di umidità e, grazie all’assenza di brina, preserva le qualità originarie degli alimenti; nel vano congelatore evita la formazione di ghiaccio rendendo superflue le operazioni di sbrinamento ed evitando che gli alimenti si attacchino tra loro.
Precauzioni e consigli I MAX WATER LEVEL ! L’apparecchio è stato progettato e costruito in conformità alle norme internazionali di sicurezza. Queste avvertenze sono fornite per ragioni di sicurezza e devono essere lette attentamente. MAX WATER LEVEL MAX WATER LEVEL Manutenzione e cura Escludere la corrente elettrica Durante i lavori di pulizia e manutenzione è necessario isolare l’apparecchio dalla rete di alimentazione: 1. Tenere premuto il tasto ON/OFF per spegnere l’apparecchio. 2.
I Risparmiare e rispettare l’ambiente • Installare l’apparecchio in un ambiente fresco e ben aerato, proteggerlo dall’esposizione diretta ai raggi solari, non disporlo vicino a fonti di calore. • Per introdurre o estrarre gli alimenti, aprire le porte dell’apparecchio il più brevemente possibile. Ogni apertura delle porte causa un notevole dispendio di energia. • Non riempire con troppi alimenti l’apparecchio: per una buona conservazione, il freddo deve poter circolare liberamente.
Installation ! Before placing your new appliance into operation please read these operating instructions carefully. They contain important information for safe use, for installation and for care of the appliance. ! Please keep these operating instructions for future reference. Pass them on to possible new owners of the appliance. Positioning and connection Positioning 1. Place the appliance in a well-ventilated humidity-free room. 2. Do not obstruct the rear fan grills.
GB Chiller system No Frost The No Frost system circulates cold air continuously to collect humidity and prevent ice and frost formation. The system maintains an optimal humidity level in the compartment, preserving the original quality of the food, preventing the food from sticking together and making defrosting a thing of the past. Do not block the aeration cells by placing food or containers in direct contact with the refrigerating back panel. Close bottles and wrap food tightly.
5. When the ice has formed (minimum time approximately 8 hours) knock the tray against a hard surface and wet the outside so that the ice cubes come loose and take them out through the opening. Precautions and tips GB ! The appliance was designed and manufactured in compliance with international safety standards. The following warnings are provided for safety reasons and must be read carefully.
GB Respecting and conserving the environment • Install the appliance in a fresh and well-ventilated room. Ensure that it is protected from direct sunlight and do not place it near heat sources. • Try to avoid keeping the door open for long periods or opening the door too frequently in order to conserve energy. • Do not fill the appliance with too much food: cold air must circulate freely for food to be preserved properly. If circulation is impeded, the compressor will work continuously.
Installation ! Conservez ce mode d’emploi pour pouvoir le consulter à tout moment. En cas de vente, de cession ou de déménagement, veillez à ce qu’il suive l’appareil pour informer le nouveau propriétaire sur son fonctionnement et lui fournir les conseils correspondants. ! Lisez attentivement les instructions : elles contiennent des conseils importants sur l’installation, l’utilisation et la sécurité de votre appareil. Mise en place et raccordement Mise en place 1.
F Système de refroidissement No Frost Le No Frost gère un flux continu d’air froid qui absorbe l’humidité et empêche la formation de glace et de givre: il maintient un niveau d’humidité adéquat à l’intérieur du compartiment réfrigérateur et, grâce à l’absence de givre, il préserve les qualités originaires des aliments; dans le compartiment congélateur il évite la formation de glace, il n’y a par conséquent plus besoin de dégivrer et les aliments ne collent plus entre eux.
Bac à glaçons Ice3. Placés dans la partie supérieure des tiroirs du compartiment freezer, ils sont plus ergonomiques et garantissent davantage de propreté: en effet, les glaçons ne touchent plus aux aliments stockés dans le freezer; de plus, fini l’eau qui dégouline lorsque vous rangez votre bac (un couvercle est fourni pour boucher le récipient après l’avoir rempli). 1. Pour sortir le bac, poussez-le vers le haut.
F pour aliments congelés, d’ustensiles pointus et coupants ou d’appareils électriques d’un type autre que celui recommandé par le fabricant. • Ne pas porter à la bouche des glaçons à peine sortis du congélateur.
Installation ! Es ist äußerst wichtig, diese Bedienungsanleitung sorgfältig aufzubewahren, um sie jederzeit zu Rate ziehen zu können. Sorgen Sie dafür, dass sie im Falle eines Umzugs oder Übergabe an einen anderen Benutzer das Gerät stets begleitet, damit auch der Nachbesitzer die Möglichkeit hat, diese zu Rate zu ziehen. ! Lesen Sie bitte folgende Hinweise aufmerksam durch, sie liefern wichtige Informationen hinsichtlich der Installation, dem Gebrauch und der Sicherheit.
D CHILD LOCK (Kindersicherung) Zur Aktivierung der Funktion „Kindersicherung” muss die Taste Child Lock für 2 Sekunden gedrückt werden. Die Aktivierung der Tastensperre wird durch ein kurzes, akustisches Signal und durch Aufleuchten der entsprechenden LED bestätigt. Zur Deaktivierung der Funktion drücken Sie die Taste Child Lock für 2 Sekunden. Die Deaktivierung wird durch ein kurzes, akustisches Signal und durch Erlöschen der entsprechenden LED bestätigt.
Eisschale Ice3. Dank der Positionierung dieses Behälters oben an den Schalen der Gefrierzone ist größere Ergonomie und Sauberkeit gewährleistet: Die Berührung mit dem gelagerten Gefriergut wird vermieden, wie auch ein Verschütten von Wasser beim Füllen des Behälters (ein entsprechender Verschluss, mit dem die Öffnung nach Füllen verschlossen werden kann, wird mitgeliefert). 1.
D • • • • • Netzstecker gezogen werden. Es genügt nicht, das Gerät durch Drücken (für länger als 2 Sekunden) der ON/OFF-Taste auszuschalten, um jeglichen Stromkontakt auszuschließen. Bei etwaigen Störungen versuchen Sie bitte nicht, das Gerät selbst zu reparieren. Verwenden Sie im Innern der Gefriergutlagerfächer bitte keine scharfen oder spitzen Gegenstände oder Elektrogeräte, sondern nur die vom Hersteller erlaubten Hilfsmittel. Eiswürfel nicht sofort in den Mund nehmen.
Installatie ! Bewaar dit boekje zorgvuldig voor eventuele toekomstige raadpleging. Wanneer u het product weggeeft, verkoopt of wanneer u verhuist, dient u dit boekje bij het apparaat te bewaren zodat alle nodige informatie voorhanden blijft. ! Lees de gebruiksaanwijzingen zorgvuldig door: er staat belangrijke informatie in over installatie, gebruik en veiligheid. Plaatsen en aansluiten Plaatsen 1. Plaats het apparaat in een goed geventileerd en droog vertrek. 2.
NL Koelsysteem No Frost TEMPERATUUR aanwijzer*: hiermee onderscheidt u het koudste gedeelte van de koelkast. 1. Controleer of op de aanwijzer het woord OK verschijnt (zie afbeelding). 2. Als er geen OK verschijnt, betekent het dat de temperatuur te hoog is: zet de knop knop TEMPERATUURREGELING op een hogere stand (kouder) en wacht circa 10 uur tot de temperatuur stabiel is. 3. Controleer de aanwijzer nogmaals: indien nodig kunt u de koelkast opnieuw regelen.
Ijsblokjeshouder Ice3 Het feit dat ze bovenop de laden van de freezer zijn geplaatst zorgt voor de beste ergonomie en reinheid: de ijsblokjes komen niet meer in contact met de etenswaren in de freezer: bovendien wordt water knoeien tijdens het opvullen vermeden (ook de deksel voor het afsluiten van het gat na het opvullen is bijgeleverd). 1. Haal de ijsblokjeshouder uit de deur door hem eerst naar de houders door middel van de communicerende vaten (zie afbeelding). 2.
NL (inclusief kinderen) met fysieke, sensorische of mentale beperkingen, of die geen ervaring of kennis hebben, tenzij ze door een persoon die verantwoordelijk is voor hun veiligheid begeleid worden bij of geïnstrueerd zijn over het gebruik van het apparaat. Kinderen moeten gecontroleerd worden om te zorgen dat ze niet met het apparaat spelen. • Het verpakkingsmateriaal is geen speelgoed voor kinderen.
Instalación ! Es importante conservar este manual para poder consultarlo cuando sea necesario. En caso de venta, cesión o traslado, verifique que permanezca junto al aparato para informar al nuevo propietario sobre su funcionamiento y sobre las precauciones durante su uso ! Lea atentamente las instrucciones: contienen información importante sobre la instalación, sobre el uso y sobre la seguridad. Colocación y conexión Colocación 1. Coloque el aparato en un ambiente bien aireado y seco. 2.
E Sistema de enfriamiento No Frost El sistema No Frost administra un flujo continuo de aire frío que recoge la humedad e impide la formación de hielo y escarcha: en el compartimento frigorífico mantiene el justo nivel de humedad y, gracias a la ausencia de escarcha, preserva las cualidades originales de los alimentos; en el compartimento congelador evita la formación de hielo volviendo innecesarias las operaciones de descongelación y evitando que los alimentos se peguen entre sí.
Cubeta de hielo Ice3. Su colocación en la parte superior de los cajones del freezer garantiza una mayor limpieza (el hielo no está en contacto con los alimentos) y ergonomía (no gotea cuando se carga). 1. Extraiga la cubeta empujándola hacia arriba. Controle que la cubeta esté completamente vacía y llénela de agua utilizando el orificio correspondiente. 2. Tenga cuidado de no superar el nivel indicado (MAX WATER LEVEL).
E Eliminación • Eliminación del material de embalaje: respete las normas locales, de esta manera los embalajes podrán ser reutilizados.
Instalação ! É importante guardar este folheto para poder consultá-lo a qualquer momento. No caso de venda, cessão ou mudança, assegure-se que o mesmo permaneça junto com o aparelho para informar ao novo proprietário sobre o funcionamento e as suas respectivas advertências. ! Leia com atenção as instruções: há informações importantes sobre a instalação, a utilização e a segurança. Posicionamento e ligação Posicionamento 1. Posicione o aparelho num ambiente bem ventilado e não húmido. 2.
P Sistema de refrigeração No Frost O No Frost realiza a gestão de um fluxo contínuo de ar frio que colecta a humidade e impede a formação de gelo e brina: no compartimento frigorífero mantém um nível certo de humidade e, por causa da ausência de brina, preserva as qualidades originárias dos alimentos; no compartimento congelador evita a formação de gelo e dispensa as operações de degelo e evita que os elementos grudem uns nos outros.
2. Preste atenção para não ultrapassar o nível indicado (MAX WATER LEVEL). Água demais dificulta a extracção do gelo (se acontecer, aguarde o gelo derreter-se e esvazie o recipiente). 3. Rode o recipiente 90°: a água enche as formas pelo princípio dos vasos comunicantes (veja a figura). 4. Tape o furo com a tampa fornecida e guarde o recipiente, introduzindo a parte superior na respectiva sede e deixe-o suspenso. 5.
P Eliminação • Eliminação do material de embalagem: obedeça as regras locais, ou reutilize as embalagens. • A directiva Europeia 2002/96/CE referente à gestão de resíduos de aparelhos eléctricos e electrónicos (RAEE), prevê que os electrodomésticos não devem ser escoados no fluxo normal dos resíduos sólidos urbanos.
Instalacja Uruchomienie i uzytkowanie ! Należy zachować niniejszą książeczkę instrukcji dla przyszłych konsultacji. W razie sprzedaży, odsprzedania, czy przeniesienia urządzenia w inne miejsce należy upewnić się, by przekazane została ono razem z instrukcją, aby nowy właściciel zapoznać się mógł z działaniem urządzenia i z odnośnymi informacjami. ! Należy uważnie przeczytać instrukcję obsługi gdyż zawiera ona ważne informacje dotyczące instalacji oraz właściwego i bezpiecznego użytkowania urządzenia.
PL System chłodzenia No Frost Rozpoznaje się dzięki temu, że na tylnich ściankach umieszczone są komory napowietrzające. No Frost zarządza stałym przepływem zimnego powietrza, które zbiera wilgotność czym zapobiega tworzenie się lodu i oblodzenia.
Wanienka na lód Ice3. ! Lód nie styka się z artykułami spożywczymi ! Nie skrapla się podczas fazy zamrażania). 1. Wyjąć wanienkę popychając ją do góry, a następnie w kierunku na zewnątrz. Sprawdzić, czy wanienka została całkowicie opróżniona, a następnie napełnić ją poprzez odpowiedni otwór. 2. Uważać, aby nie przekroczyć wskazanego poziomu (MAX WATER LEVEL). Zbyt dużo wody blokuje wyjście kulek lodu (jeśli tak się dzieje, odczekać aż lód się rozpuści i opróżnić pojemnik). 3.
PL i zostały przez te osoby przeszkolone w kwestiach dotyczących obsługi urządzenia. Dzieci powinny znajdować się pod kontrolą, aby można było mieć pewność, że nie bawią się one urządzeniem. • Części opakowania nie nadają się do zabawy dla dzieci! Usuwanie odpadów • Pozbycie się materiałów opakowania: stosować się do lokalnych przepisów; w ten sposób opakowanie będzie mogło zostać ponownie wykorzystane.
Instalare ! Este important să păstraţi acest manual pentru a-l putea consulta în orice moment. În caz de vânzare, de cesiune sau de schimbare a locuinţei, acesta trebuie să fie înmânat împreună cu maşina de spălat, pentru a informa noul proprietar cu privire la funcţionare şi la respectivele avertismente. ! Citiţi cu atenţie instrucţiunile: veţi găsi informaţii importante cu privire la instalaţie, la folosire şi la siguranţă. Amplasare şi racordare Amplasare 1.
RO Sistemul No Frost generează un flux de aer rece care recoltează umiditatea împiedicând formarea de gheaţă sau brumă: în frigider menţine nivelul de umiditate corect şi, datorită absenţei de brumă, păstrează prospeţimea alimentelor, iar în congelator evită formarea de gheaţă, împiedicând deci lipirea alimentelor ceea ce anulează necesitatea efectuării operaţiilor de dezgheţare.
Întreţinere şi curăţire Siguranţa generală Întrerupeţi alimentarea electrică a aparatului. În timpul operaţiilor de curăţire şi întreţinere nu este necesar să izolaţi complet combina (să întrerupeţi curentul de la reţea). 1. Ţineţi apăsată tasta ON/OFF până când display-ul se stinge. 2. scoateţi ştecherul din priză. ! Dacă nu respectaţi această procedură, se poate declanşa alarma, dar aceasta nu reprezintă o anomalie.
195088380.02 05/2012 RO electrice şi electronice, la punctele de colectare municipale, societăţile autorizate de colectare/reciclare sau distribuitori (în cazul în care se achiziţionează echipamente noi de acelaşi tip) facilitează refolosirea, reciclarea sau alte forme de valorificare a acestora.