
Operation Manual


23
2
9
8
6
5
7
4
1
2
3
Operating the machin
e
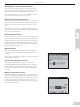
5. Fix button
%\XVLQJWKH),;EXWWRQ\RXFDQORFNWKHVWLWFKDWWKHEHJLQQLQJ
DQGRUDWWKHHQG7KH/('QH[WWRWKHEXWWRQLVOLWZKHQ),;LV
DFWLYDWHG3UHVVWKH),;EXWWRQWRWXUQRII WKHIXQFWLRQ
7KH),;IXQFWLRQLVDXWRPDWLFDOO\DFWLYDWHGZKHQDVWLWFKLV
VHOHFWHGRUZKHQ6723WKH7KUHDG&XWWHURU6WLWFK5HVWDUWKDV
been used. You can turn off the automatic FIX function in the
6(70HQXVHHSDJH
6. Sensor Foot Up/Extra Lift button
This button raises the presser foot to the up position. Press the
button once more and the presser foot will raise to the Extra
/LIWSRVLWLRQWRPDNHLWHDV\WRSODFHDQGUHPRYHKHDY\RUÁXII\
fabrics and battings under the presser foot.
7. Start/Stop button
Press this button to run and stop the machine without the foot
control. Press the button once to begin sewing and press again to
stop sewing.
8. Sensor Foot Down/Pivot Position button
3UHVV6HQVRU)RRW'RZQDQG3LYRWDQGWKHSUHVVHUIRRWZLOO
be completely ORZHUHGVRWKHPDFKLQHÀUPO\KROGVWKHIDEULF
3UHVV6HQVRU)RRW'RZQDJDLQWRUDLVHWKHSUHVVHUIRRWWR
3LYRWSRVLWLRQRUDÁRDWLQJSRVLWLRQRYHUWKHIDEULFIRUHDVLHU
placement of the fabric.
The presser foot will be lowered automatically when you start
sewing. You can also tap the foot control to lower the presser
foot.
When you stop with the needle in the down position, the presser
IRRWLVDXWRPDWLFDOO\OLIWHGWRSLYRWSRVLWLRQ7KLVIXQFWLRQFDQEH
WXUQHGRII LQWKH6(70HQXVHHSDJH
9. Reverse button
Press the button while sewing and the machine will sew in
UHYHUVHXQWLOWKHEXWWRQLVUHOHDVHG7KHQ\RXUVHZLQJPDFKLQH
ZLOOVHZIRUZDUG7KH/('RQWKHEXWWRQLVOLWZKHQUHYHUVHLV
DFWLYDWHG
)RUSHUPDQHQWUHYHUVHSUHVVWKHEXWWRQRQFHEHIRUHVWDUWLQJ
WRVHZ<RXUVHZLQJPDFKLQHVHZVLQUHYHUVHXQWLO\RXSUHVVWKH
button again.
5HYHUVHLVDOVRXVHGZKHQVHZLQJEXWWRQKROHVEDUWDFNVGDUQLQJ
and to begin and end tapering stitches to step between the parts
of the stitch.