
Operators Manual


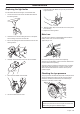

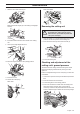

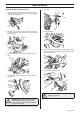

Table Of Contents
- Contents
- Pre-delivery service
- After the first 8 hours
- Dear Customer,
- Driving and transport on public roads
- Towing
- Use
- Good service
- Serial Number
- Symbols
- Safety instructions
- Driving on slopes
- Children
- Maintenance
- Transport
- Presentation
- Throttle control
- Choke control
- Speed limiter
- Parking brake
- Cutting unit
- Lifting lever for the cutting unit
- Cutting height adjustment lever
- Lights
- Counter
- Seat
- Fuelling
- Release lever
- Before starting
- Start the engine
- Starting the engine with a weak battery
- Driving the Rider
- Cutting tips
- Stop the engine
- Maintenance schedule
- Cleaning
- Removing of the machine hoods
- Checking and adjusting the steering wires
- Adjusting the parking brake Rider 15V2
- Adjusting the parking brake Rider 15V2 AWD
- Checking and adjusting of throttle wire
- Checking and adjusting the choke wire
- Replacement of fuel filter
- Replacing the air filter
- Checking the fuel pump’s air filter
- Controlling the acid level in a dry- charged battery
- Ignition system
- Check the safety system
- Replacing the light bulbs
- Main fuse
- Checking the tyre pressure
- Checking the engine’s cooling air intake
- Fitting the cutting head
- Removing the cutting unit
- Checking and adjustment of the cutting unit’s ground pressure
- Checking the cutting unit’s parallelism
- Adjusting the parallelism of the cutting unit
- Replacing the cutting unit belts
- Service position for the cutting unit
- Checking the blades
- Removing the BioClip plug
- Checking the engine’s oil level.
- Changing the oil filter
- Checking the transmission oil level
- Lubricating the belt adjuster
- General lubrication
- Winter storage
- Guard
- Service
- EC-declaration of conformity (Applies to Europe only)

English – 29
Maintenance
Placing in the service position
1 Position the machine on flat ground. Apply the parking
brake. Adjust the cutting unit to the lowest cutting height
and lower the cutting unit.
2 Remove the front hood by removing the pin. (There are
complete instructions on using the service position inside
the front hood).
3 Remove the two support wheels from under the front
hood.
4 Fit the support wheels on either side of the rear of the
cutting unit.
5 Disengage the spring for the drive belt tensioning wheel.
Rider 15V2
Rider 15V2 AWD
6 Place a foot on the front edge of the cutting unit near the
wheel and raise the front edge of the unit to make it easier
to remove the lift strut.
7 Engage the strut in the holder.
!
WARNING! Wear protective glasses when
dismantling the cutting unit. The spring
which tensions up the belt may break and
cause personal injury.
!
WARNING! Observe caution to avoid
trapping your hand.