USER MANUAL QFC90150X
We were thinking of you when we made this product
electrolux 3 NO SE REKOMMENDATIONER OCH TIPS 5 ANBEFALINGER OG FORSLAG 14 EGENSKAPER 6 EGENSKAPER 15 8 INSTALLATION INSTALLASJON 17 ANVÄNDING 11 BRUK 20 UNDERHÅLL 12 VEDLIKEHOLD 21
electrolux SE NO Välkommen till Electrolux värld, Velkommen til Electrolux verden Tack for att du har valt en förstklassig produkt från Electrolux, viken vi hoppas skall ge dig mycket nöje i framtiden. Electrolux ambition ar att erbjuda ett brett sortiment av produkter som kan göra livet enklare. Du hittar några exempel på omslaget till denna bruksanvisning. Avsatt några minuter till att läsa denna bruksanvisning sa att du kan utnyttja fordelarna med din nya produkt.
REKOMMENDATIONER OCH TIPS electrolux 5 REKOMMENDATIONER OCH TIPS INSTALLATION • Tillverkaren åtar sig inget ansvar för fel som beror på felaktig eller olämplig instal-lation. • Minsta tillåtna avstånd mellan spishäll och köksfläkt är 650 mm (vissa modeller kan installeras på en lägre höjd, se avsnitten mått och installation). • Kontrollera att matningsnätets spänning motsvarar den som anges på märkskyl-ten inuti köksfläkten. • För Klass I-apparater, kontrollera att matningsnätet ger effektiv jordning.
electrolux EGENSKAPER EGENSKAPER Mått 126 70 51 253 80 545 ø120 max. 1000 ø150 min. 730 81 63 41 Placering SE Minsta tillåtna avstånd från fläktens underkant till elektrisk spis eller häll är 500mm och till gasspis eller gashäll är 650mm. 572 598 / 898 300 Min. Min. 500mm 650mm 254 107.
EGENSKAPER electrolux Komponenter Ref.Antal Produktkomponenter 1 1 Köksfläktsstomme komplett med: Reglage, belysning, fläktenhet, filter 2 1 Teleskopisk skorsten bestående av: 2.1 1 Övre skorsten 2.2 1 Undre skorsten 9 1 Reduktionsfläns ø 150-120 mm 10a 1 Fläns ø 150 med backventil 10b 1 Snabbanslutning ø 120-125 mm 14.1 2 Anslutningsförlängning för luftutsläpp 15 1 Anslutning för luftutsläpp 15 14.1 10b 7.3 12a 7.2.1 9 10a 2.1 12c 2 Ref.Antal Installationskomponenter 7.2.
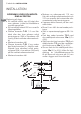
electrolux INSTALLATION INSTALLATION • Markera en referenspunkt 116 mm från det vertikala referensstrecket och 310 mm ovanför det horisontella referensstrecket enligt anvisningarna. • Upprepa detta moment på den motsatta sidan. • Borra 8 mm hål i de markerade punkterna. • Sätt in expansionspluggarna 11 i hålen. • Fäst den nedre konsolen 7.2.1 med de medföljande skruvarna 12a (4,2 x 44,4). • Sätt ihop den övre konsolen 7.2.1 och stödkonsolen 7.3 med de medföljande två skruvarna 12a (4,2 x 44,4).
INSTALLATION electrolux MONTERING AV KÖKSFLÄKTSSTOMME • Innan du hakar fast köksfläktsstommen, skruva fast de 2 skruvarna Vr som sitter i upphängningspunkterna på köksfläktsstommen. • Haka fast köksfläktsstommen i de förberedda 12a skruvarna. • Skruva fast 12a stödskruvarna. • Skruva på skruvarna Vr för att nivellera köksfläktsstommen.
electrolux INSTALLATION ELEKTRISK ANSLUTNING • Anslut fläktkåpan till eluttaget och installera en tvåpolig brytare med en öppning på minst 3 mm emellan kontakterna. SE • Avlägsna fettfiltren (se avsnitt “Underhåll”) och se till att nätsladdens kontaktdon är rätt isatt i fläktens uttag MONTERING AV SKORSTEN Skorsten, övre sektion • För försiktigt två motstående sidor av den övre skorstensdelen utåt och haka dem på fästena 7.2.1. Se till att de sitter ordentligt.
ANVÄNDING electrolux 11 ANVÄNDING SE Kontrollpanel KNAPP LYSDIOD FUNKTIONER T1 Motor Stänger av motorn. T2 Hastighet Påslagen Aktiverar motorn på den första hastigheten. T3 Hastighet Påslagen Aktiverar motorn på den andra hastigheten. T4 Hastighet Fast Ett kort tryck aktiverar motorn på den tredje hastigheten. Blinkande Tryck i 2 sekunder. Aktiverar den tidsinställda fjärde hastigheten i 10 minuter, efter att den har slutförts återgår den till den tidigare inställda hastigheten.
electrolux UNDERHÅLL UNDERHÅLL RENGÖRNING AV FETTFILTER • rengöring av fettfilter av metall. SE • filtren är diskbara och måste rengöras minst varannan månad. Rengör oftare vid intensiv användning. • ta bort filtren, ett i taget, låt dem torka före återmonte-ring. • vid återmontering av filtren, var noga med att handta-gen vänds utåt.
ANBEFALINGER OG FORSLAG electrolux 13 ANBEFALINGER OG FORSLAG INSTALLASJON • Produsenten skal ikke kunne holdes ansvarlig for eventuelle skader som oppstår som følge av feil eller ufullstendig montering. • Minimum sikkerhetsavstand mellom komfyrtoppen og viftehetten er 650 med mer (noen modeller kan installeres lavere, se avsnittene Mål og Installasjon). • Kontroller at nettspenningen er i overensstemmelse med spenningen som er angitt på merkeplaten på innsiden av hetten.
electrolux EGENSKAPER EGENSKAPER Dimensjoner Placering NO Avstanden mellom en koketopp og 126 70 51 253 80 545 ø120 min. 730 ø150 max. 1000 81 63 41 undersiden av fettfilteret skal være minimum 500mm. Til en topp med gassbrennere skal minimumsavstanden være 650mm. 572 598 / 898 300 Min. Min. 500mm 650mm 254 107.
EGENSKAPER electrolux 15 Deler Ref.Antall Produktets deler 1 1 Kjøkkenviftens hoveddel komplett med: Kontroller, lys, vifteenhet, filtre 2 1 Uttrekkbart røkrør; består av: 2.1 1 Øverste røkrør 2.2 1 Nederste røkrør 9 1 Reduksjonsflens med en diameter på 150-120 mm 10 a 1 Flens med ventil 10 b 1 Forsterkningsring med en diameter på 120-125 mm 14.1 2 Forlengelsesledning for luftutløpskopling 15 1 Luftutløpskopling Ref.Antall Installasjonsdeler 7.2.1 2 Festekonsoller til øverste røkrør 7.
electrolux INSTALLASJON INSTALLASJON BORING AV HULL I VEGGEN OG FESTING AV KONSOLLENE • Gjenta dette arbeidet på motsatt side. • Bor hull med en diameter på 8 mm i de avmerkede punktene. • Sett ekspansjonspluggene 11 inn i hullene. • Fest den nederste konsollen 7.2.1 med skruene 12a (4,2 x 44,4) som følger med. • Fest den øverste konsollen 7.2.1 sammen med festekonsollen til koplingen 7.3 med de to skruene 12a (4,2 x 44,4) som følger med.
INSTALLASJON electrolux MONTERING AV KJØKKENVIFTENS HOVEDDEL • Før du hekter på kjøkkenviftens hoveddel, må du stramme de to skruene Vr som er plassert på hektepunktene til kjøkkenviftens hoveddel. • Hekt kjøkkenviftens hoveddel på skruene 12a. • Stram til skruene 12a. • Skru på skruene Vr for å nivellere kjøkkenviftens hoveddel.
electrolux INSTALLASJON ELEKTRISK TILKOPLING • Kople kjøkkenviften til strømnettet med en topolet bryter med en kontaktåpning på minst 3 mm. • Fjern fettfiltrene (se avsnittet VedlikeNO hold) og kontroller at koplingsstykket til nettkabelen er korrekt innført i stikkontakten til sugesystemet. MONTERING AV RØKRØRET Øverste røkrør • Utvid litt de to kantene på sidene og hekt dem på bak konsollene 7.2.1. Lukk kantene deretter helt igjen.
BRUK electrolux 19 BRUK NO T1 T2 T3 T4 L Kontrollpanel KNAPP T1 Motor LED FUNKSJONER Slår av motoren. T2 Hastighet Tent Slår motoren på ved den første hastigheten. T3 Hastighet Tent Slår motoren på ved den andre hastigheten. T4 Hastighet Tent konstant Trykk kort på knappen for å slå motoren på ved den tredje hastigheten. Blinker Trykk i 2 sekunder. Aktiverer den fjerde hastigheten i 10 minutter. Når tiden er utløpt går motoren automatisk tilbake til den tidligere innstilte hastigheten.
VEDLIKEHOLD electrolux 20 VEDLIKEHOLD VASKING AV DE SELVBÆRENDE FETTFILTRENE AV METALL • Filtrene kan vaskes også i oppvaskmaskinen. De må vaskes ca. hver andre måned og eventuelt oftere avhengig av bruksforholdene. • Fjern filtrene ett av gangen ved å trykke dem mot baksiden og samtidig skyve dem nedover. • Vask filtrene. Pass på at du ikke bøyer dem. La dem tørke før du monterer dem igjen. • Når du monterer filtrene igjen må du passe på at håndtaket er rettet mot utsiden.
www.electrolux.